Hello everyone.
There has been plenty of these on forums (id imagine) but I never really understood half the things people did when doing their conversion (modifying a single din console to fit a double din headunit).
Now this can be a difficult and time consuming mod, so if anyone wants this built for them then I charge £20 to build + parts. Id mark it at roughly £70 - £90 for build which includes part delivery charges and labour. This may well be cheaper as I already have new rods, nuts and washers which will save you £10 instantly!
If you live anywhere near Frome in Somerset then Im happy to build for you, and hunt for parts. Deal arranged if needed.
Anyhow, heres some pictures and brief info about how I did it all.
What you need
- Double din headunit
- Double din cage from Autoleads (part no: DFPK-113. The standard cage can work but I think this ones better as you can adjust the depth of the unit)
- Single din center console
- Double din facia from SEAT (part no: S1M0863263F40N. This was the number for my car, it may be different in yours as they come in 3 colours)
- 2x250mm length bolts (M6 is best)
- 12xM6 nuts
- 12 washers
- 2 right angle brackets
- screws
- glue gun
- saw of some sorts (junior hack saw maybe)
How I did it
Step 1)
Take the console out of the car. The easiest way I did this was removing the under tray of the steering column. Remove the end cap where the fuse box is and remove the screws to remove the fuse box, do not remove the fuse box completely though. Then there is some screw in the foot well on the panel itself, remove them accordingly so the panel can come off. The top parts of the panel are held in place by some very strong clips, pull hard to remove.
Then in the passenger foot well under the storage tray on the right there is another screw, remove this.
You will then need to pop the facia off of the front, this can be stiff where it is forced on at the factory but dont worry, if you snap it you're not going to need it anyways") but yes, remove this, it is strong so dont worry about breaking it.
but yes, remove this, it is strong so dont worry about breaking it.
Behind the facia is multiple screws. Remove the ashtray first, then the heater controls (make sure your ignition isnt on, otherwise you will get alot of computer errors!), then finally - remove all the other screws. Once these are done, the console can be removed and you can then remove the console. Twist it from side to side, it should be easy as you've removed the drivers side foot well. If you cant do it, or dont want to break anything then simply remove the glove box.
Now the console is out, lets get to work...
Step 2)
<-- PICTURE -->
Now then. All you have to do with this is get your facia that you purchased from SEAT and place it on the console as it should, then get your saw and start hacking away at it!!
Step 3)
As you can see in the previous picture, I added the heating unit where it should go on the new facia, here is some images on how I fixed it (you get the idea)
<-- PICTURE -->
<-- PICTURE -->
<-- PICTURE -->
I then found out the glue I had wasnt very good, so I went and got some new glue for the gun (if you have a 12mm thickness glue gun then thats best, the small ones are pants). Once I got my new glue I re-glued it all and came to this:
[IMGhttps://dl.dropboxusercontent.com/u/17466229/seat%20leon%20double%20din%20conversion/Photo%2018-01-2012%2009%2017%2040%20PM%20(HDR).jpg[/IMG]
Step 4)
Now its time to fix the cage into the unit, YES this is awkward, try your best and go from there.
Okay, first of all you will need to add the rods into the lips at the top and bottom of the cage (if you purchased the cage i said then you'll notice what i mean). Once you've added the rods then its worth while showing in your head roughly where to put the washers and nuts.
This is the pattern:
washer nut nut washer washer nut, simples.
Measure up roughly where to sit the cage (make the top and bottom gab between the facia and cage as close to the same as possible, then mark up). Now the beauty of having this cage is the fact the lock in parts are on the headunit, which you can adjust depth wise, so you can sink your headunit in to the mm. so the overal depth of how far the cage will sit in doesnt matter too much, obviously dont sink it back 10ft, just about 5/10mm.
Once you've marked up, its time to drill the holes! Use the same size drill bit as the rods for the best support.
Now for the awkward part. You need to remove the cage and just have the rods at hand. Again, as if you was reading a book - washer first, then nut, nut again then another washer. You might think "why the first washer and nut?" well thats so you can centralize the unit, bargain! Then you need to feed one end of the rod into the hole, then put the washers and nuts on the other end in the same order, but as if you was reading a book backwards. Then feed the rod in. Get a washer and put that on the other side of the wall and nut it, and so on. Do that twice for the top and bottom.
Now I understand people must be thinking (wtf, I dont get this right no good jabber chatting hobo who cant string a sentence together correctly.. god I wish I had a diagram).... WELL I THOUGHT OF YOU PEOPLE!!!!
<-- PICTURE -->
Step 4)
Now you should end up with pretty much a finished product! Fit your headunit for testing and then refit back into your car! Some of the screw holes have vanished due to you hacking away, but there is many solutions to this, which I am yet to carry out but I will post pictures once Ive done them
You may also notice a slight gap around my unit, it may be different to yours, but the easy option is to get a bit of plastic, cut it to size, wrap it/spray it and then glue it in place.. or thats what I plan to do!
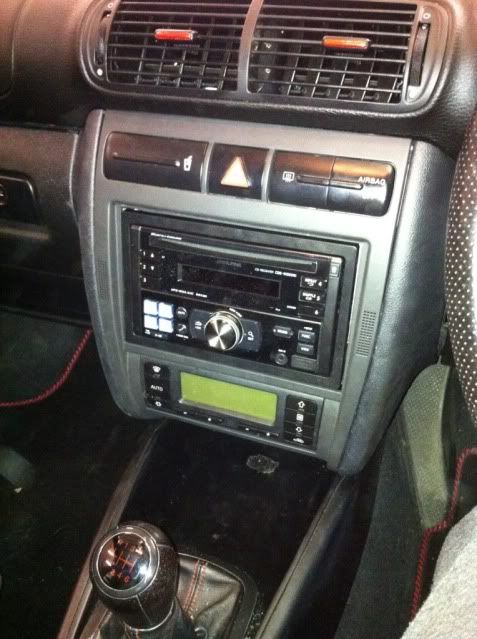
Here is my finished product:
<-- PICTURE -->
<-- PICTURE -->
<-- PICTURE -->
<-- PICTURE -->
Thank you very much for reading my tut, would be nice to hear some feedback as this is the first time I've ever done anything like this
Oh ye, I couldnt do anything without this <3
<-- PICTURE -->
.
.
.
.
.
Edit:
I've been made aware that the pictures disappeared. I'm not sure what order they go in but here's all the pictures I found in my archive relating to this mod:


There has been plenty of these on forums (id imagine) but I never really understood half the things people did when doing their conversion (modifying a single din console to fit a double din headunit).
Now this can be a difficult and time consuming mod, so if anyone wants this built for them then I charge £20 to build + parts. Id mark it at roughly £70 - £90 for build which includes part delivery charges and labour. This may well be cheaper as I already have new rods, nuts and washers which will save you £10 instantly!
If you live anywhere near Frome in Somerset then Im happy to build for you, and hunt for parts. Deal arranged if needed.
Anyhow, heres some pictures and brief info about how I did it all.
What you need
- Double din headunit
- Double din cage from Autoleads (part no: DFPK-113. The standard cage can work but I think this ones better as you can adjust the depth of the unit)
- Single din center console
- Double din facia from SEAT (part no: S1M0863263F40N. This was the number for my car, it may be different in yours as they come in 3 colours)
- 2x250mm length bolts (M6 is best)
- 12xM6 nuts
- 12 washers
- 2 right angle brackets
- screws
- glue gun
- saw of some sorts (junior hack saw maybe)
How I did it
Step 1)
Take the console out of the car. The easiest way I did this was removing the under tray of the steering column. Remove the end cap where the fuse box is and remove the screws to remove the fuse box, do not remove the fuse box completely though. Then there is some screw in the foot well on the panel itself, remove them accordingly so the panel can come off. The top parts of the panel are held in place by some very strong clips, pull hard to remove.
Then in the passenger foot well under the storage tray on the right there is another screw, remove this.
You will then need to pop the facia off of the front, this can be stiff where it is forced on at the factory but dont worry, if you snap it you're not going to need it anyways
but yes, remove this, it is strong so dont worry about breaking it.Behind the facia is multiple screws. Remove the ashtray first, then the heater controls (make sure your ignition isnt on, otherwise you will get alot of computer errors!), then finally - remove all the other screws. Once these are done, the console can be removed and you can then remove the console. Twist it from side to side, it should be easy as you've removed the drivers side foot well. If you cant do it, or dont want to break anything then simply remove the glove box.
Now the console is out, lets get to work...
Step 2)
<-- PICTURE -->
Now then. All you have to do with this is get your facia that you purchased from SEAT and place it on the console as it should, then get your saw and start hacking away at it!!
Step 3)
As you can see in the previous picture, I added the heating unit where it should go on the new facia, here is some images on how I fixed it (you get the idea)
<-- PICTURE -->
<-- PICTURE -->
<-- PICTURE -->
I then found out the glue I had wasnt very good, so I went and got some new glue for the gun (if you have a 12mm thickness glue gun then thats best, the small ones are pants). Once I got my new glue I re-glued it all and came to this:
[IMGhttps://dl.dropboxusercontent.com/u/17466229/seat%20leon%20double%20din%20conversion/Photo%2018-01-2012%2009%2017%2040%20PM%20(HDR).jpg[/IMG]
Step 4)
Now its time to fix the cage into the unit, YES this is awkward, try your best and go from there.
Okay, first of all you will need to add the rods into the lips at the top and bottom of the cage (if you purchased the cage i said then you'll notice what i mean). Once you've added the rods then its worth while showing in your head roughly where to put the washers and nuts.
This is the pattern:
washer nut nut washer washer nut, simples.
Measure up roughly where to sit the cage (make the top and bottom gab between the facia and cage as close to the same as possible, then mark up). Now the beauty of having this cage is the fact the lock in parts are on the headunit, which you can adjust depth wise, so you can sink your headunit in to the mm. so the overal depth of how far the cage will sit in doesnt matter too much, obviously dont sink it back 10ft, just about 5/10mm.
Once you've marked up, its time to drill the holes! Use the same size drill bit as the rods for the best support.
Now for the awkward part. You need to remove the cage and just have the rods at hand. Again, as if you was reading a book - washer first, then nut, nut again then another washer. You might think "why the first washer and nut?" well thats so you can centralize the unit, bargain! Then you need to feed one end of the rod into the hole, then put the washers and nuts on the other end in the same order, but as if you was reading a book backwards. Then feed the rod in. Get a washer and put that on the other side of the wall and nut it, and so on. Do that twice for the top and bottom.
Now I understand people must be thinking (wtf, I dont get this right no good jabber chatting hobo who cant string a sentence together correctly.. god I wish I had a diagram).... WELL I THOUGHT OF YOU PEOPLE!!!!
<-- PICTURE -->
Step 4)
Now you should end up with pretty much a finished product! Fit your headunit for testing and then refit back into your car! Some of the screw holes have vanished due to you hacking away, but there is many solutions to this, which I am yet to carry out but I will post pictures once Ive done them
You may also notice a slight gap around my unit, it may be different to yours, but the easy option is to get a bit of plastic, cut it to size, wrap it/spray it and then glue it in place.. or thats what I plan to do!
Here is my finished product:
<-- PICTURE -->
<-- PICTURE -->
<-- PICTURE -->
<-- PICTURE -->
Thank you very much for reading my tut, would be nice to hear some feedback as this is the first time I've ever done anything like this
Oh ye, I couldnt do anything without this <3
<-- PICTURE -->
.
.
.
.
.
Edit:
I've been made aware that the pictures disappeared. I'm not sure what order they go in but here's all the pictures I found in my archive relating to this mod:
Last edited: