First the aux cable mod - If you only have rear aux socket on your new radio, and you still want to use the aux input in the centre consul just behind the cup holders, this can be achieved by making an adapter cable. After removal of original stereo, take a look at the big block quadlock connector, and the blue section of it in particular - see top left of this pic:
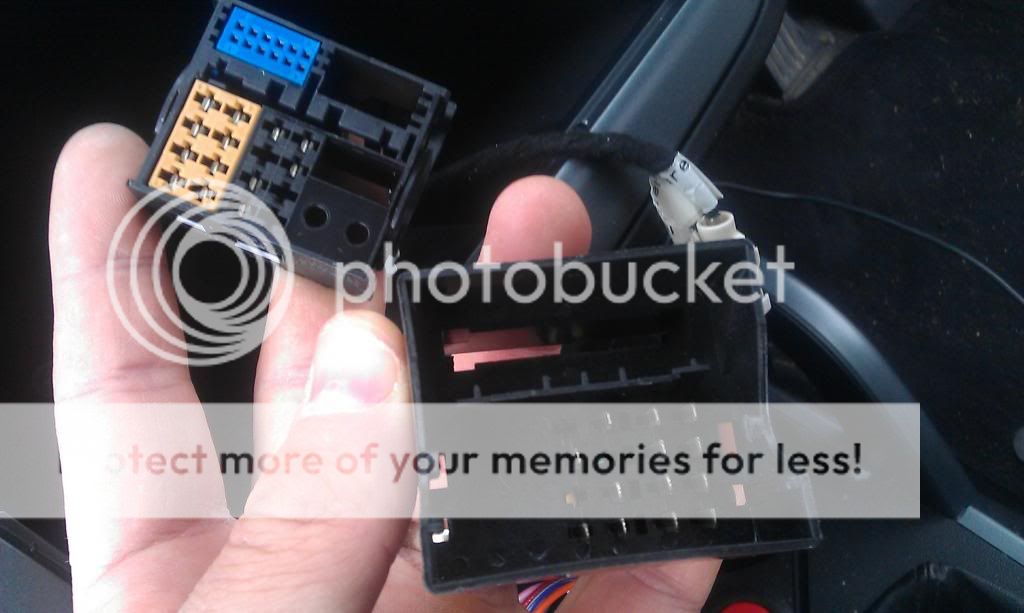
The blue plug can be removed from the main connector by pressing the tab on the back. Once this has been done, you need to remove the blue part, leaving a simple 12 pin socket:

On the back of this connector are 3 wires, one is the earth (Black wire on the bottom row of 6 pins) and the other two are the L + R audio signals (white and purple wires next to eachother on the top row of 6 pins) - if you look on the sticker on the top of your old original radio, you can see these pin connections marked in the diagram.
Next up, you need to get hold of a 12 pin quadlock header: http://uk.rs-online.com/web/p/pcb-headers/7183739/
Then, take a standard stereo 3.5mm jack aux lead, and chop one end off, expose and strip the ends of the earth, and L+R ends, and solder onto the connector paying careful attention that the connections match up to the wiring config on the 12 pin connector in the car - I had to re-solder mine twice because I got it wrong! And you should end up with something looking like this:


Then, before using insulating/electrical tape to cover your handywork, test it with your new radio config to check it works ok. Plug the new connector into the now separated black 12 pin connector in the car:

Wire up your new radio, plug the 3.5mm jack end of your new cable into the rear aux socket on new radio, then plug in your phone/ipod etc. into the centre consul socket as usual, select the aux input mode on your new radio and crank it up!
The blue plug can be removed from the main connector by pressing the tab on the back. Once this has been done, you need to remove the blue part, leaving a simple 12 pin socket:
On the back of this connector are 3 wires, one is the earth (Black wire on the bottom row of 6 pins) and the other two are the L + R audio signals (white and purple wires next to eachother on the top row of 6 pins) - if you look on the sticker on the top of your old original radio, you can see these pin connections marked in the diagram.
Next up, you need to get hold of a 12 pin quadlock header: http://uk.rs-online.com/web/p/pcb-headers/7183739/
Then, take a standard stereo 3.5mm jack aux lead, and chop one end off, expose and strip the ends of the earth, and L+R ends, and solder onto the connector paying careful attention that the connections match up to the wiring config on the 12 pin connector in the car - I had to re-solder mine twice because I got it wrong! And you should end up with something looking like this:
Then, before using insulating/electrical tape to cover your handywork, test it with your new radio config to check it works ok. Plug the new connector into the now separated black 12 pin connector in the car:
Wire up your new radio, plug the 3.5mm jack end of your new cable into the rear aux socket on new radio, then plug in your phone/ipod etc. into the centre consul socket as usual, select the aux input mode on your new radio and crank it up!