
Audi S3 GT3582R stroker Build (previously GT3071r)
- Thread starter tufftybloke
- Start date
You are using an out of date browser. It may not display this or other websites correctly.
You should upgrade or use an alternative browser.
You should upgrade or use an alternative browser.
Bit of an update... have been busy over the past week accumulating stuff...
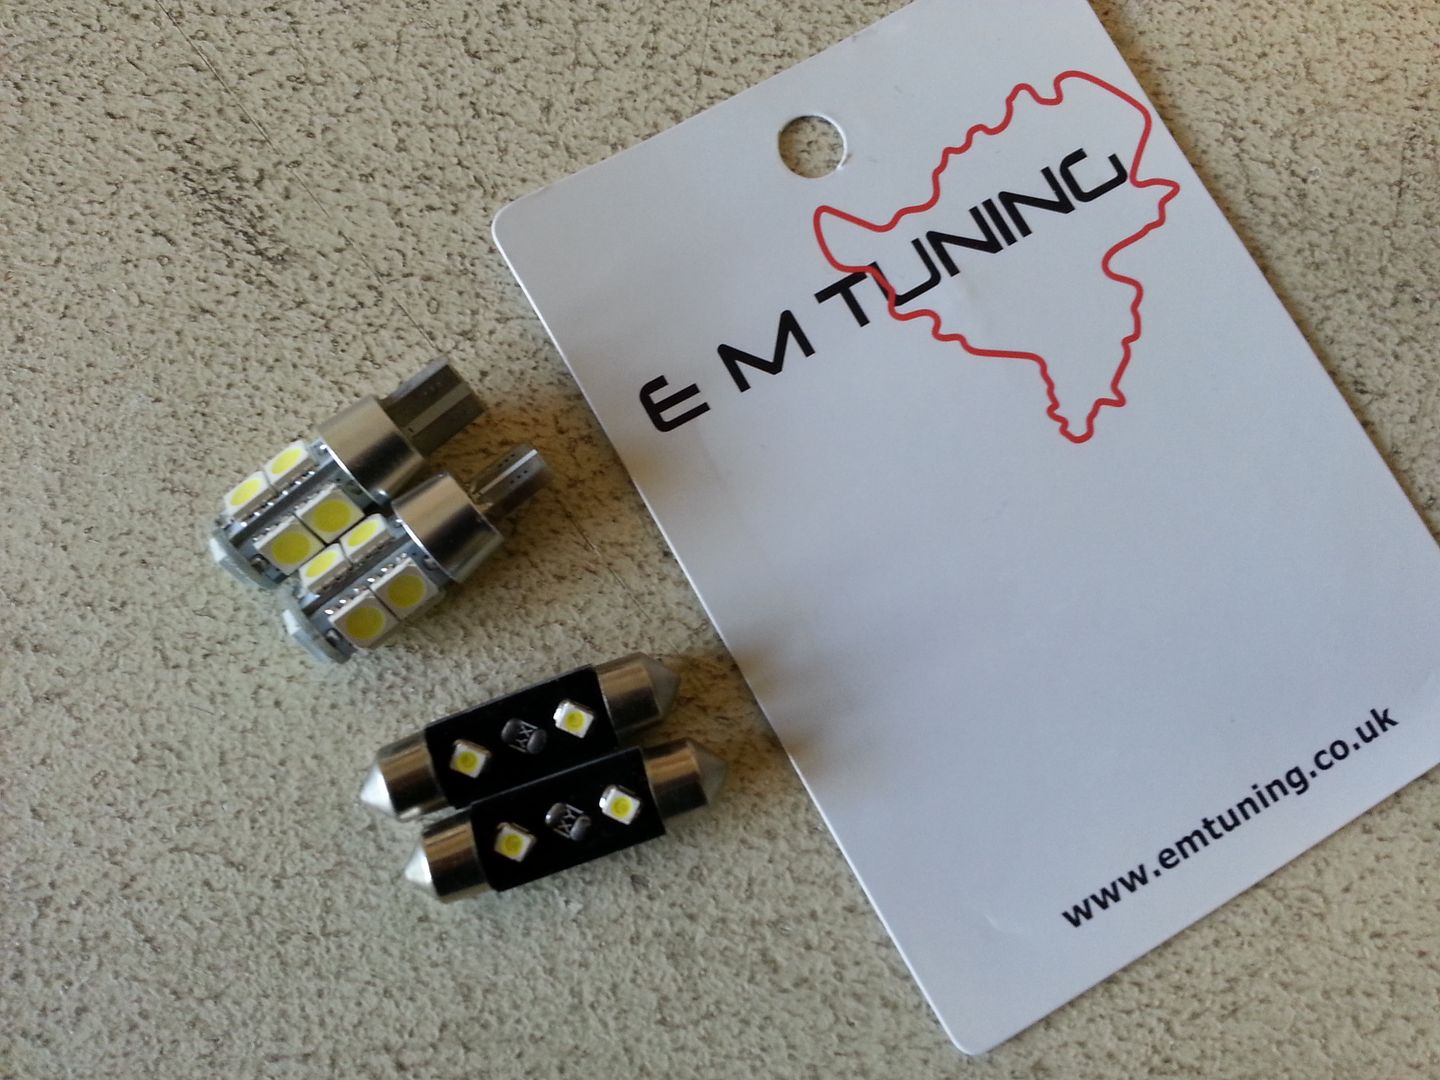
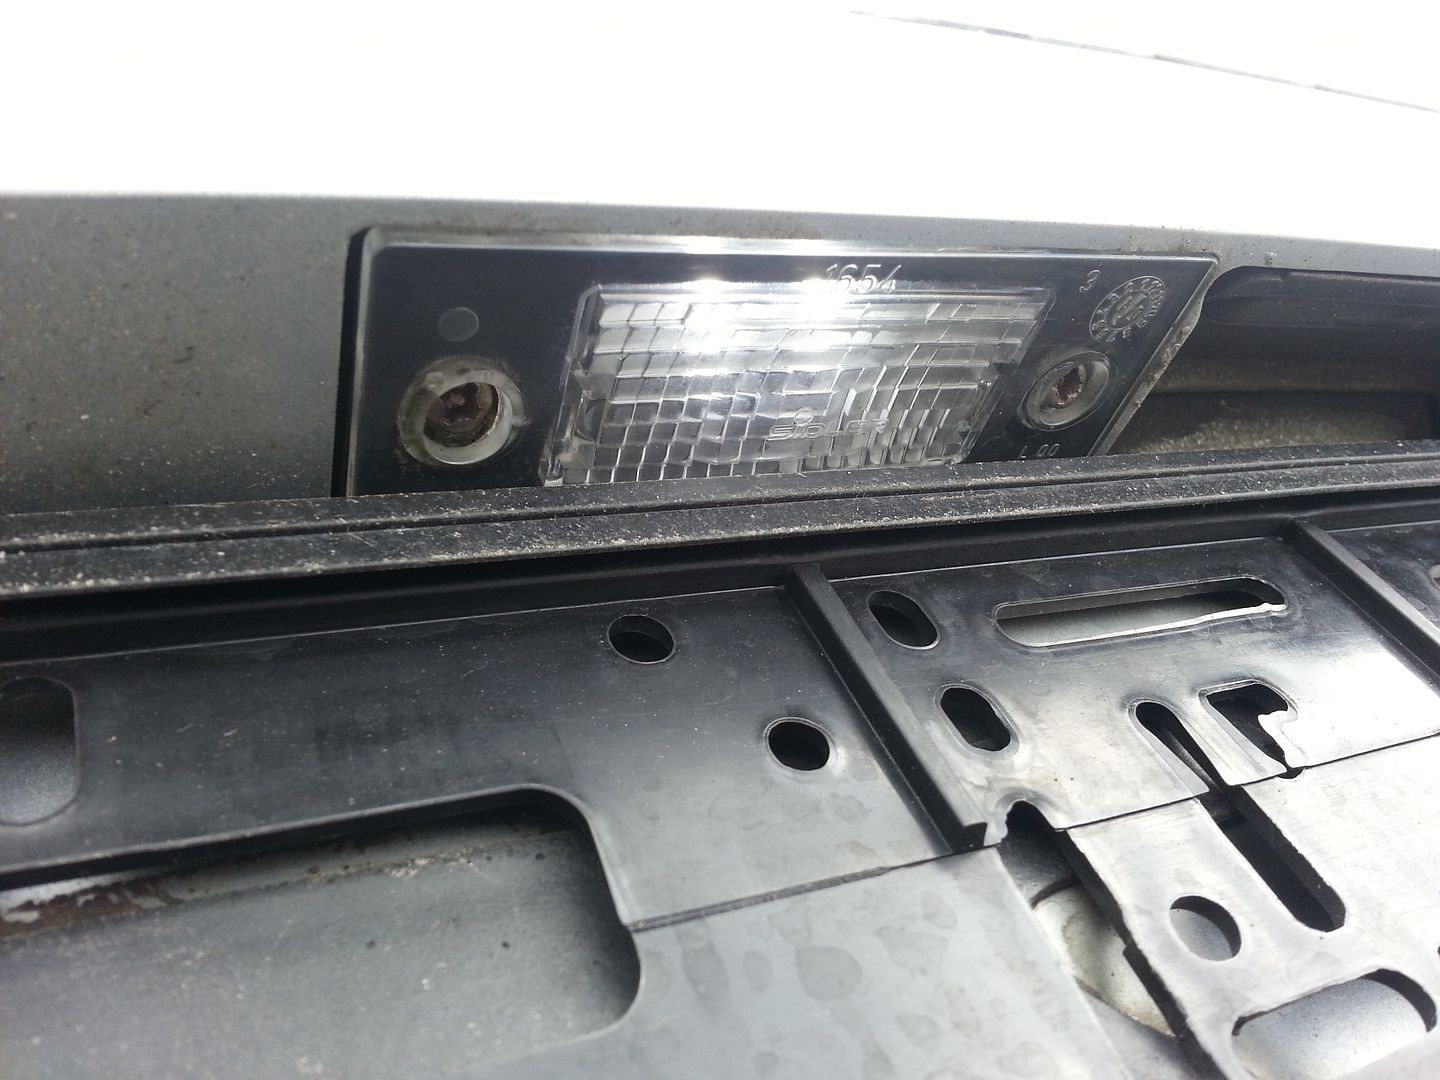
First up some number plate and sidelight LED's from EM Tuning... not fitted the sidelights yet as I have plans for the headlights later..
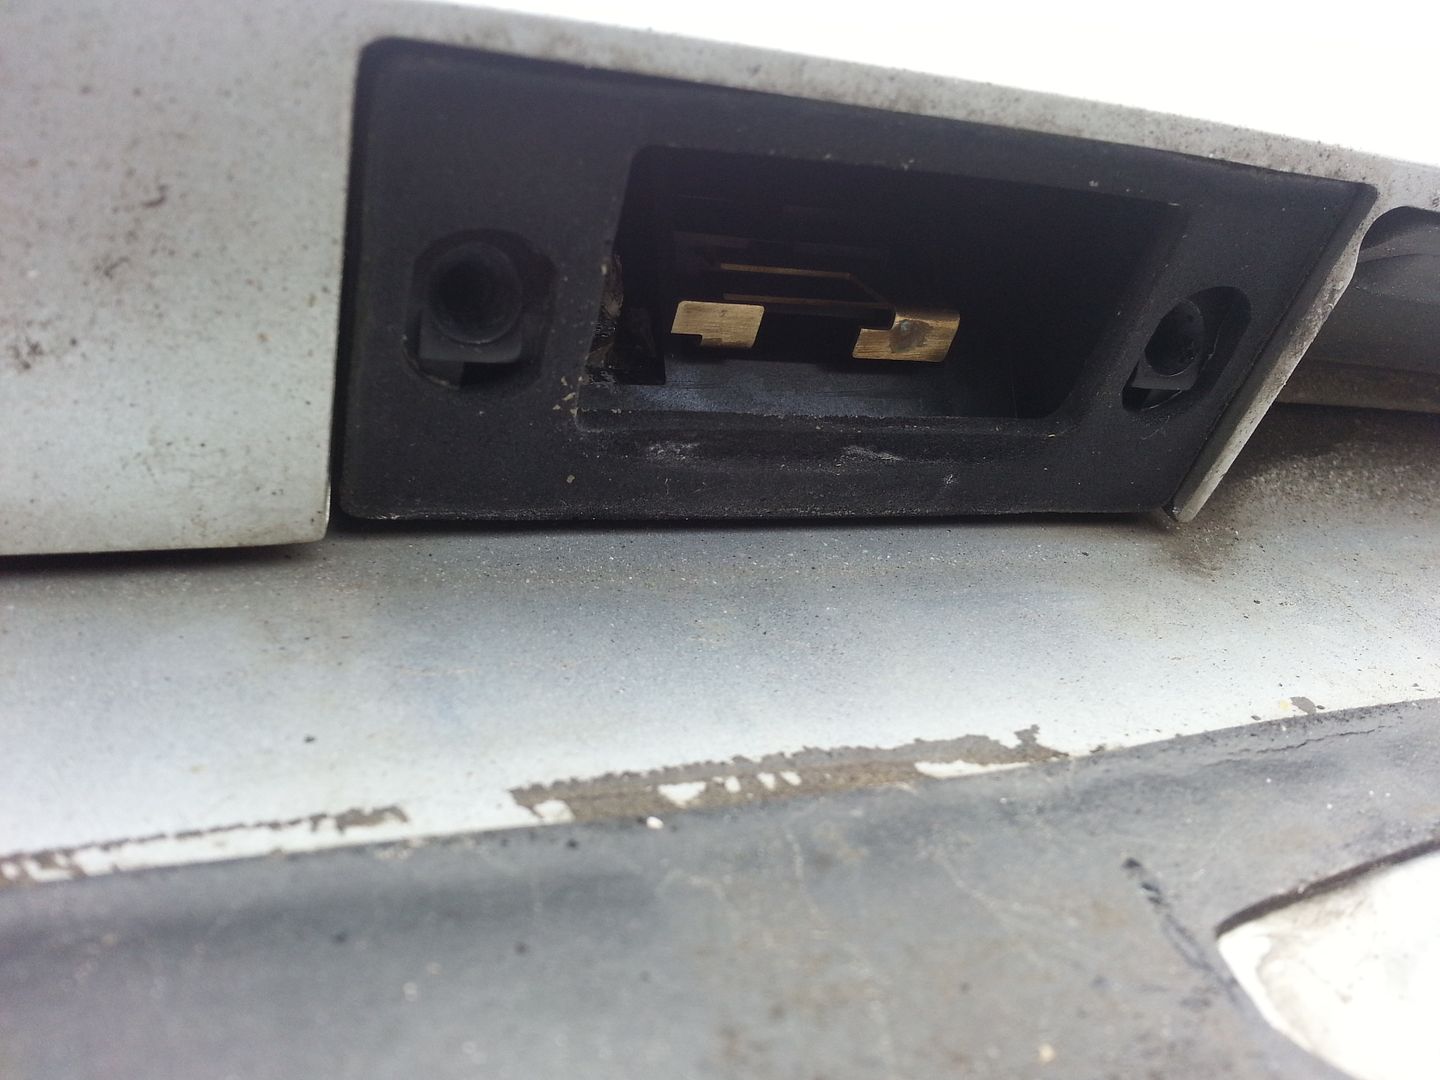
Needed to remove the plate and the surround to allow the light fitting to be removed..
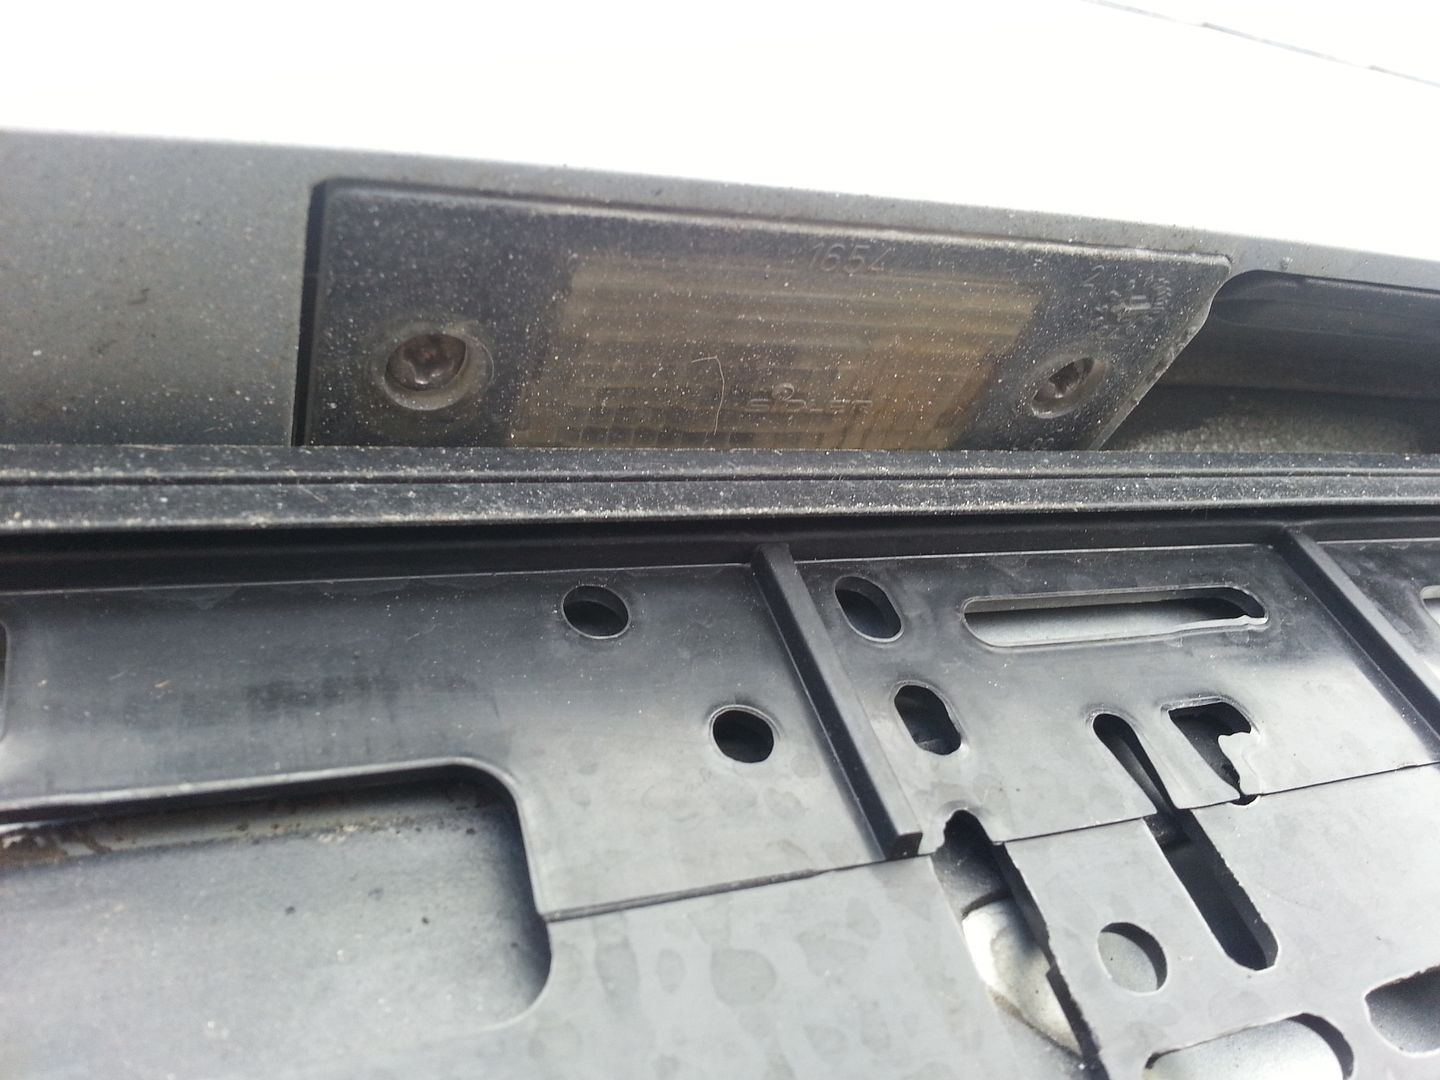
...needed to clean up the contacts with wet and dry as they were looking a little corroded...
Swapped out the bulbs... Trups supplies ones that don't light up the road behind you")
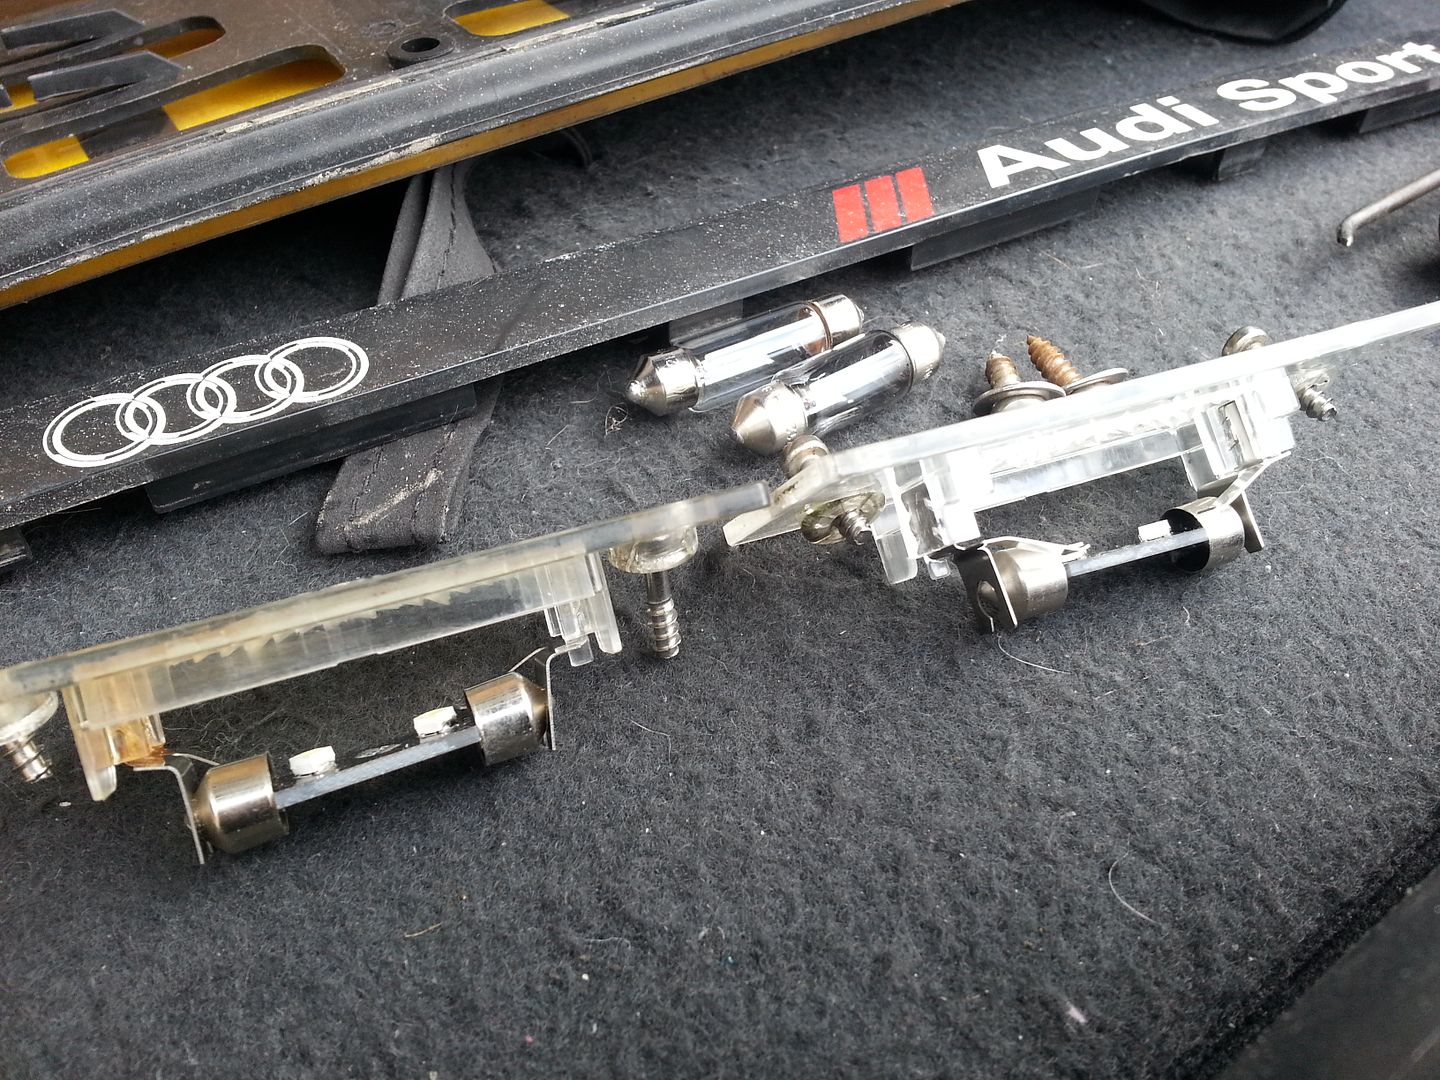
...nice white light...
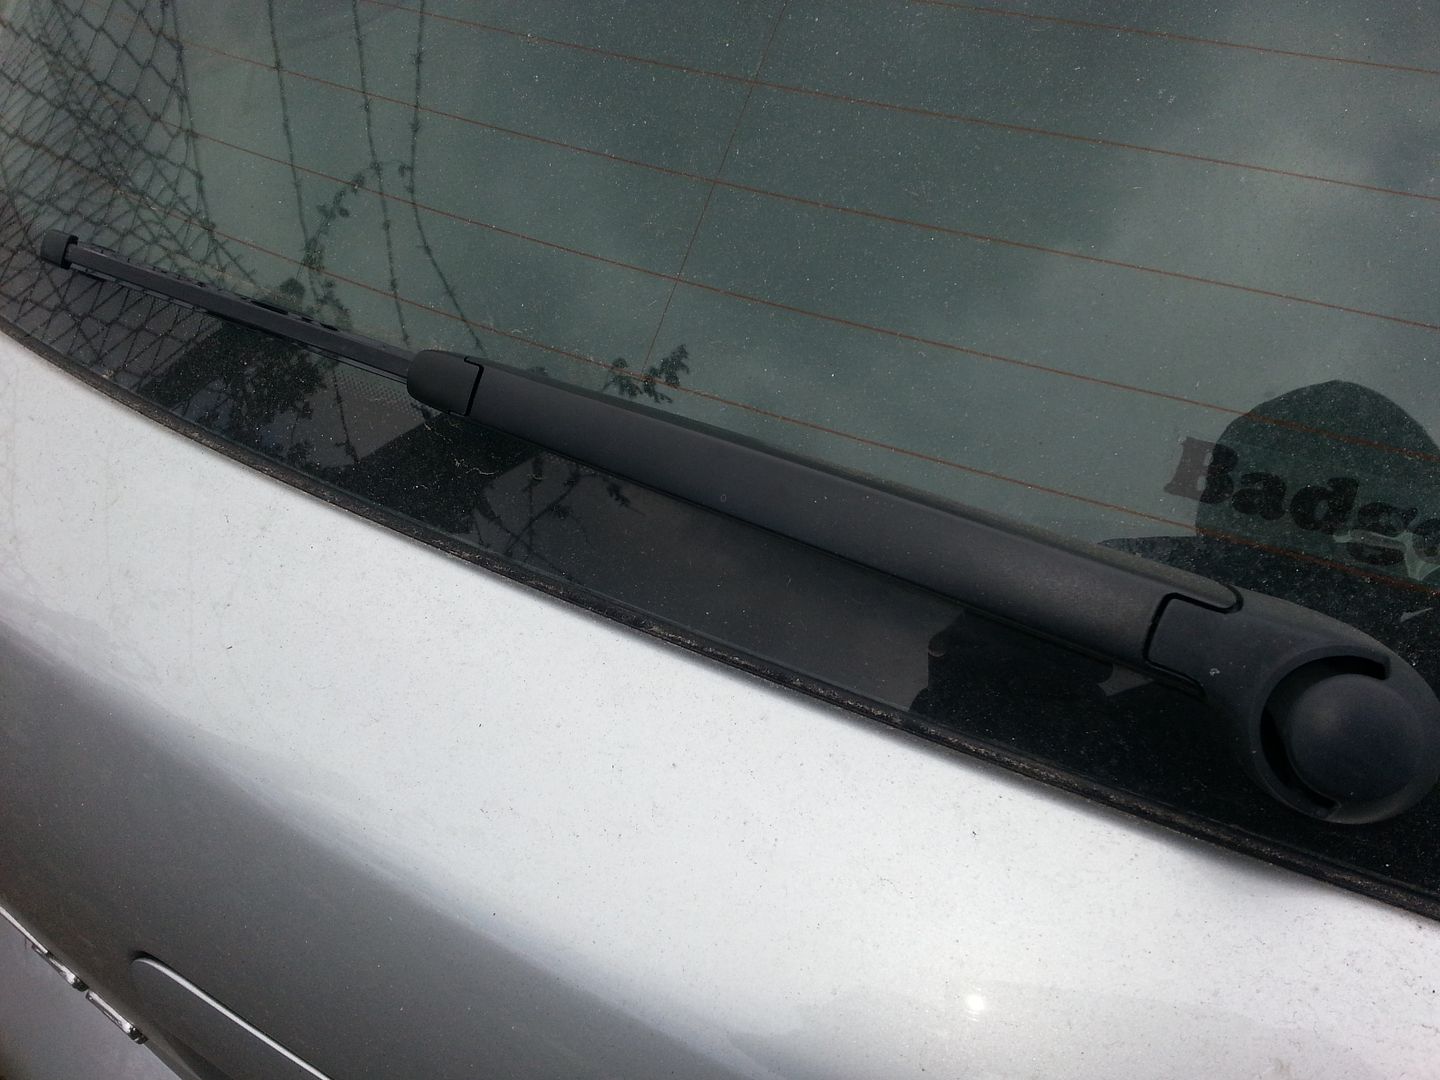
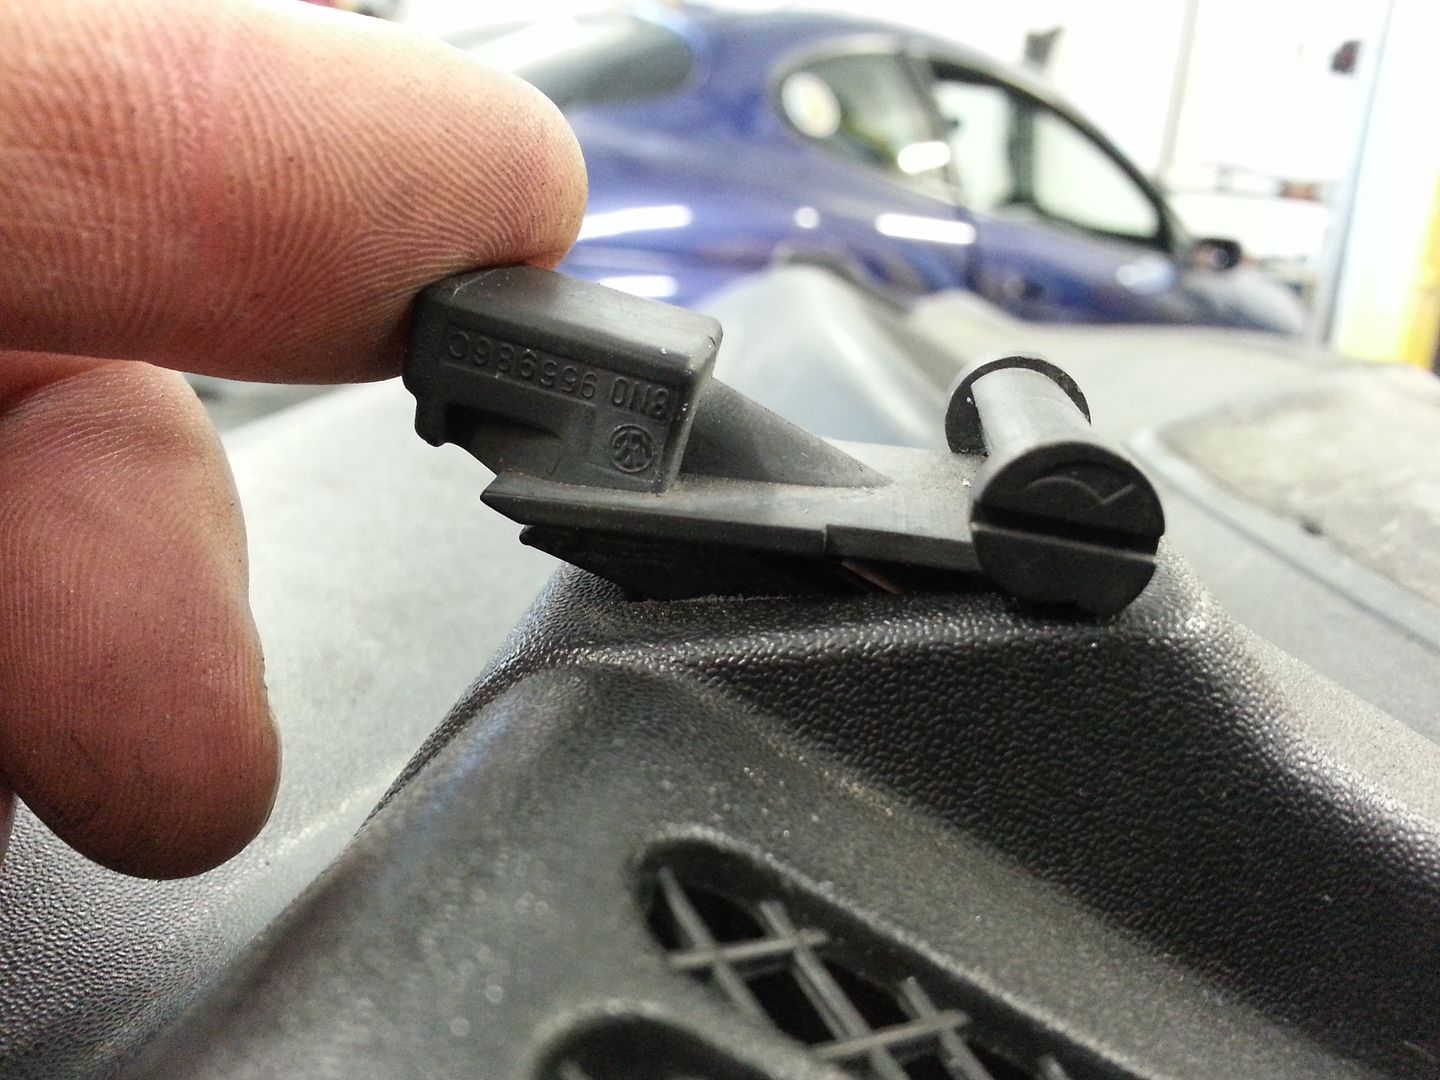
On to the next job, fitting some aero wipers I got well cheap on ebay.... these are the proper aero type, I have been running the std arms with aero 'upgrades' but these came along at a real good price and I needed new wipers...
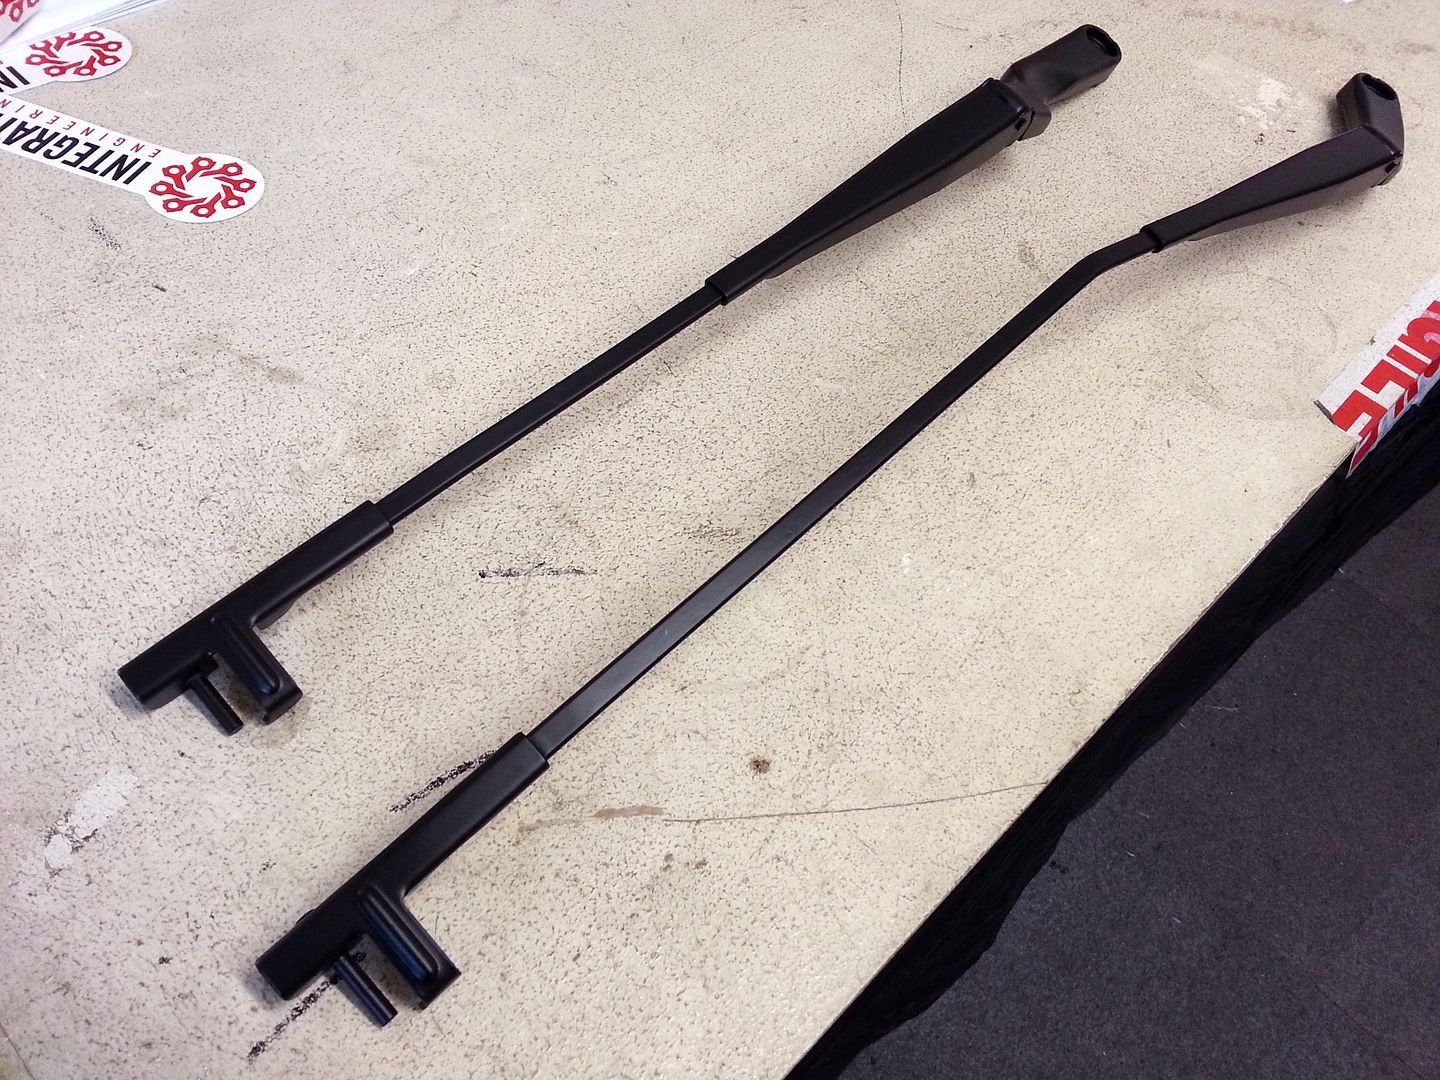

...and bought a new blade for the Polo rear I already had...
I have also bagged a pair of the TT fan jets for a bargain £8 (eBay again) which I will fit later...
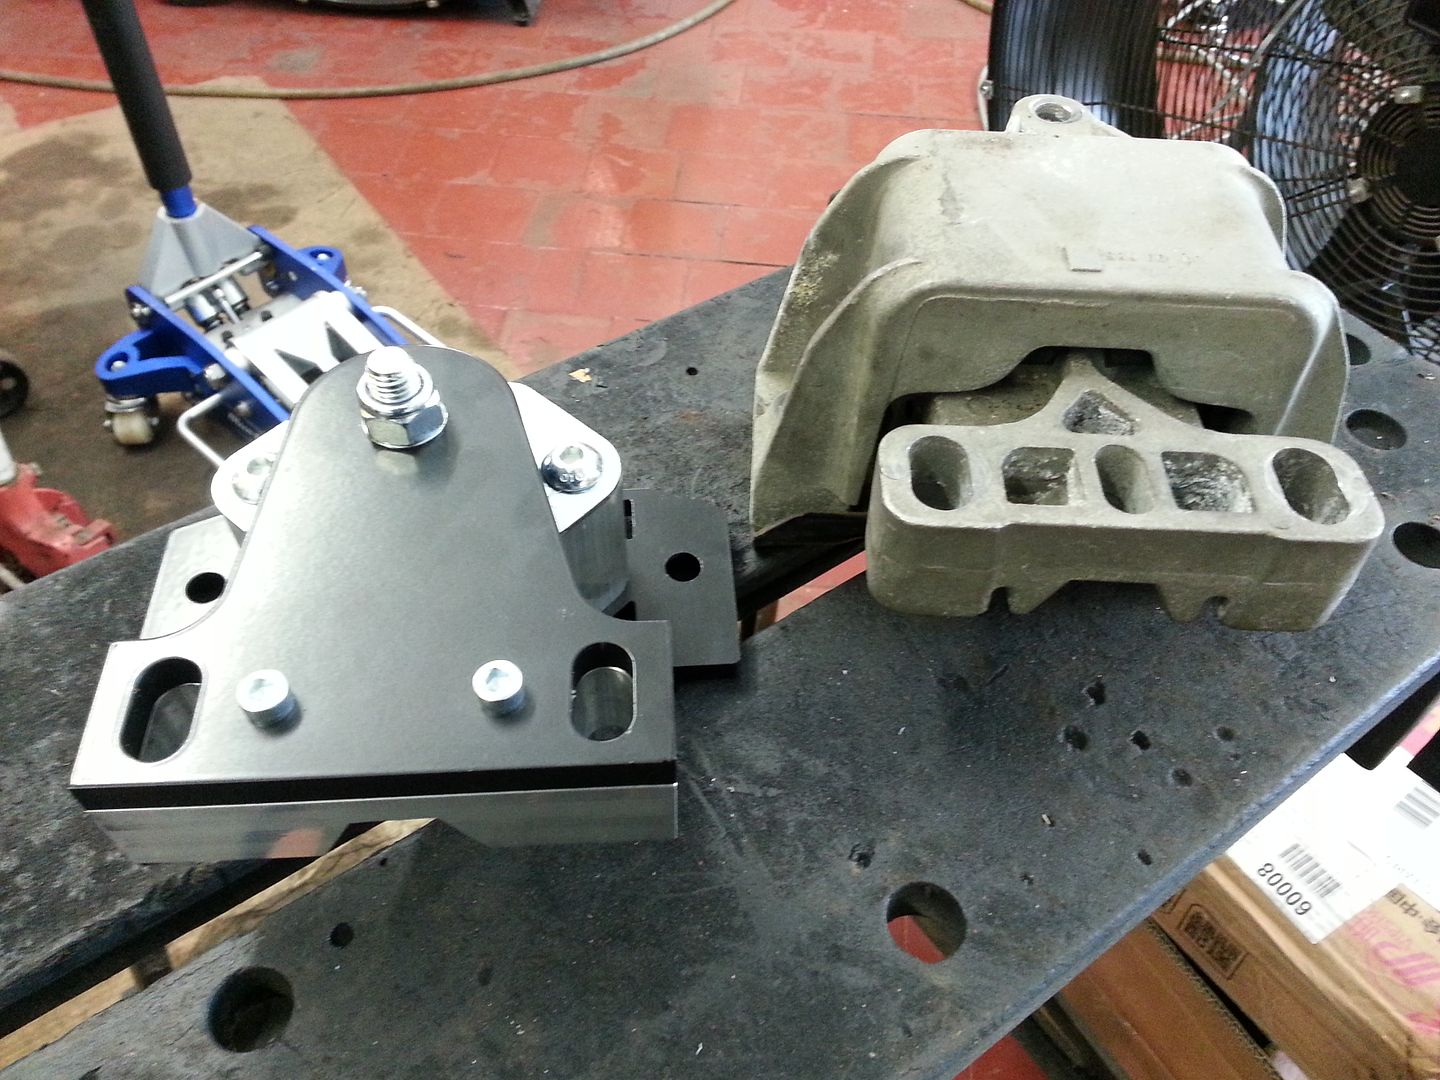
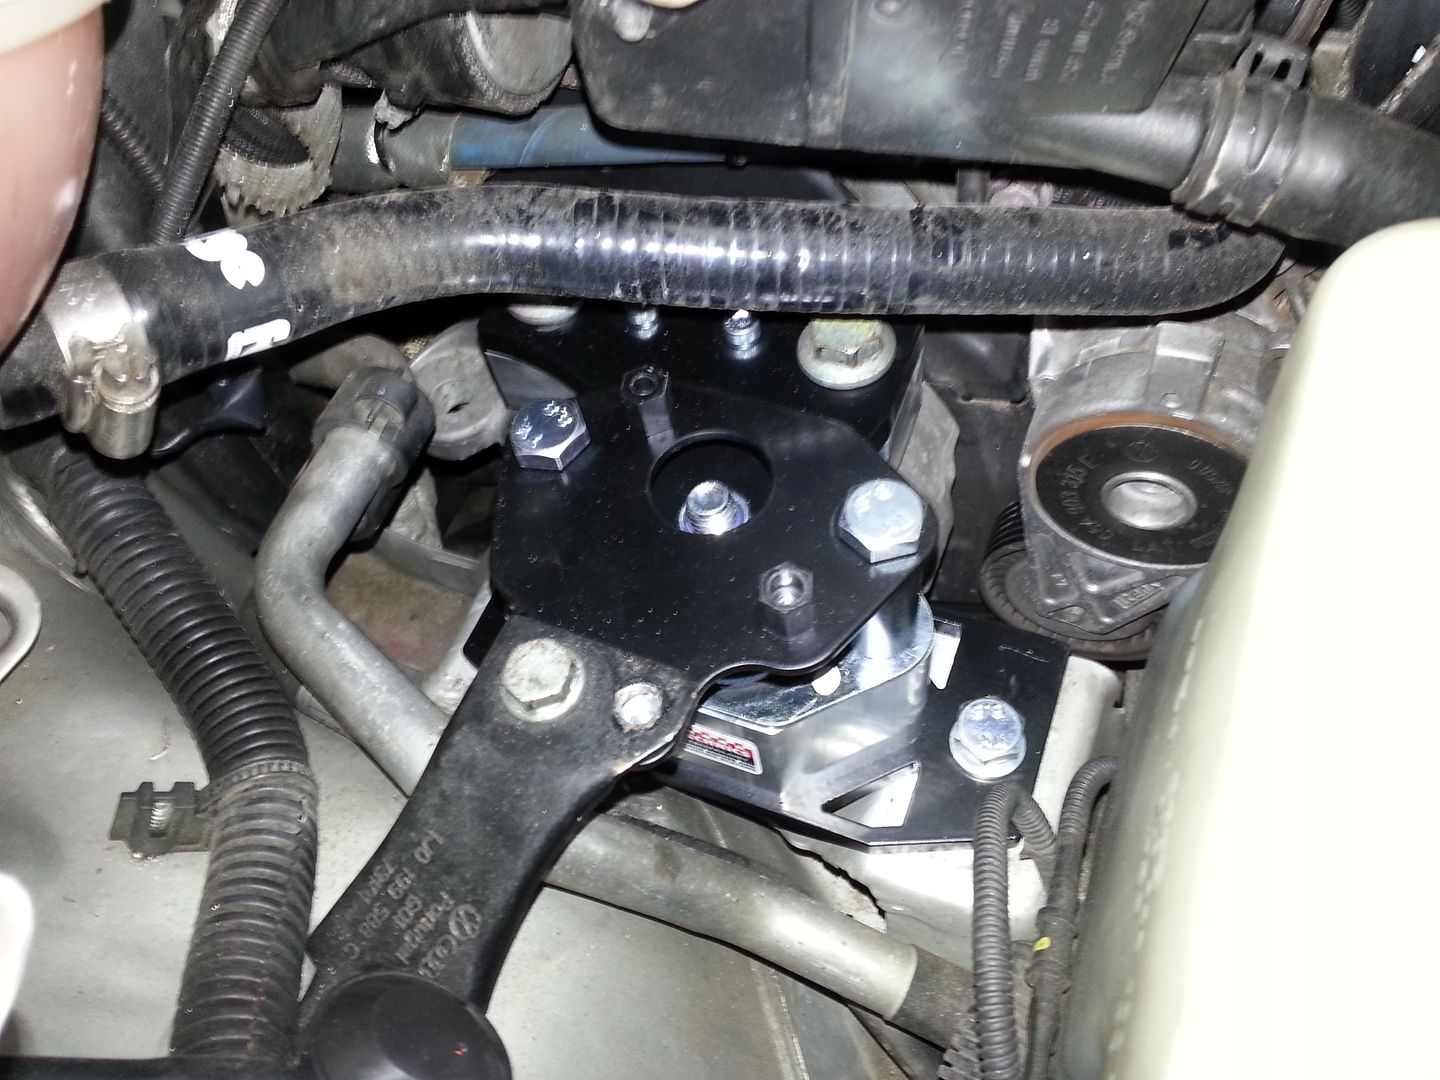
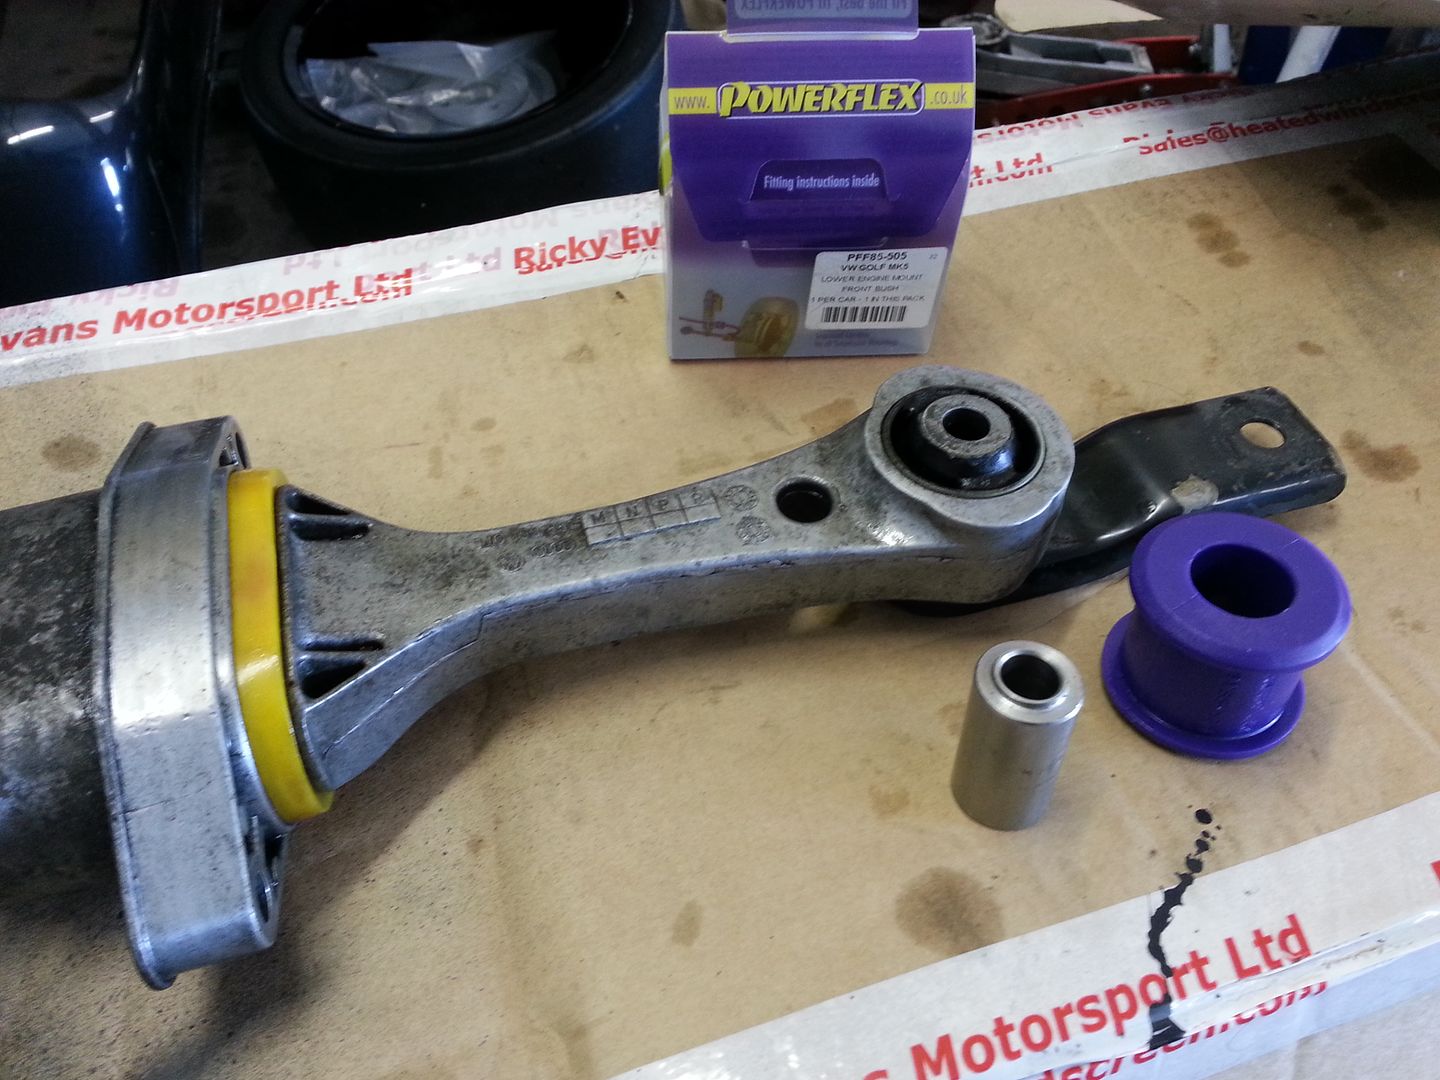
After the minor incident where I was close to parking the car up for a year I decided to change the engine mounts... I already have a set of THS uprated ones which have been working well but decided to make sure the engine stays where its put I went for a set of Vibratechnics mounts...
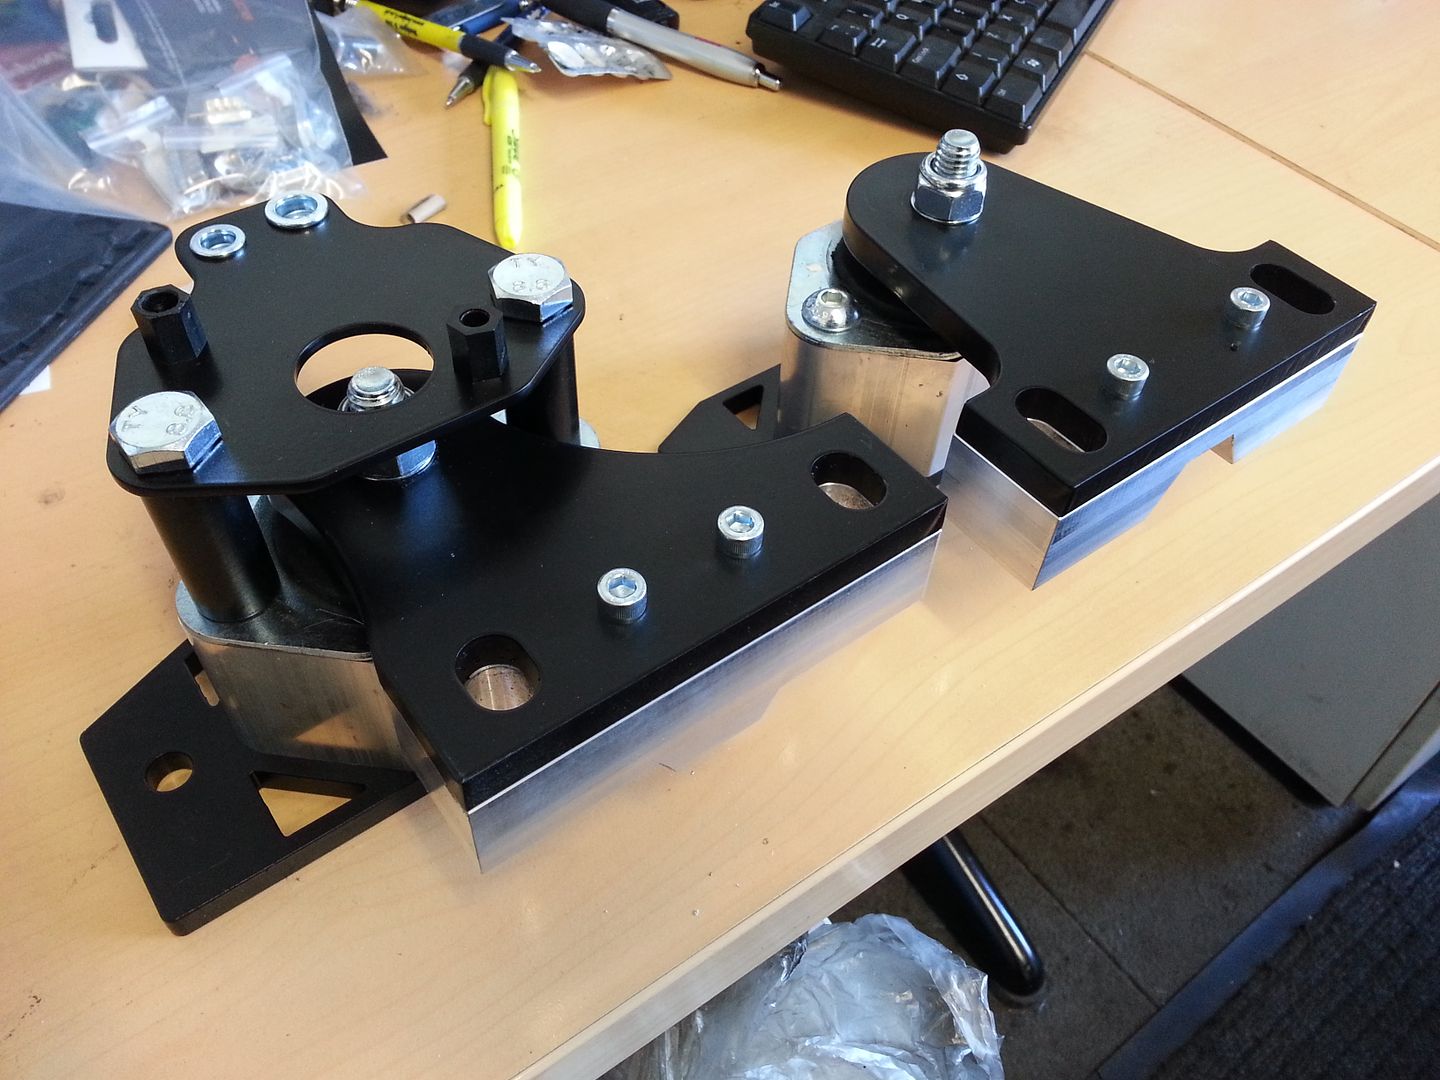
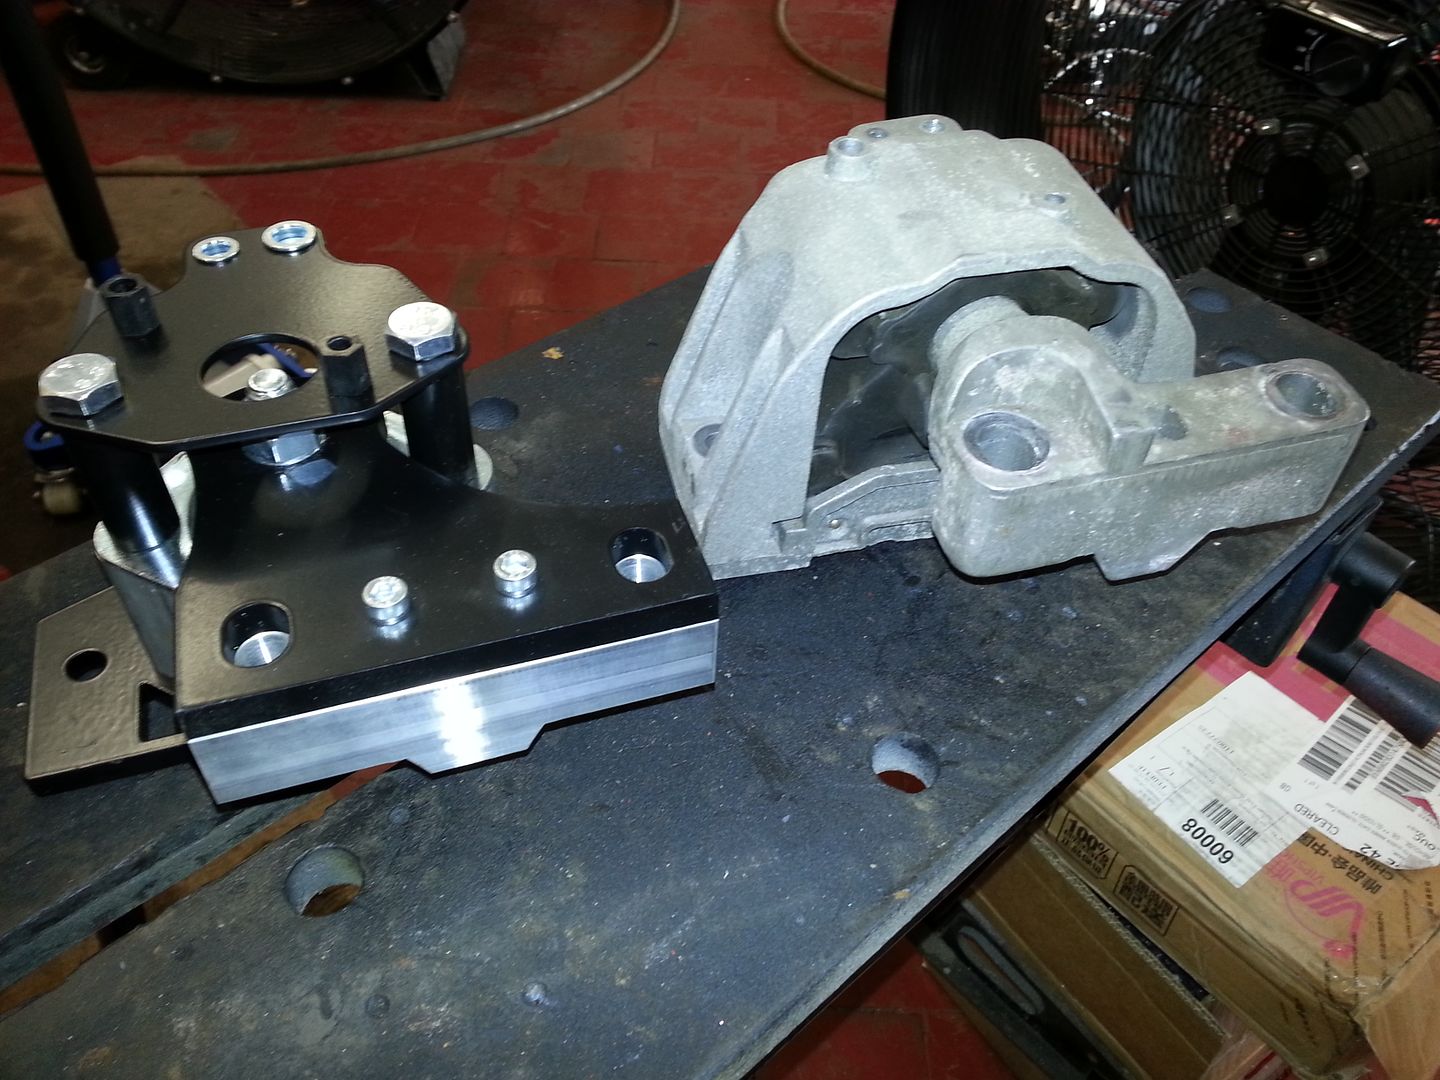
Gearbox side first...
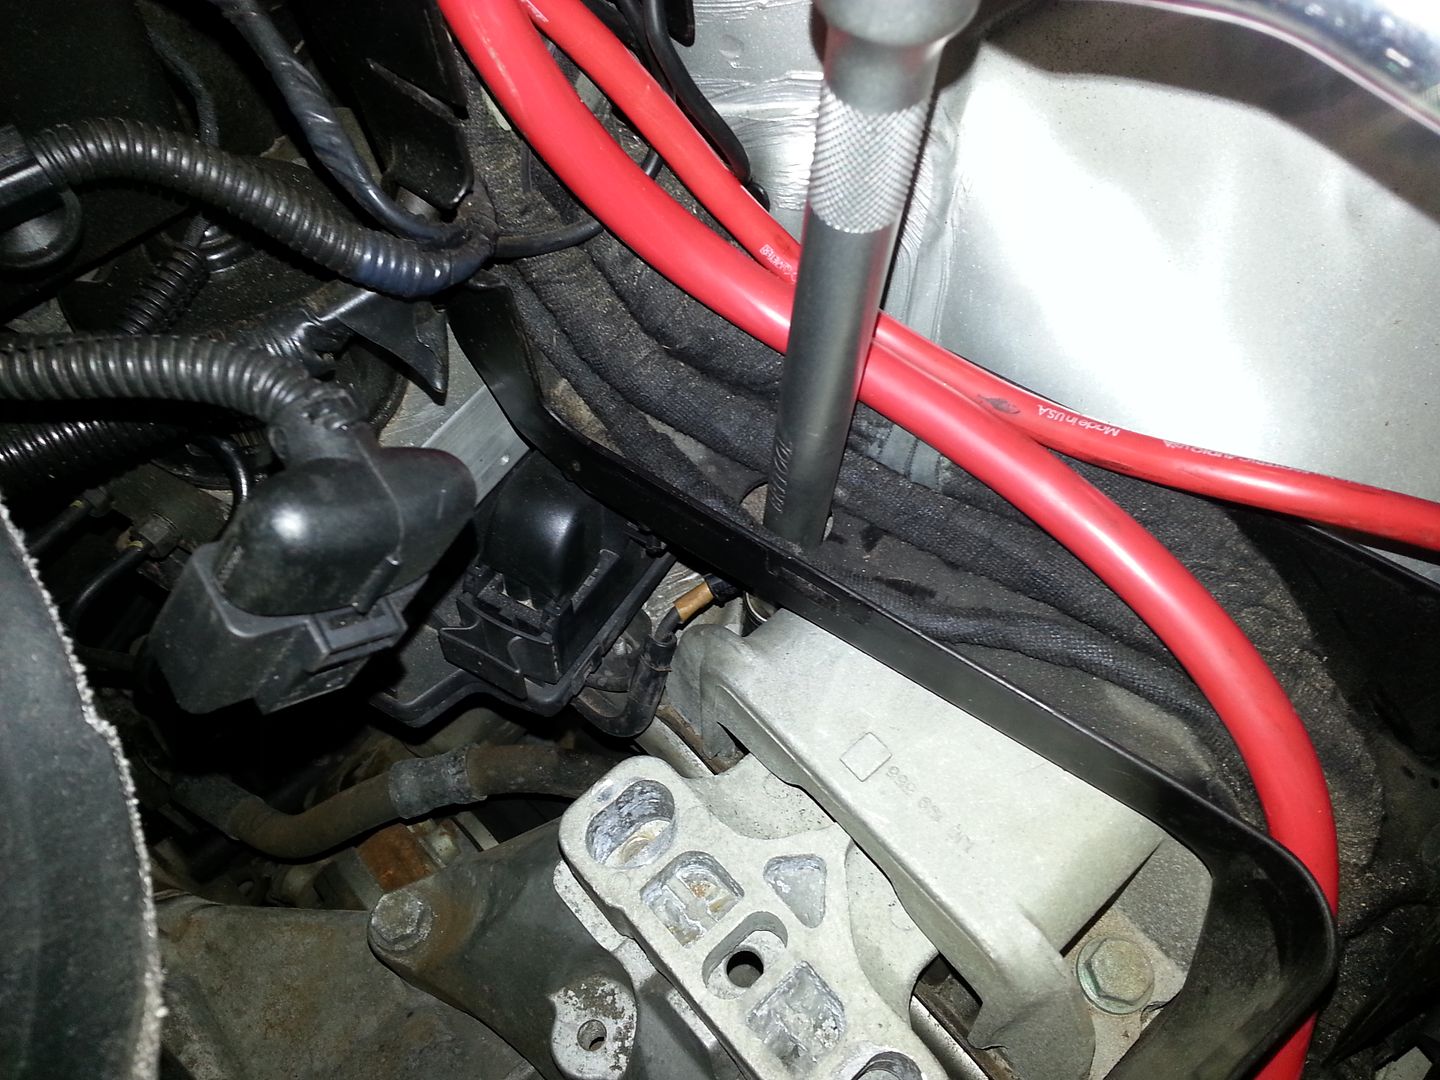
...two bolts have to be accessed through the trunking so the strut brace etc was undone so I could remove the top of the trunking to gain access to...
...and

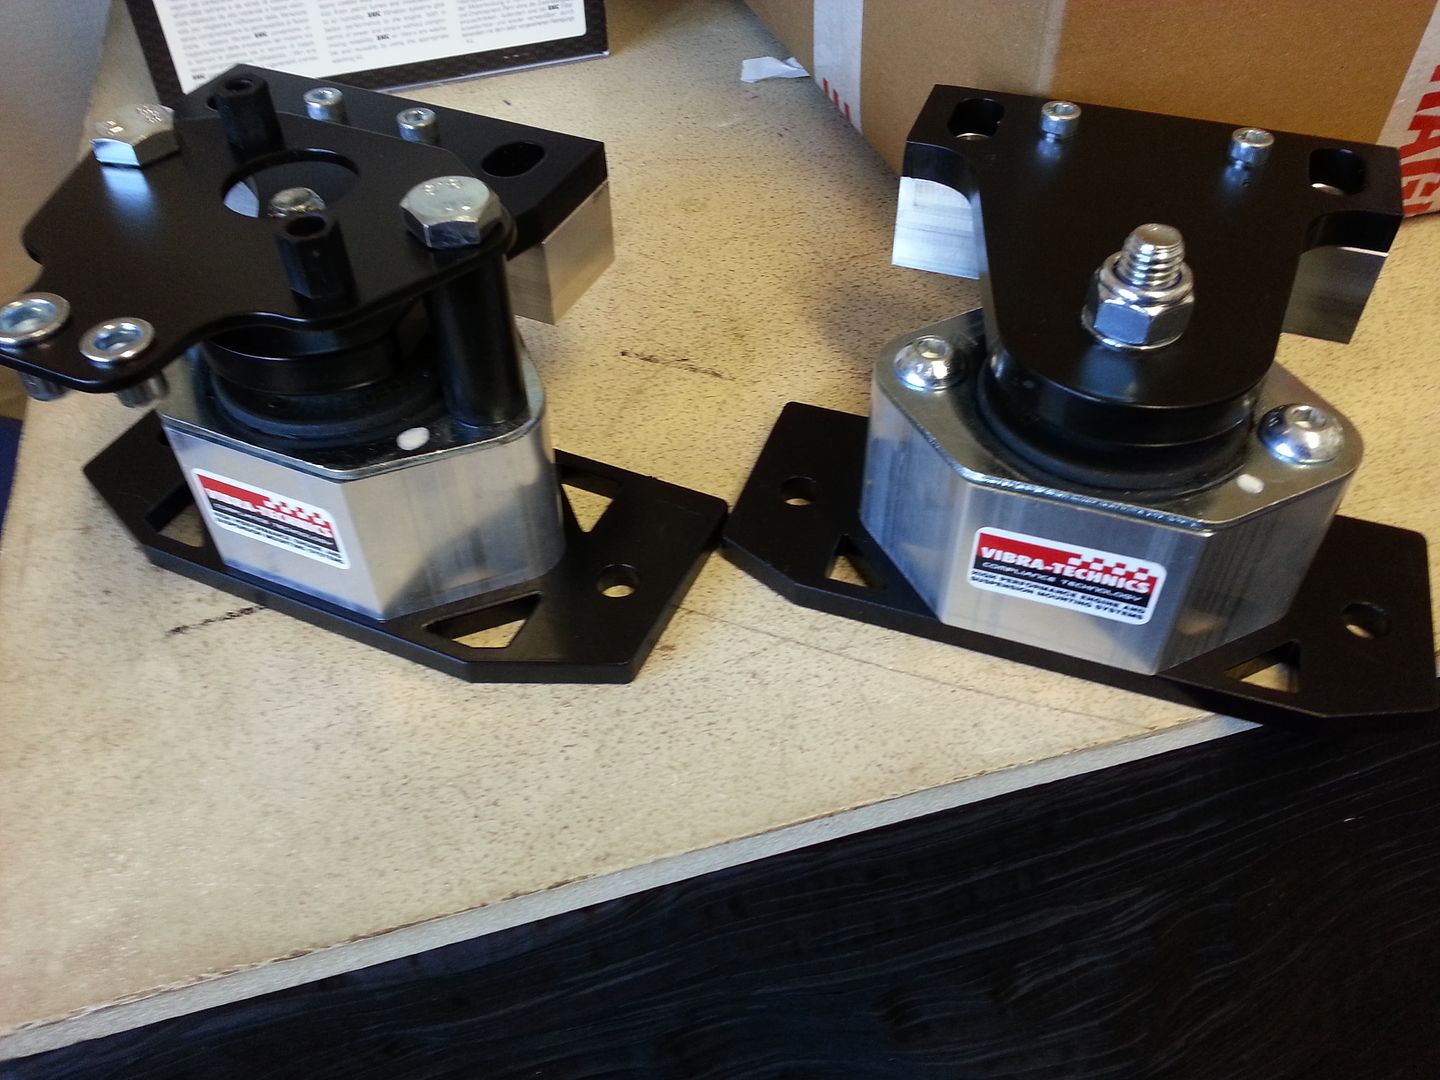
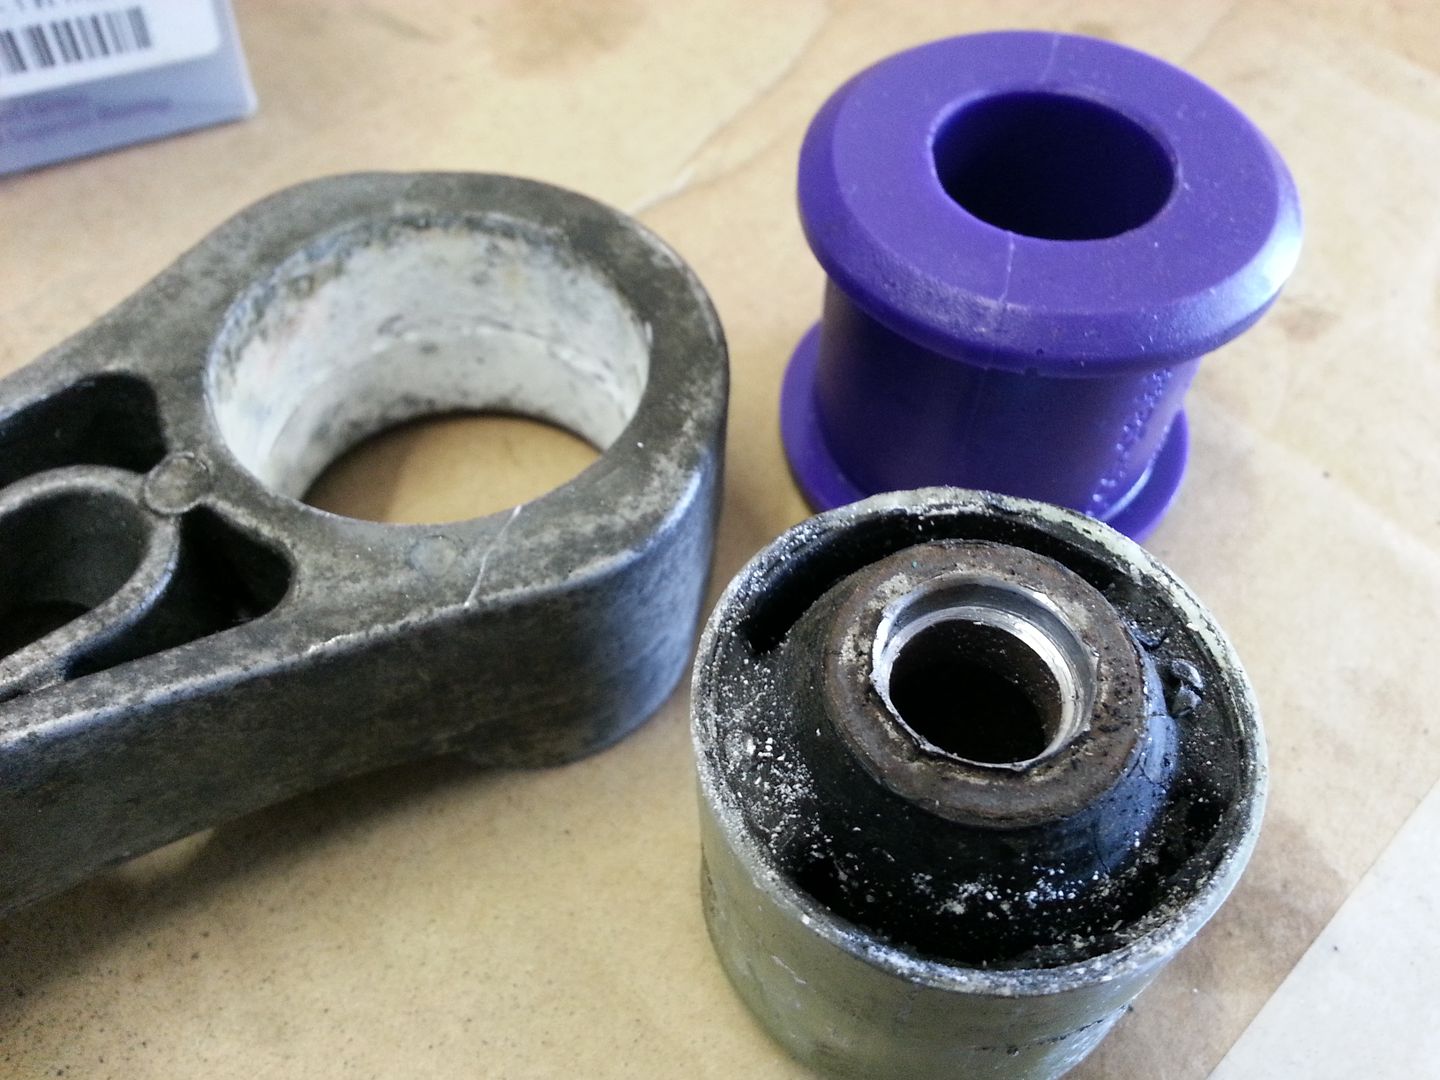
VT and THS (and OE)
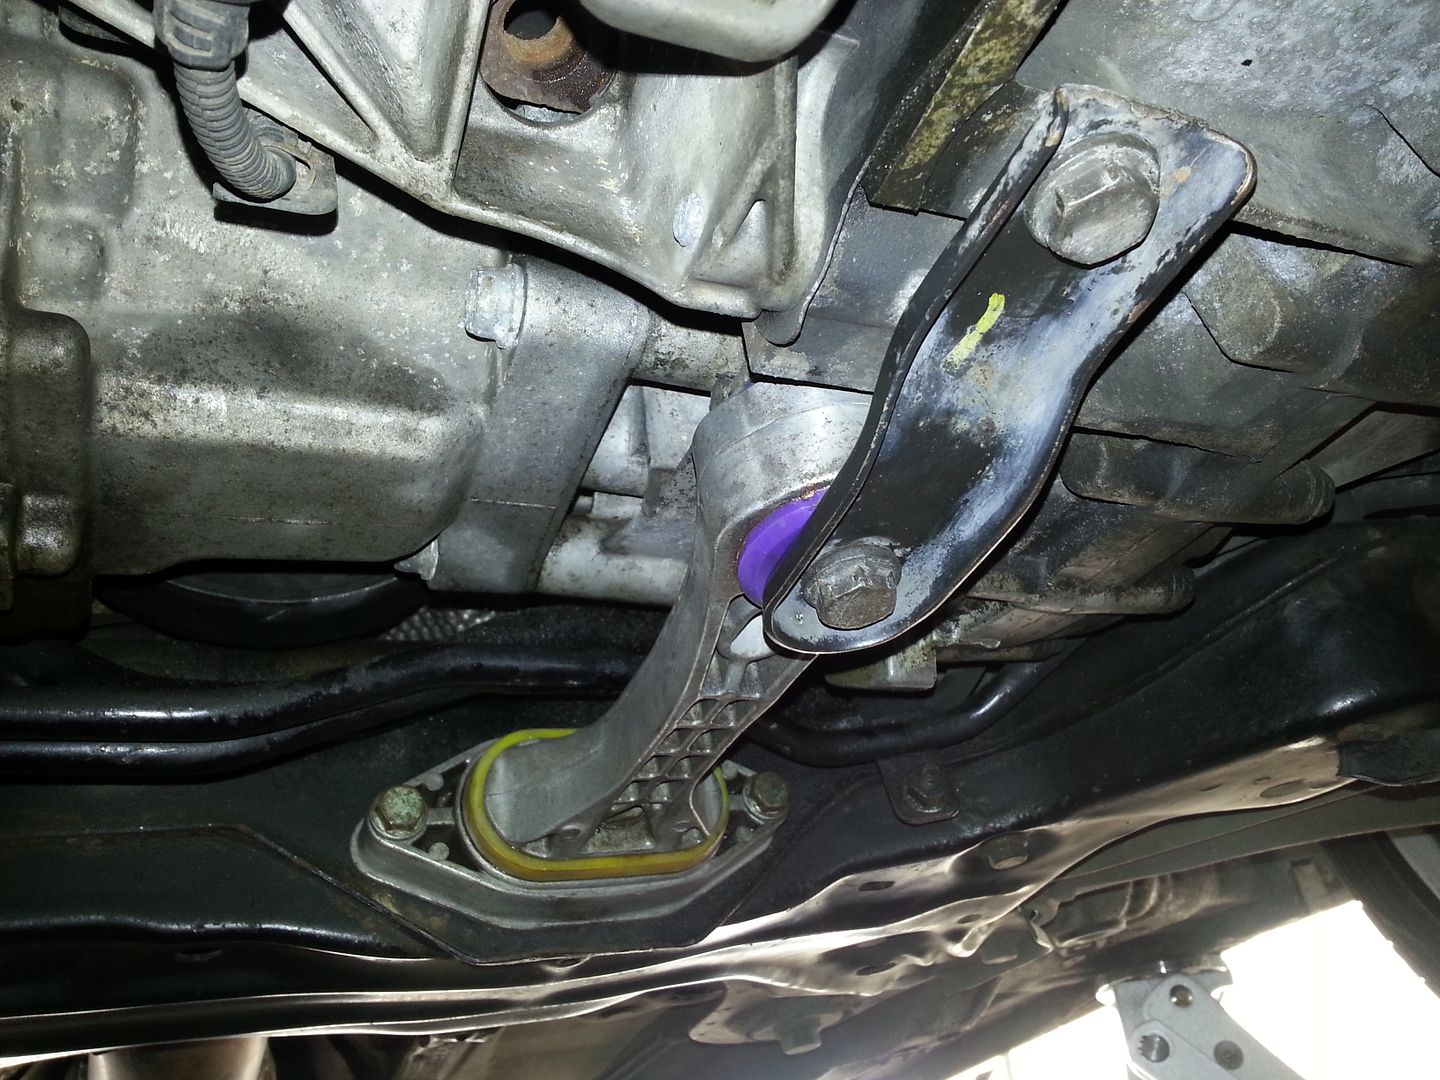
VT gearbox mount fitted
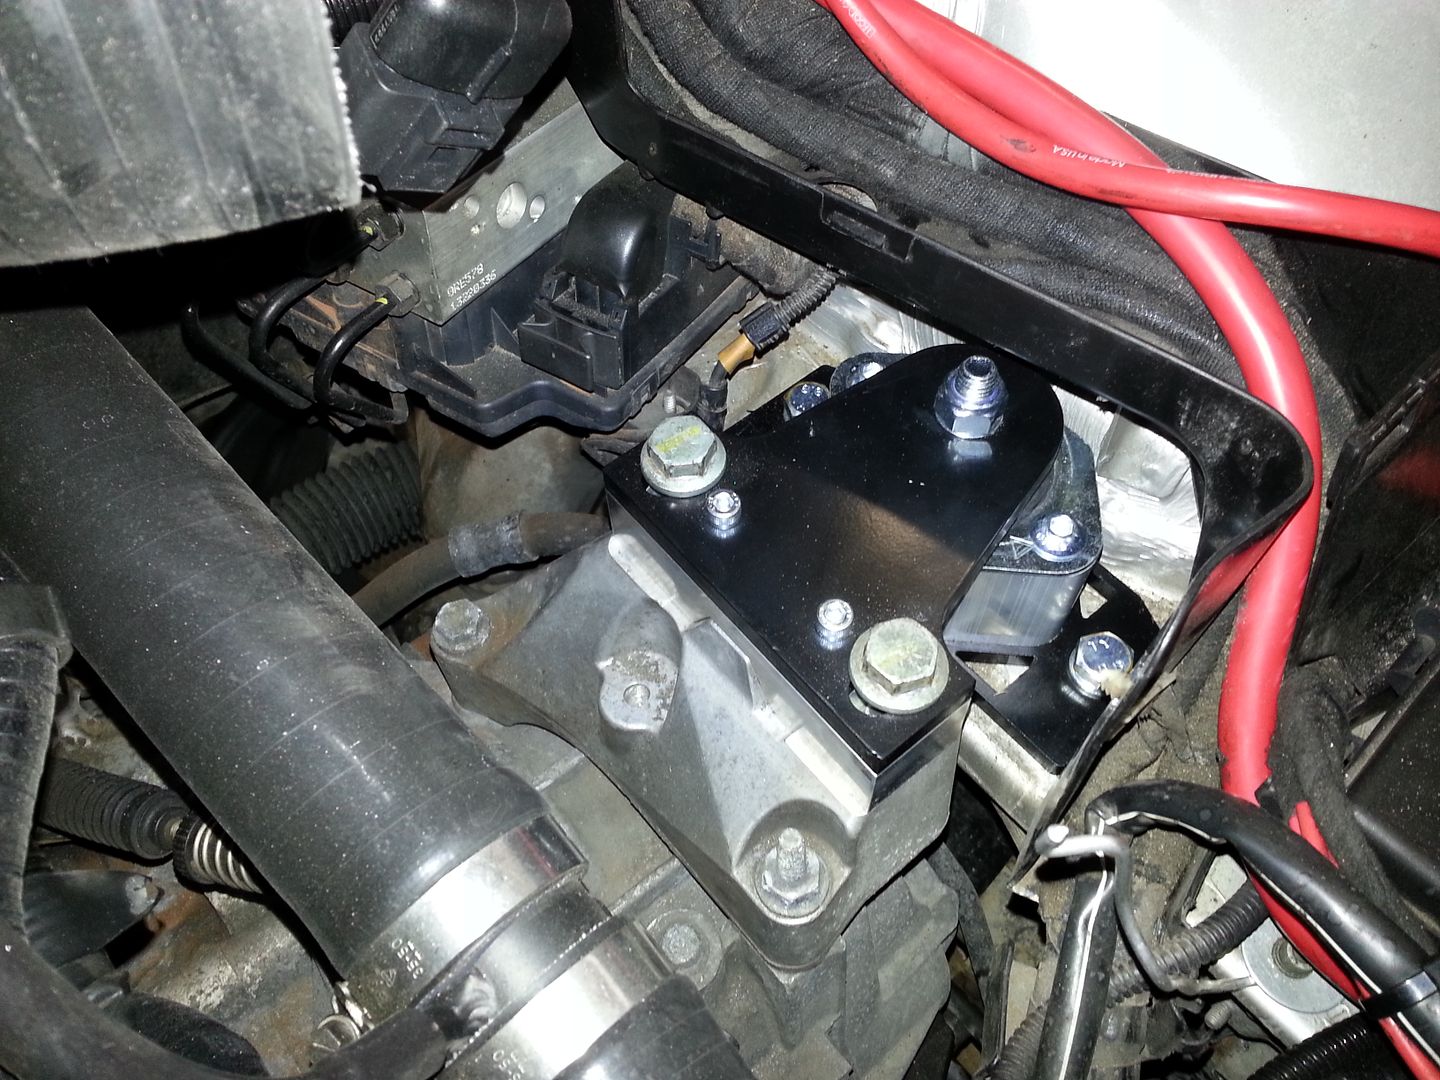
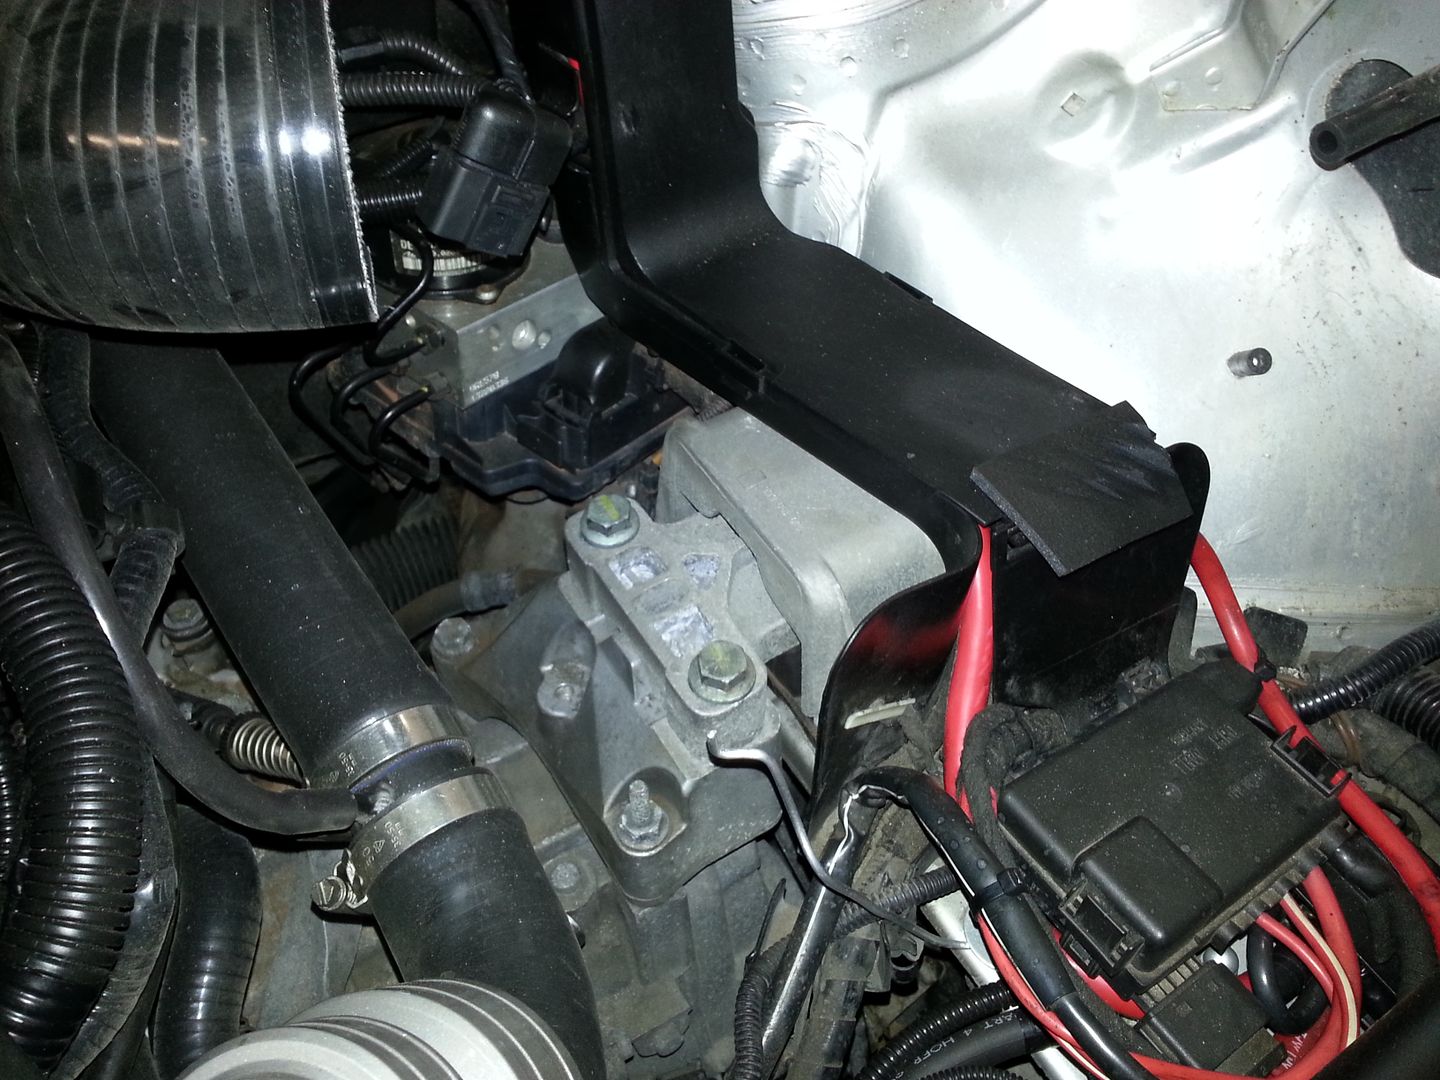
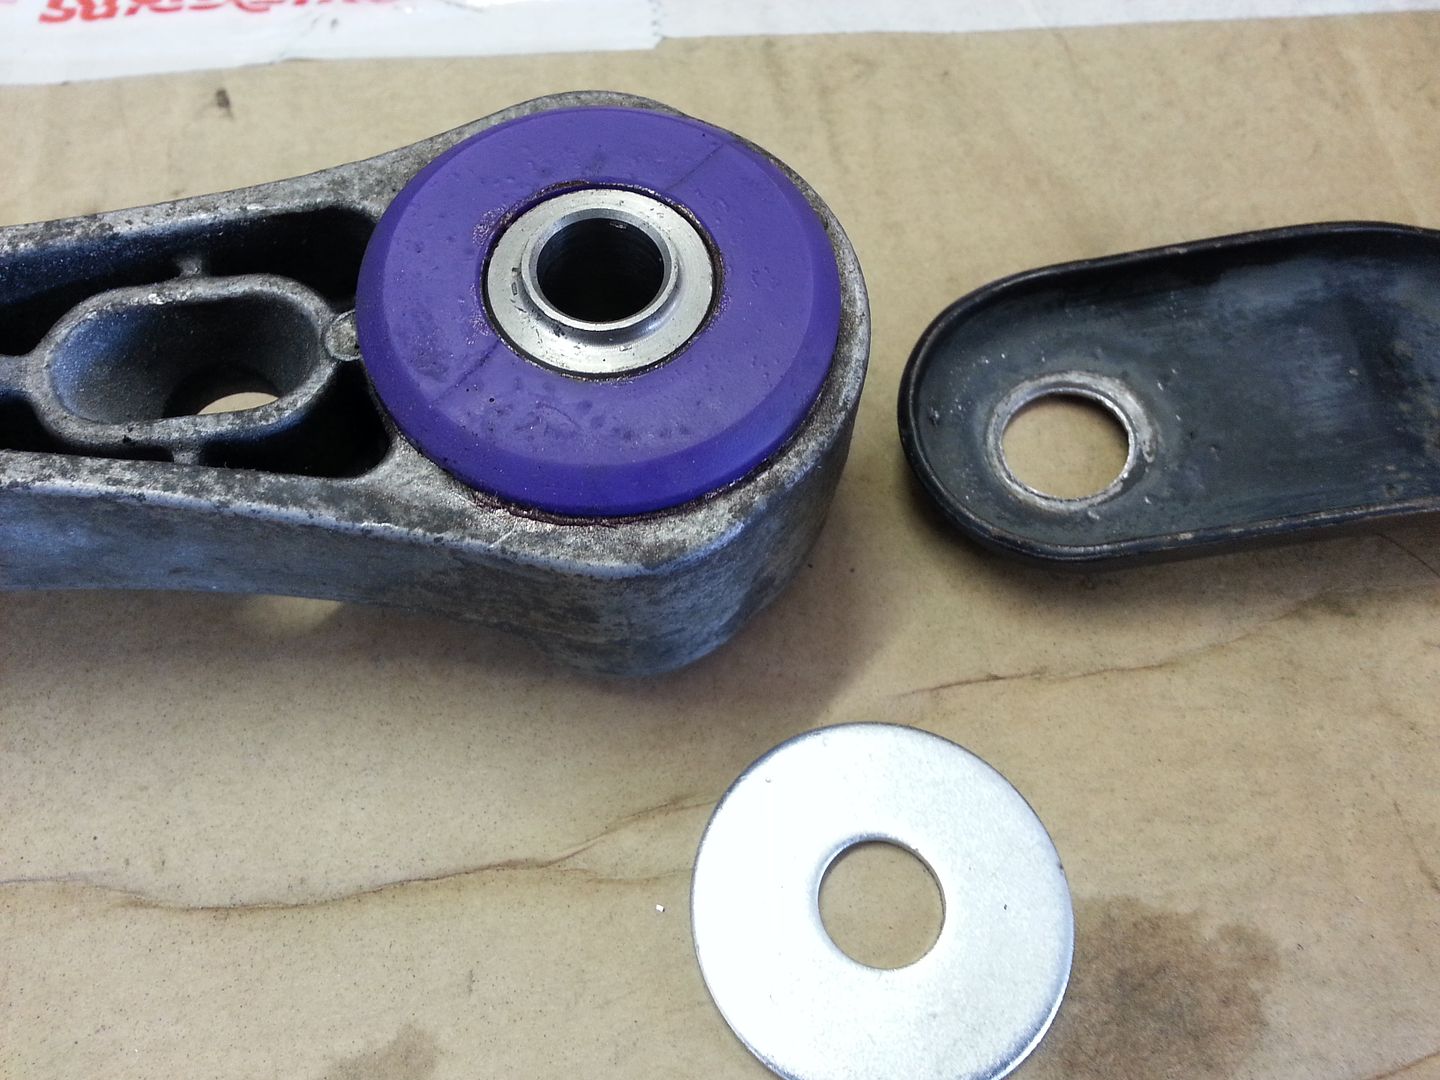
Engine side is hidden by just about everything... so charcoal filter out and everything bungied out of the way (inc charge pipe)
VT vs THS
..and VT fitted...
Surprisingly the THS mounts are in rather good nick... nothing to suggest they are knackered at all... so they will be going on eBay LOL...
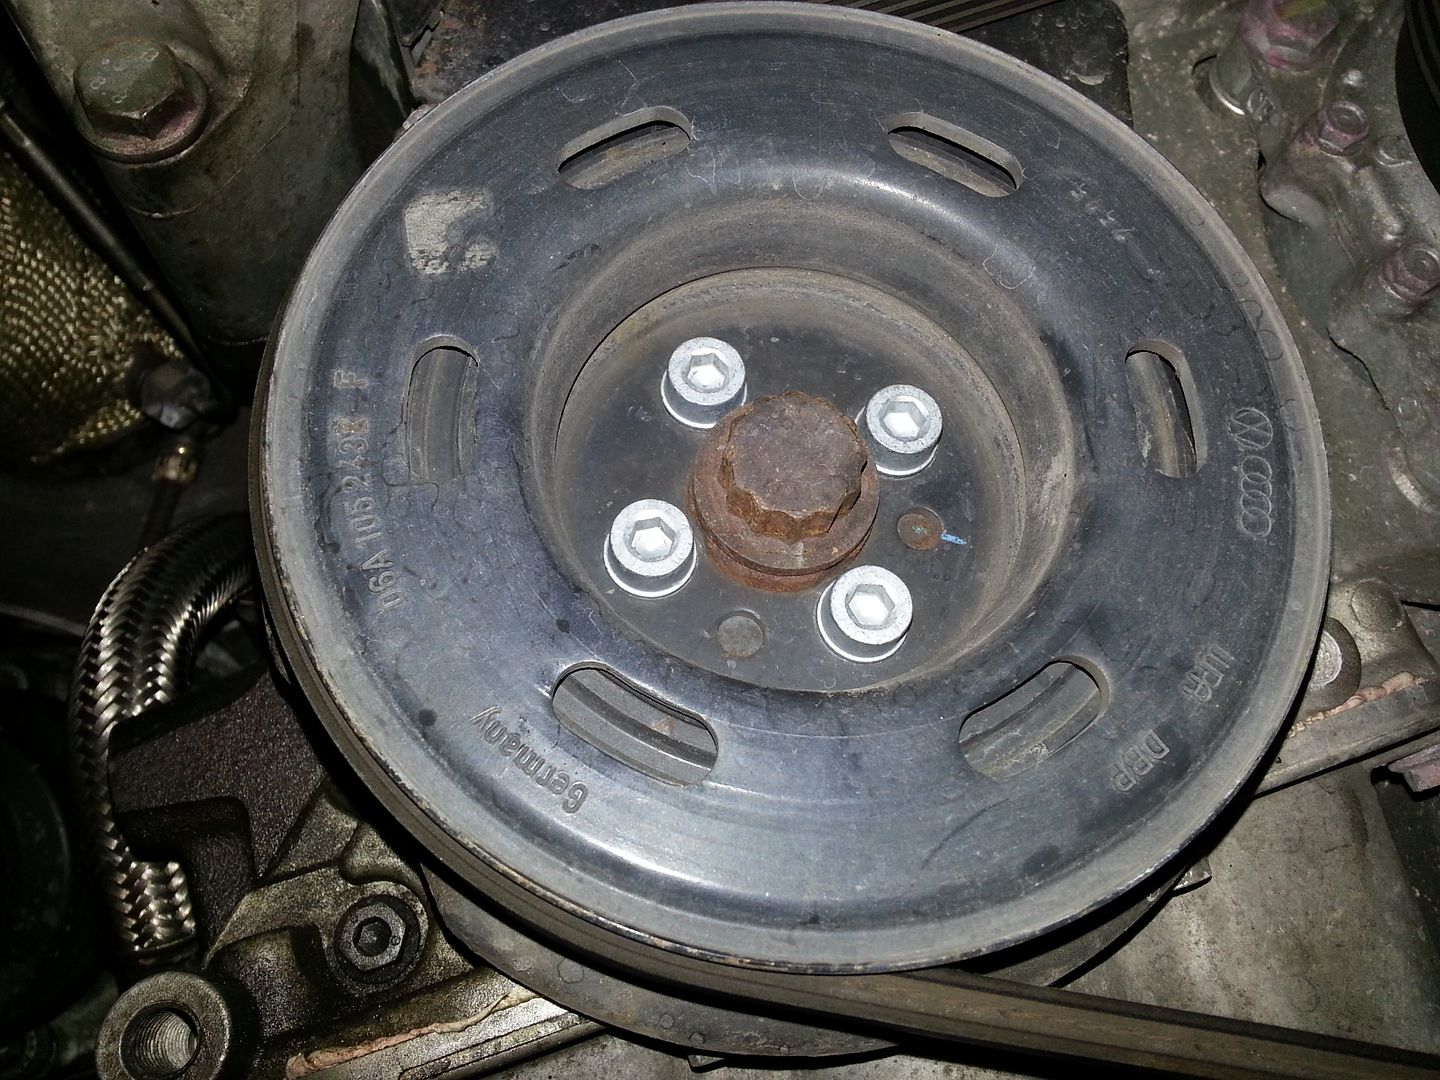
One last job of the day... where I have had the head off more than a few times the bolts holding the damped crank pulley on were getting a little tired... these are quite a hard bolt too... 10,1 rated IIRC and I bought a set of replacements a while back but never got around to fitting them so today, I did.. just as well as one needed a little more effort to remove... these bolts require a 6mm allen key to remove... one rounded and needed a a bit of persuasion with a hammer and a splined bit...
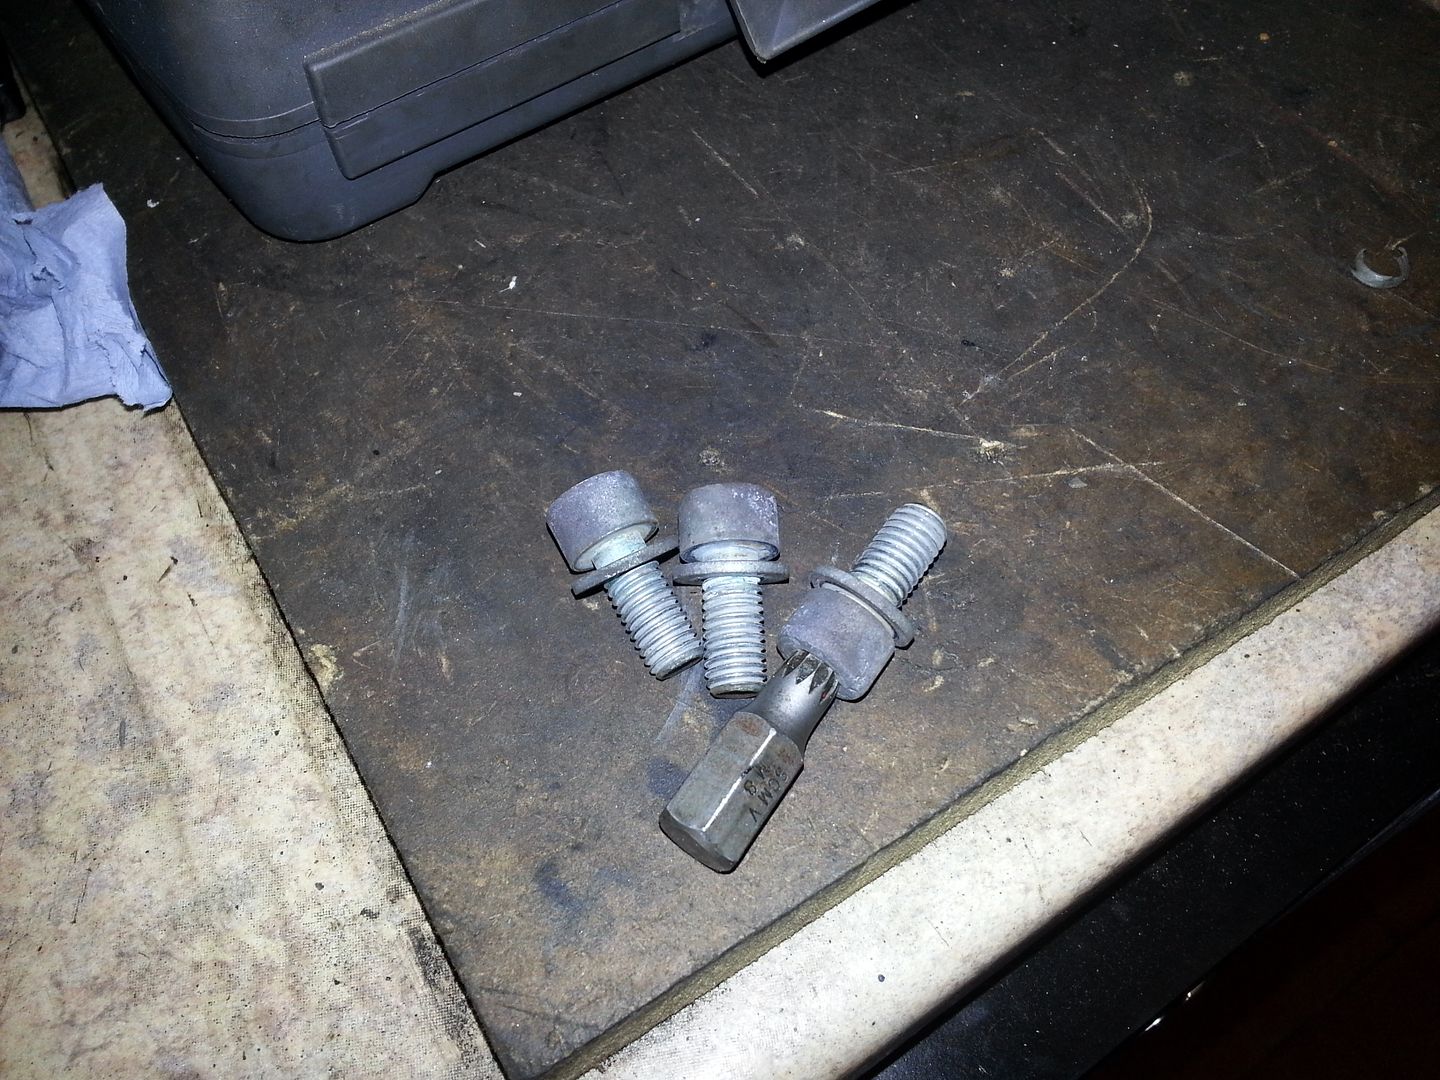
...nice new OEM ones fitted...
All in all fairly productive... I even manged to realign the exhaust as the middle clamp was loose and it was knocking in places and I even washed the car for the first time in weeks!!!...
The mounts are still bedding in so there is a little more vibration than previously on idle but this is to be expected... I fully anticipate this to die down a bit over time... on cruise its unnoticeable...
I have a week off at the beginning of next month... plans for then are:
I have also been given something else to test....
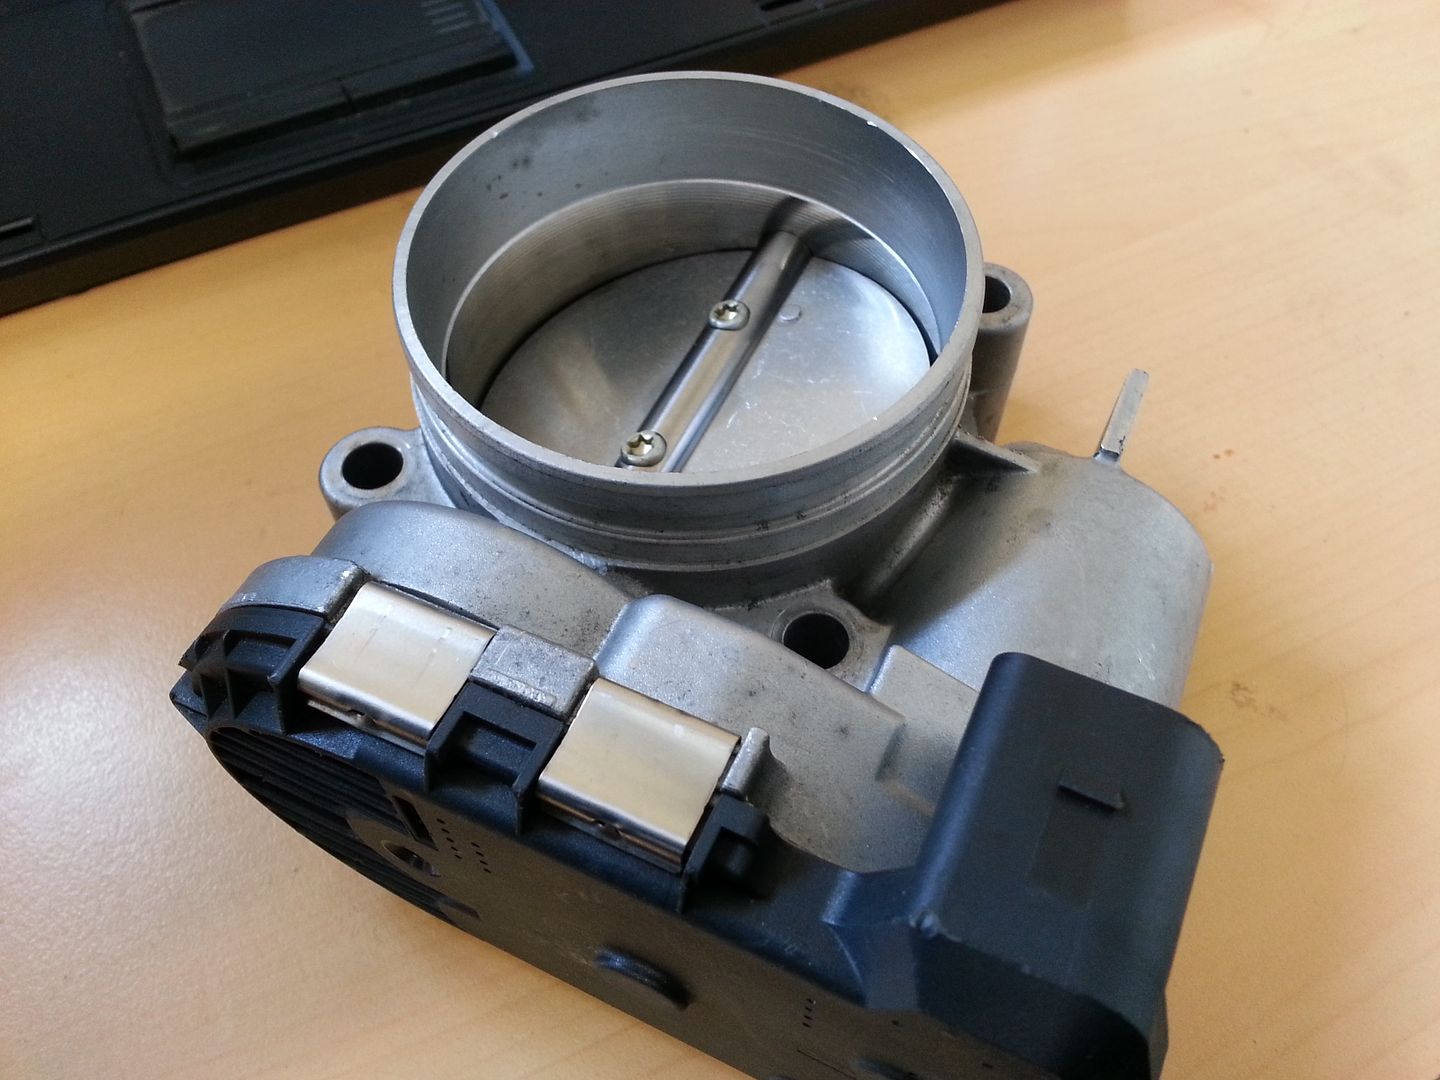
Its a 70mm throttle body... just interested to see if it makes any difference at all...
<tuffty/>
First up some number plate and sidelight LED's from EM Tuning... not fitted the sidelights yet as I have plans for the headlights later..
Needed to remove the plate and the surround to allow the light fitting to be removed..
...needed to clean up the contacts with wet and dry as they were looking a little corroded...
Swapped out the bulbs... Trups supplies ones that don't light up the road behind you
...nice white light...
On to the next job, fitting some aero wipers I got well cheap on ebay.... these are the proper aero type, I have been running the std arms with aero 'upgrades' but these came along at a real good price and I needed new wipers...
...and bought a new blade for the Polo rear I already had...
I have also bagged a pair of the TT fan jets for a bargain £8 (eBay again) which I will fit later...
After the minor incident where I was close to parking the car up for a year I decided to change the engine mounts... I already have a set of THS uprated ones which have been working well but decided to make sure the engine stays where its put I went for a set of Vibratechnics mounts...
Gearbox side first...
...two bolts have to be accessed through the trunking so the strut brace etc was undone so I could remove the top of the trunking to gain access to...
...and
VT and THS (and OE)
VT gearbox mount fitted
Engine side is hidden by just about everything... so charcoal filter out and everything bungied out of the way (inc charge pipe)
VT vs THS
..and VT fitted...
Surprisingly the THS mounts are in rather good nick... nothing to suggest they are knackered at all... so they will be going on eBay LOL...
One last job of the day... where I have had the head off more than a few times the bolts holding the damped crank pulley on were getting a little tired... these are quite a hard bolt too... 10,1 rated IIRC and I bought a set of replacements a while back but never got around to fitting them so today, I did.. just as well as one needed a little more effort to remove... these bolts require a 6mm allen key to remove... one rounded and needed a a bit of persuasion with a hammer and a splined bit...
...nice new OEM ones fitted...
All in all fairly productive... I even manged to realign the exhaust as the middle clamp was loose and it was knocking in places and I even washed the car for the first time in weeks!!!...
The mounts are still bedding in so there is a little more vibration than previously on idle but this is to be expected... I fully anticipate this to die down a bit over time... on cruise its unnoticeable...
I have a week off at the beginning of next month... plans for then are:
- Fit WMI (finally), I have all the bits now so no excuses...
- Wire in a relay for the inline fuel pump
- Look at modding the Miltek back box as its a little worse for wear after the NLS/launching and starting to make a hissing noise under full power... typically a sign its not flowing as well as it could so it will be dissected then made 3" internally with maybe some further fabrication on the tail pipes... don't know for sure until I am in there...
- Refurb the headlights this time by removing them fully and doing it on the bench where I have a bit more control... I have bought some clear Lamin-x film which I am told (by Lamin-x) has UV protection built in...
- Get the car on the dyno for tweaking and dialling in WMI...
I have also been given something else to test....
Its a 70mm throttle body... just interested to see if it makes any difference at all...
<tuffty/>
Last edited:
I have also been given something else to test....
Its a 70mm throttle body... just interested to see if it makes any difference at all...
<tuffty/>
Don't forget to bead it
Have some time off work so obviously this meant tinkering time with the car....
First job was to replace the small dogbone bush... instructions are supplied so won't bother with the detail so pics should do
There was an increase in vibration on idle but this has settled now... with VT road mounts, a yellow bush and now this bush there is of course going to be increased vibrations and engine noise... its the price of power or at least effective use of power... but when cruising there is nothing really noticeable and thats fine with me...
Next job was to run the hose for the WMI... interior apart... again!...
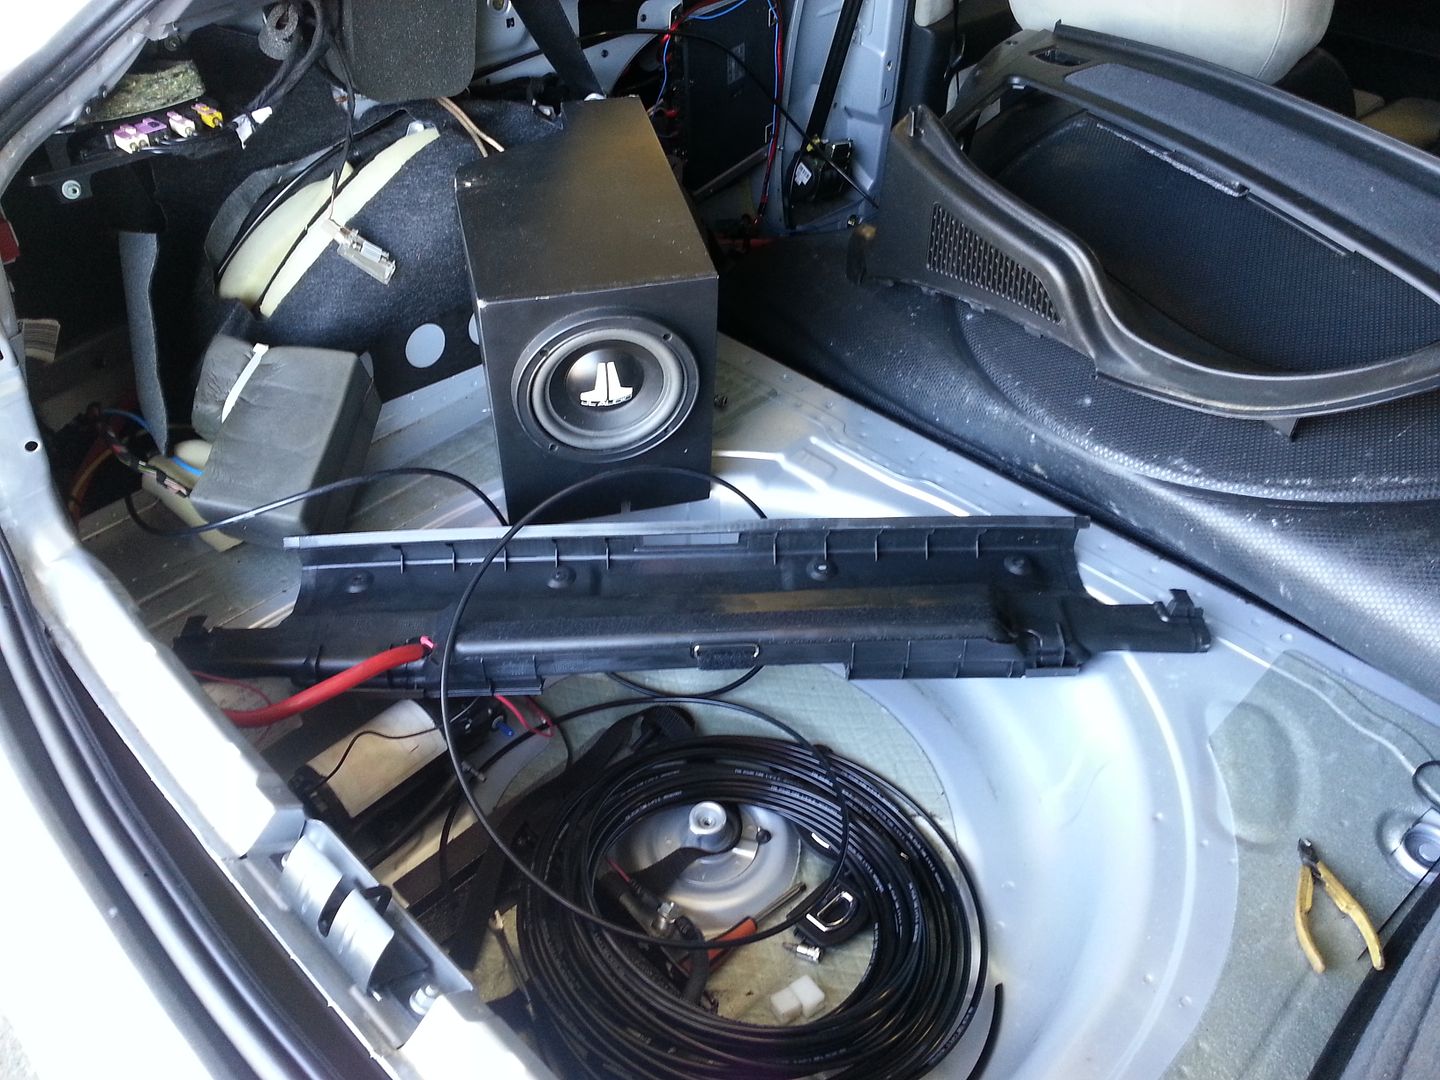
...drilled a smaller hole next to the one that the opposite side of the pollen filter...
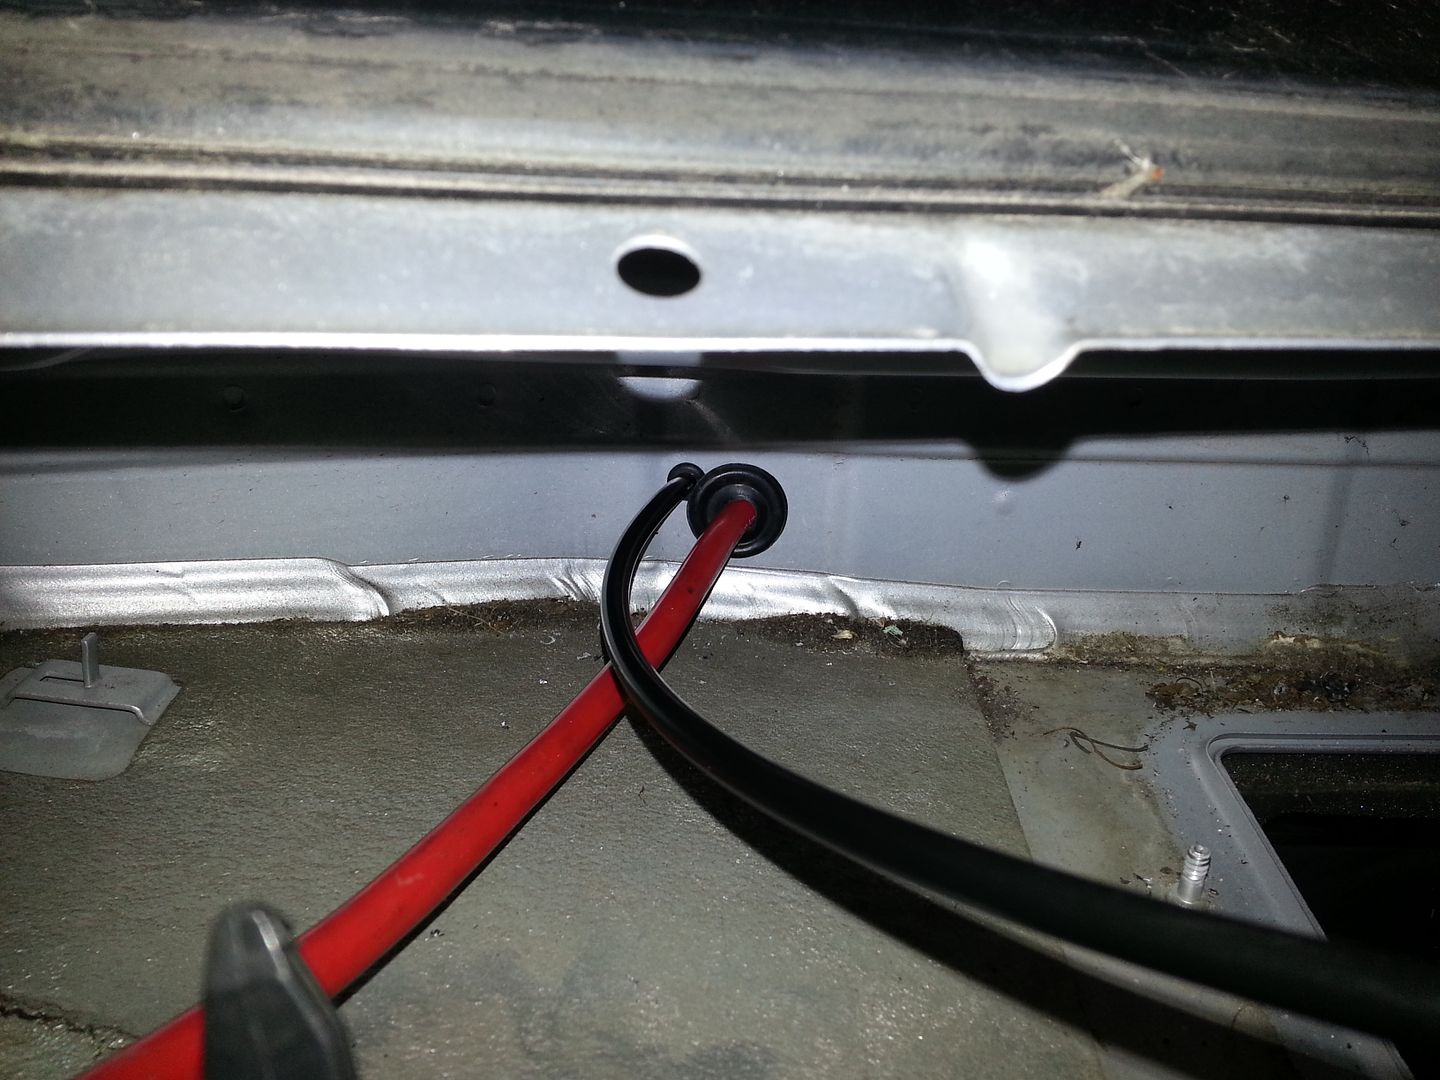
...getting busy in the cable trunking...
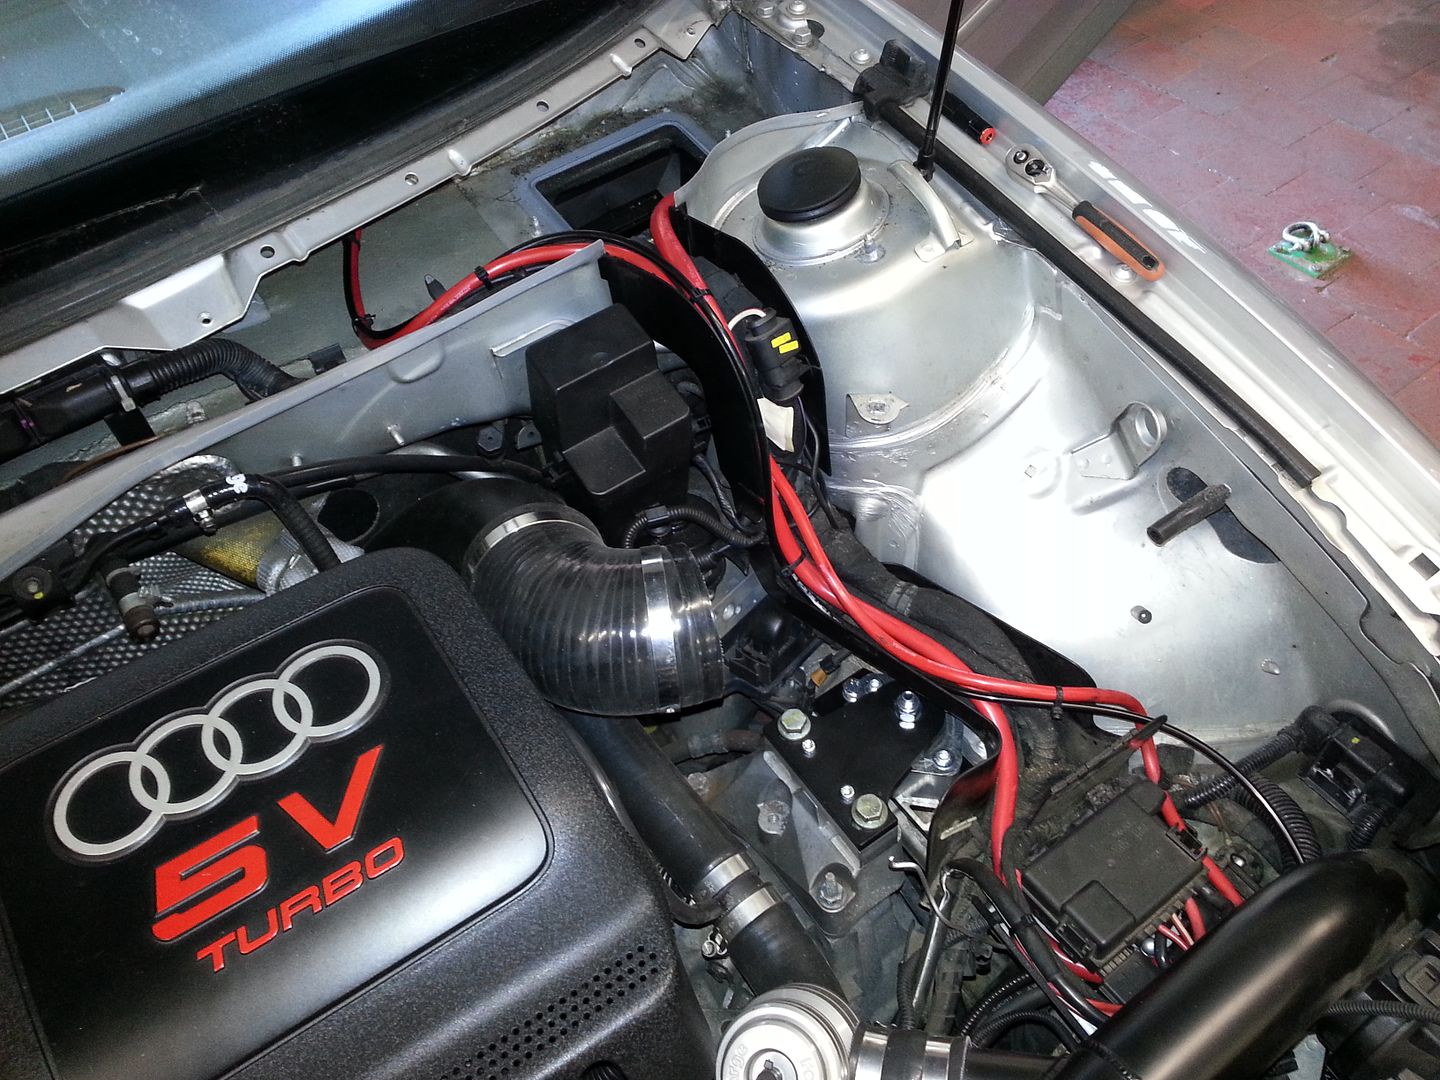
Not fitted the pump yet as I need to run the wires and work out which side of the battery to fit it... that will come later as will fitting the nozzle which I have decided will go initially in the FMIC outlet... I am looking at using a dual nozzle system as have seen one of these work rather well... I may even look at staging delivery too...
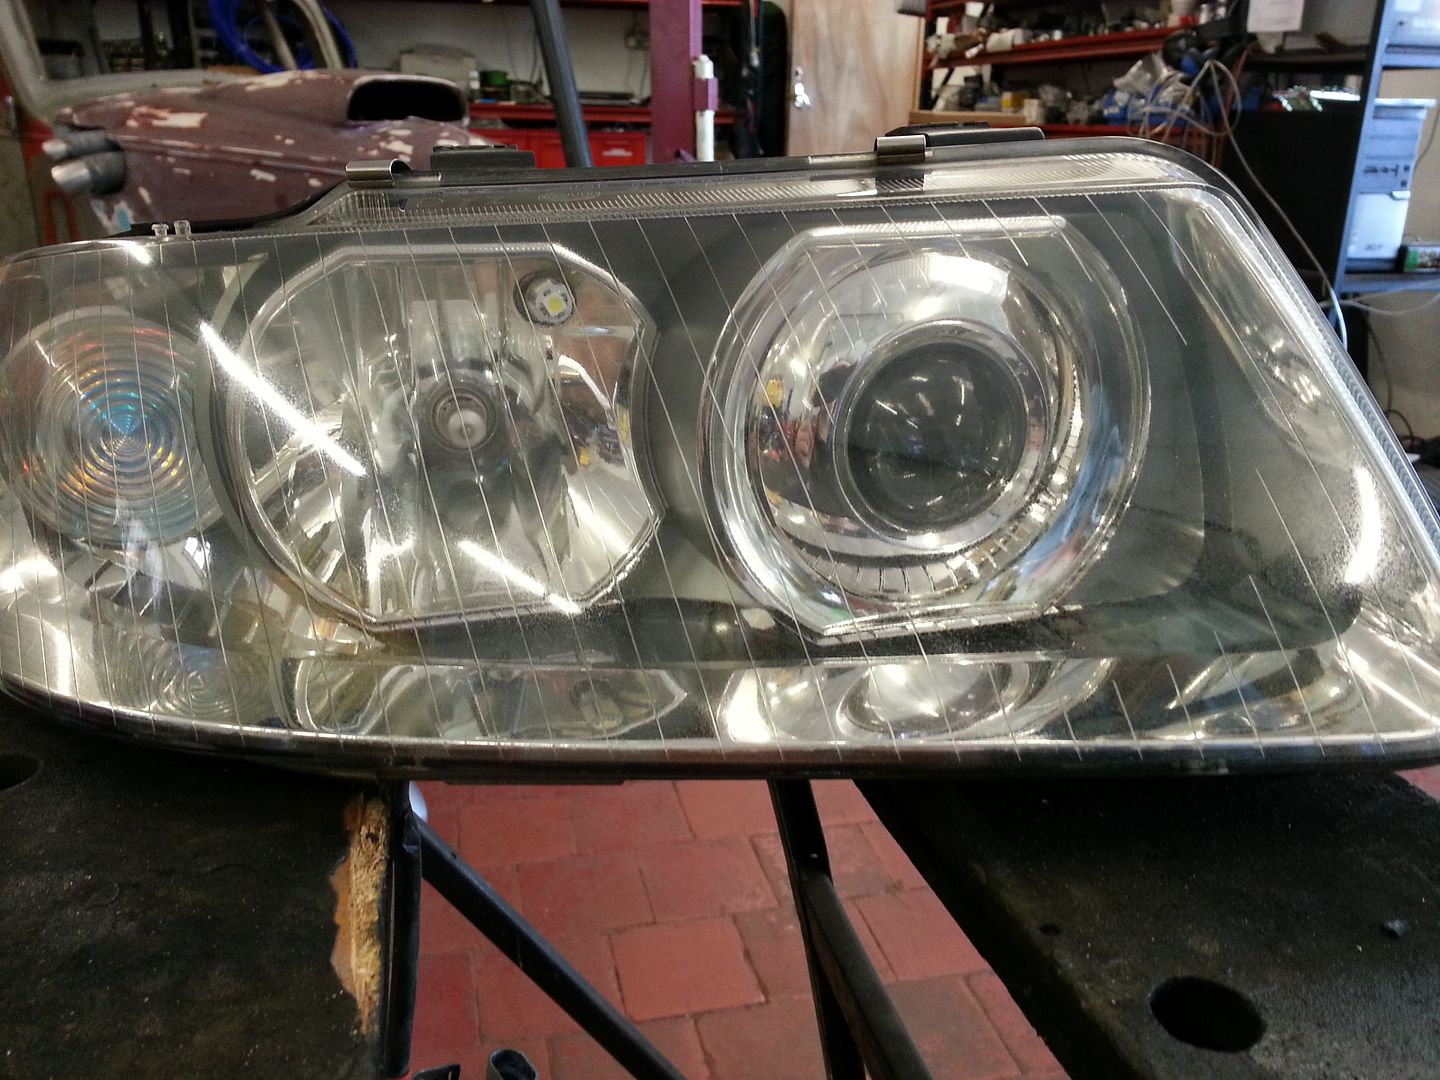
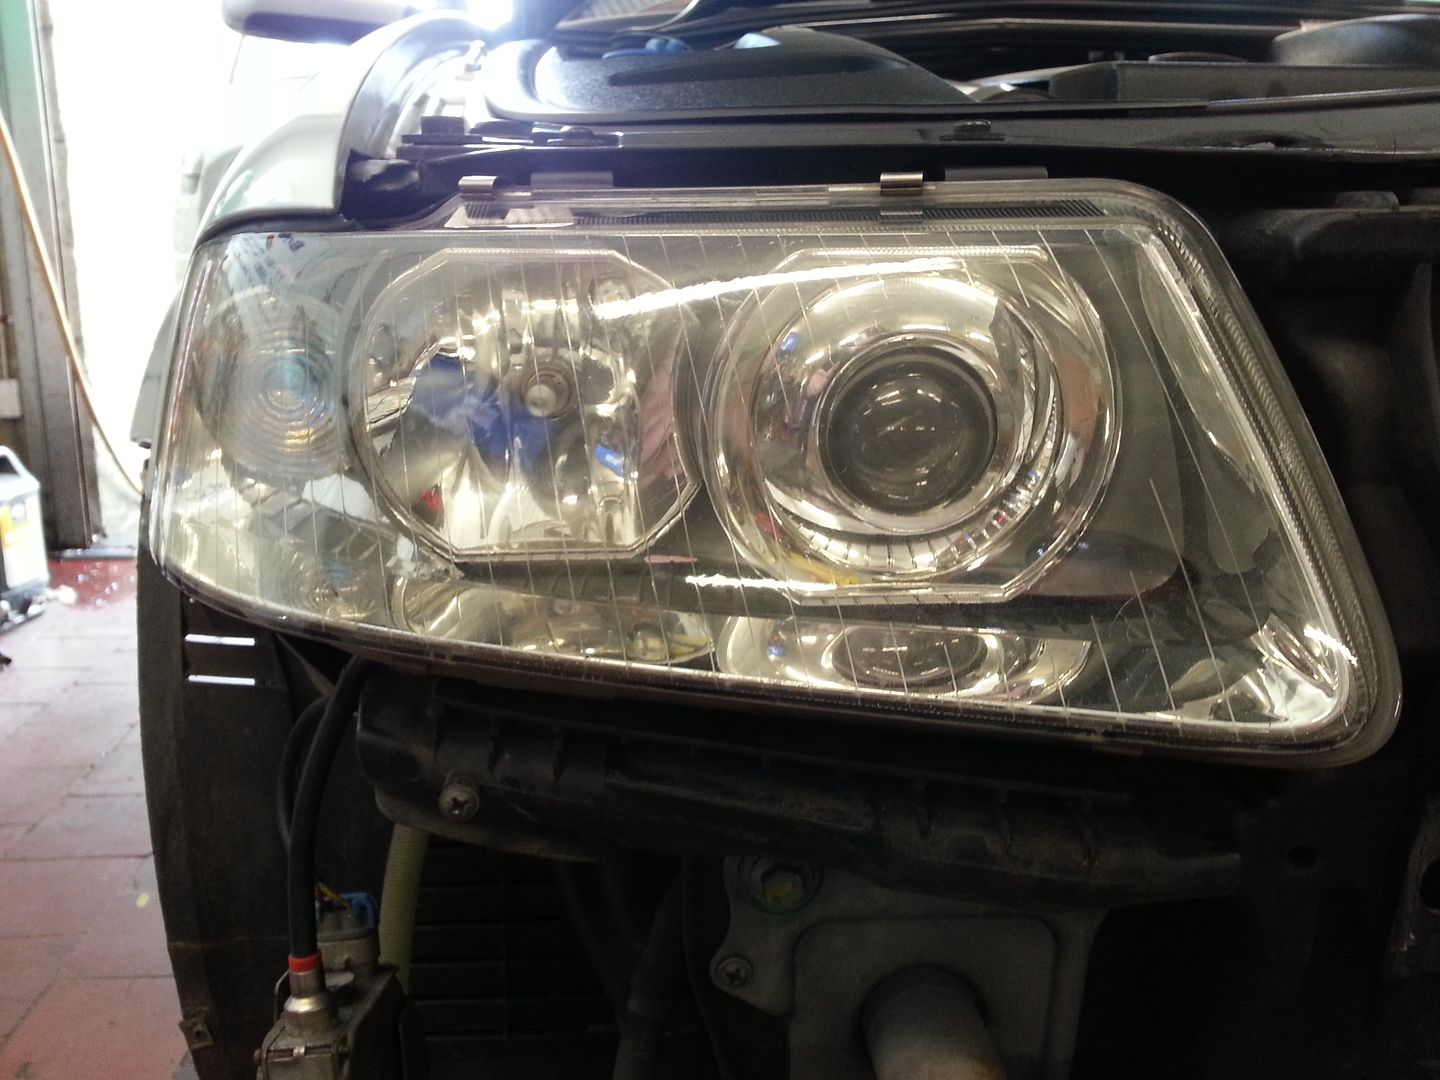
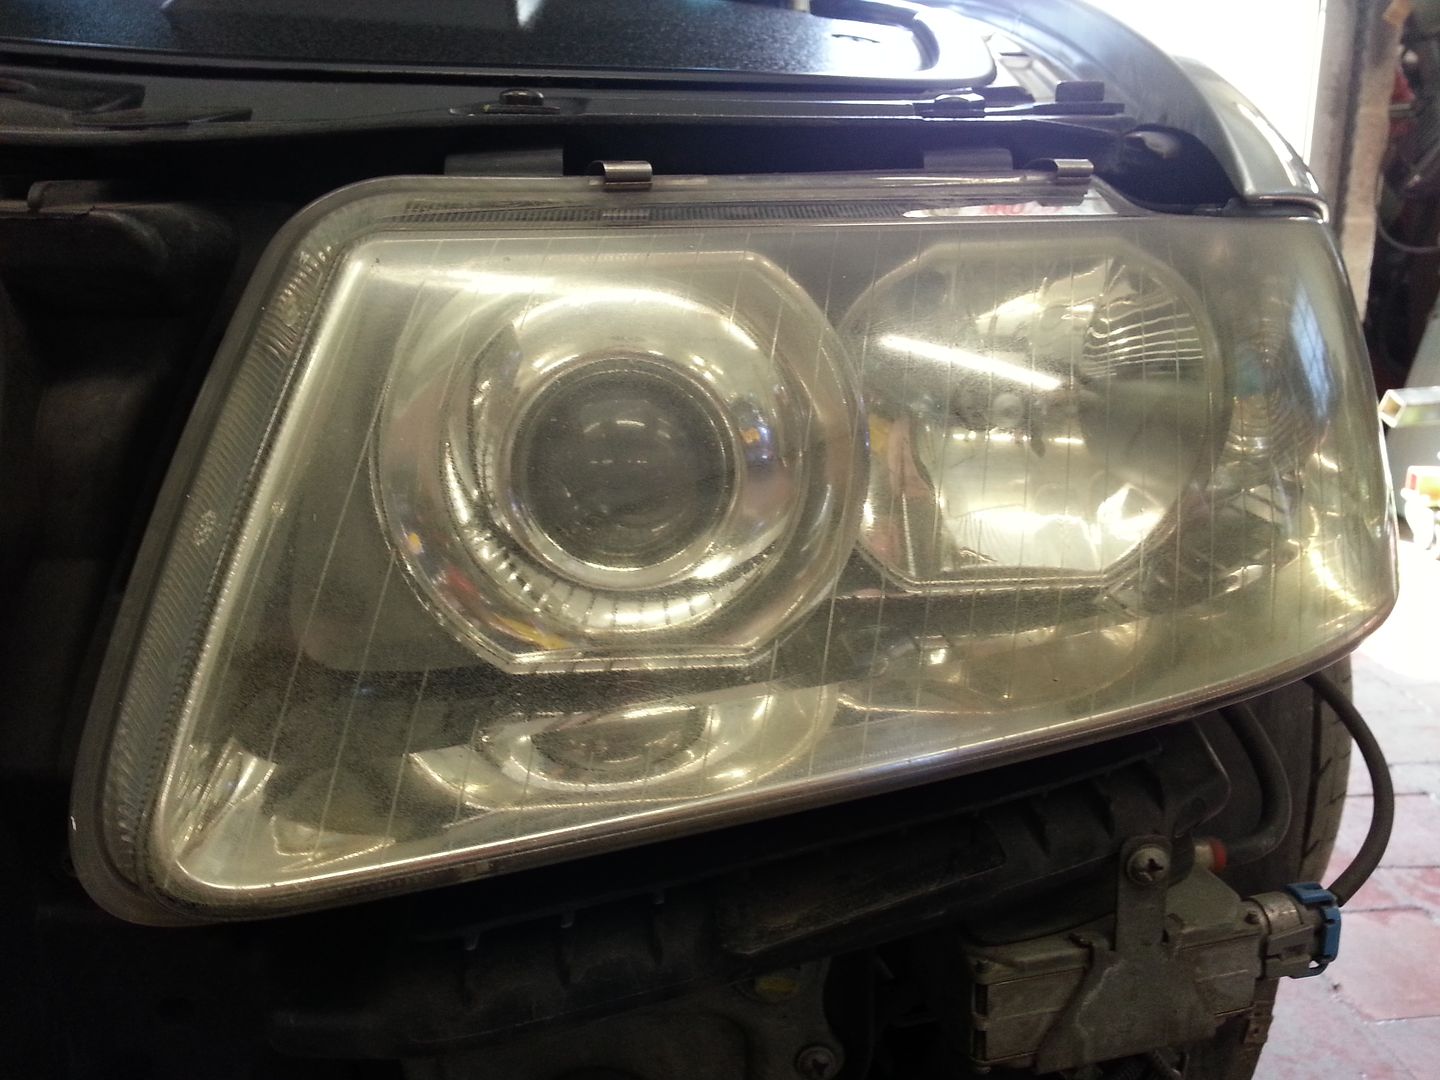
Next I polished the headlights again as they were showing signs of going a bit yellow again... this time however I have bought some Lamin-x to act as a UV shield... also had some LED sidelights from Trups to fit...
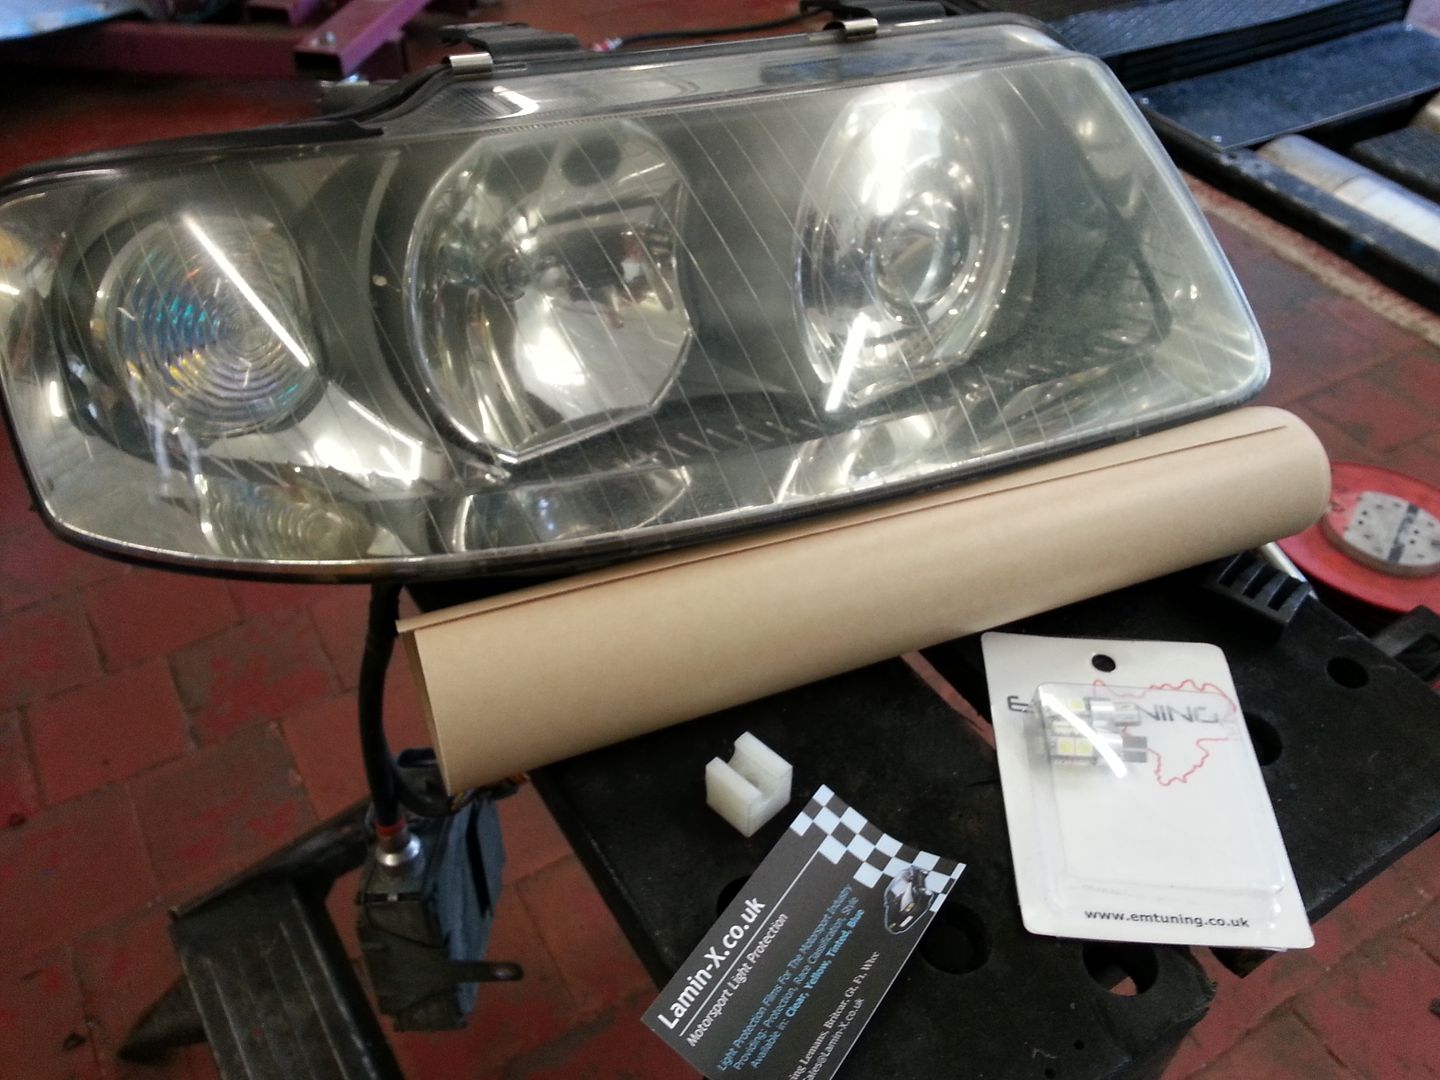
...after a couple of passes with the DA...
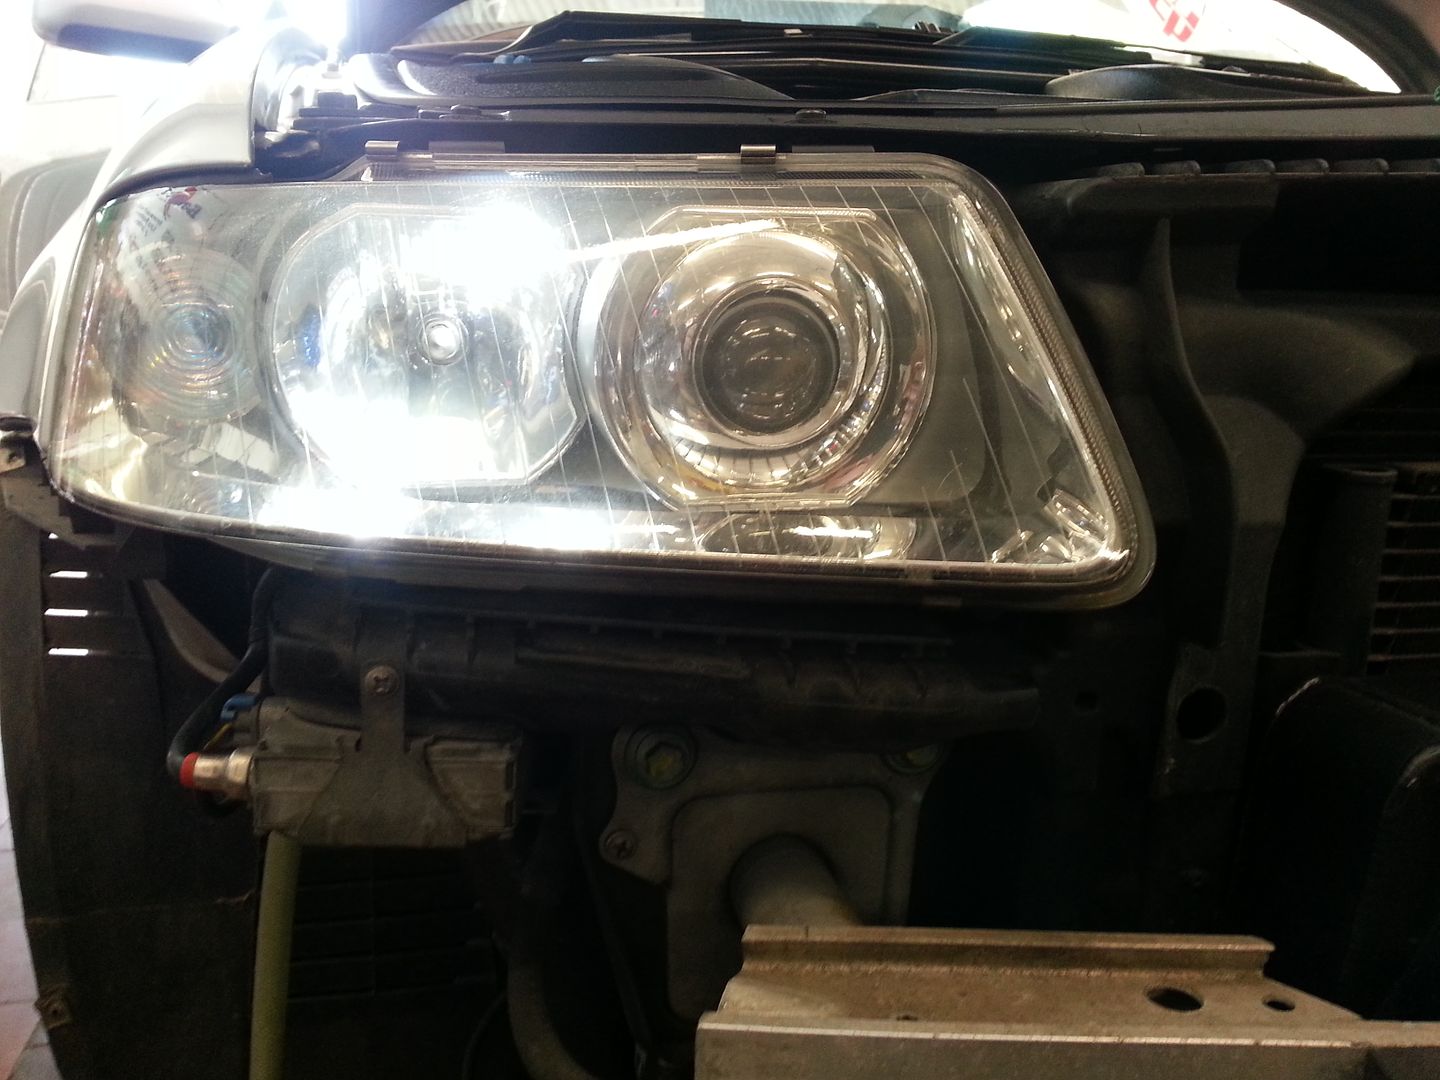
Applying the Lamin-x..
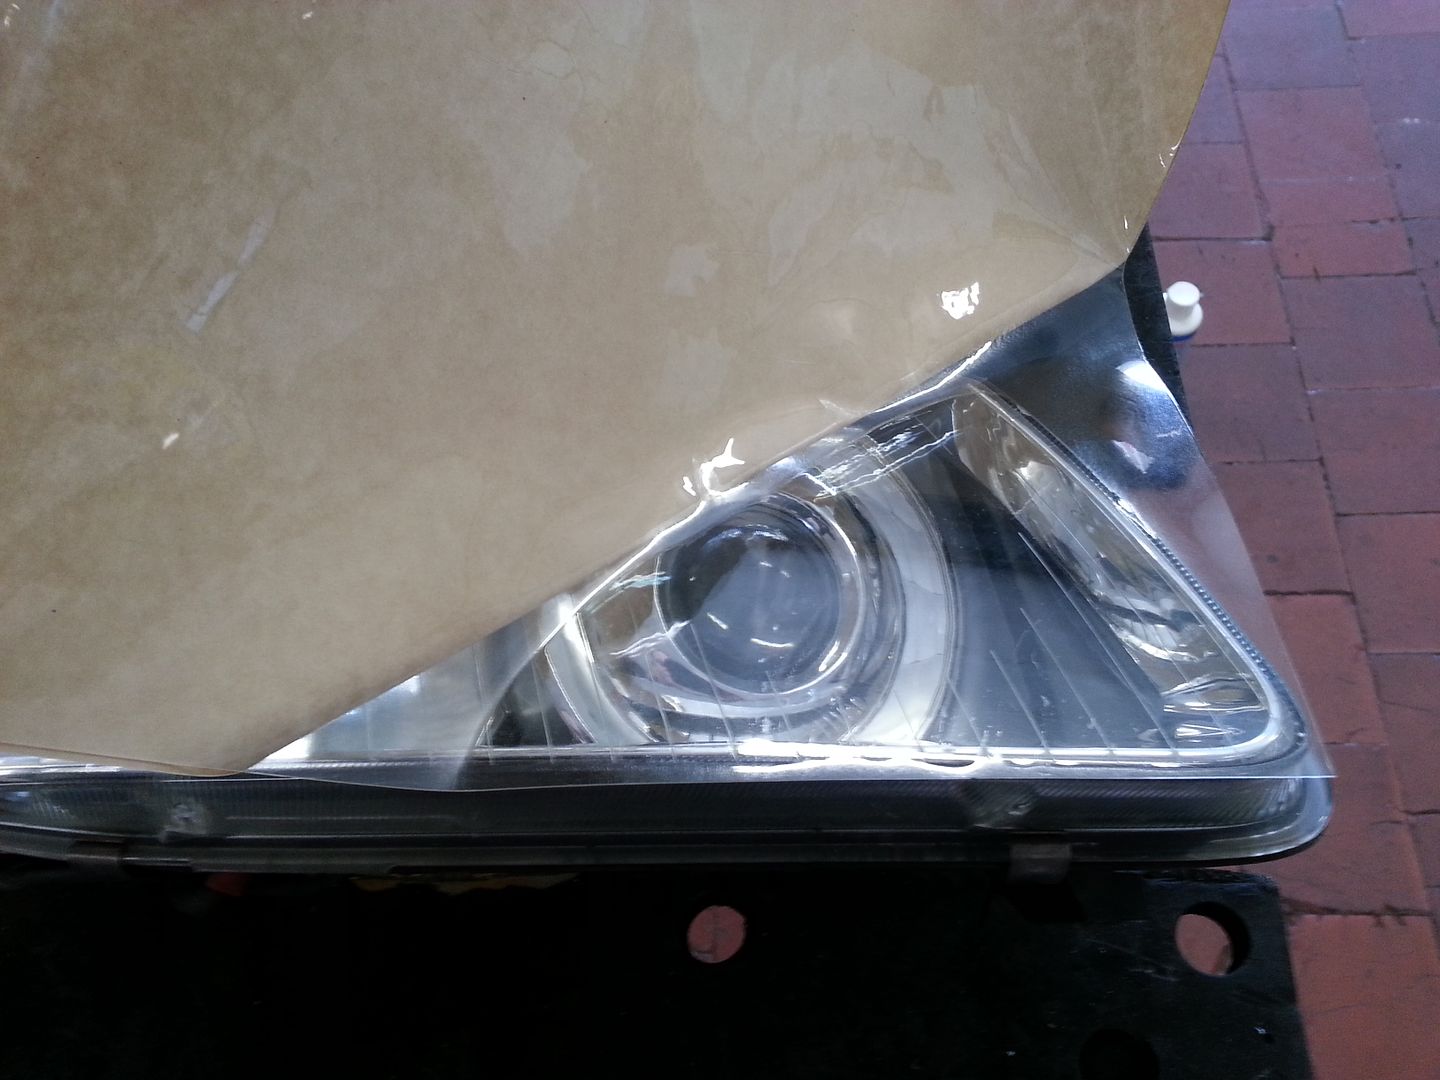
...and done ready for trimming...
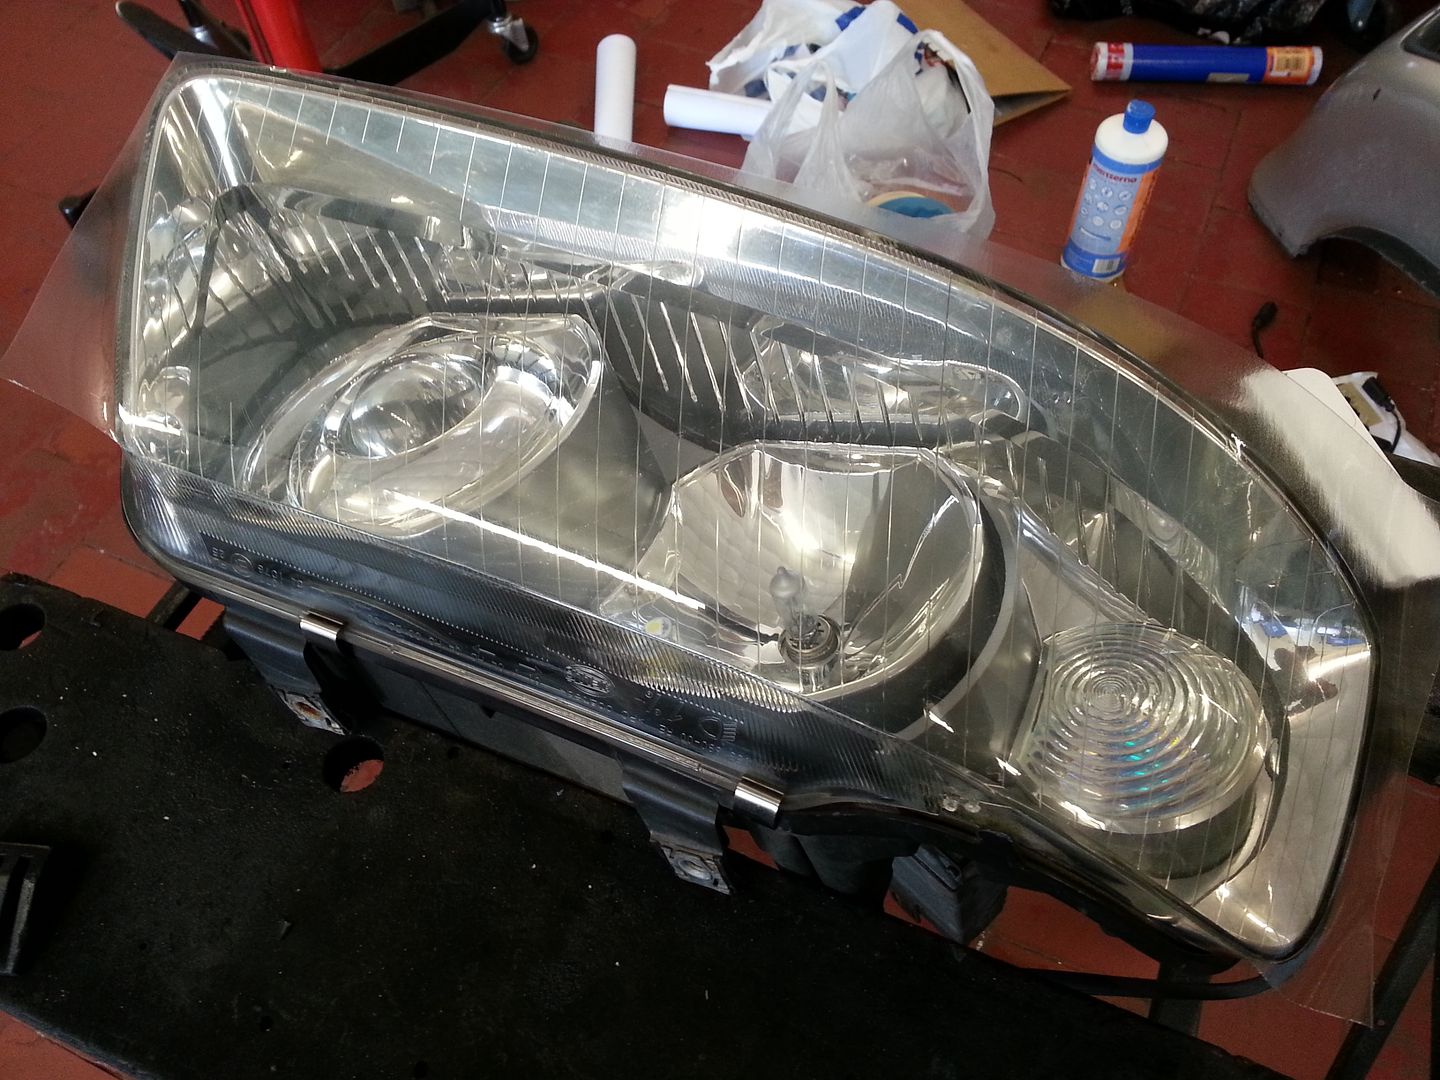
Refitted..
...and next the passenger side
LED sidelights...
...old 'blue' bulbs...

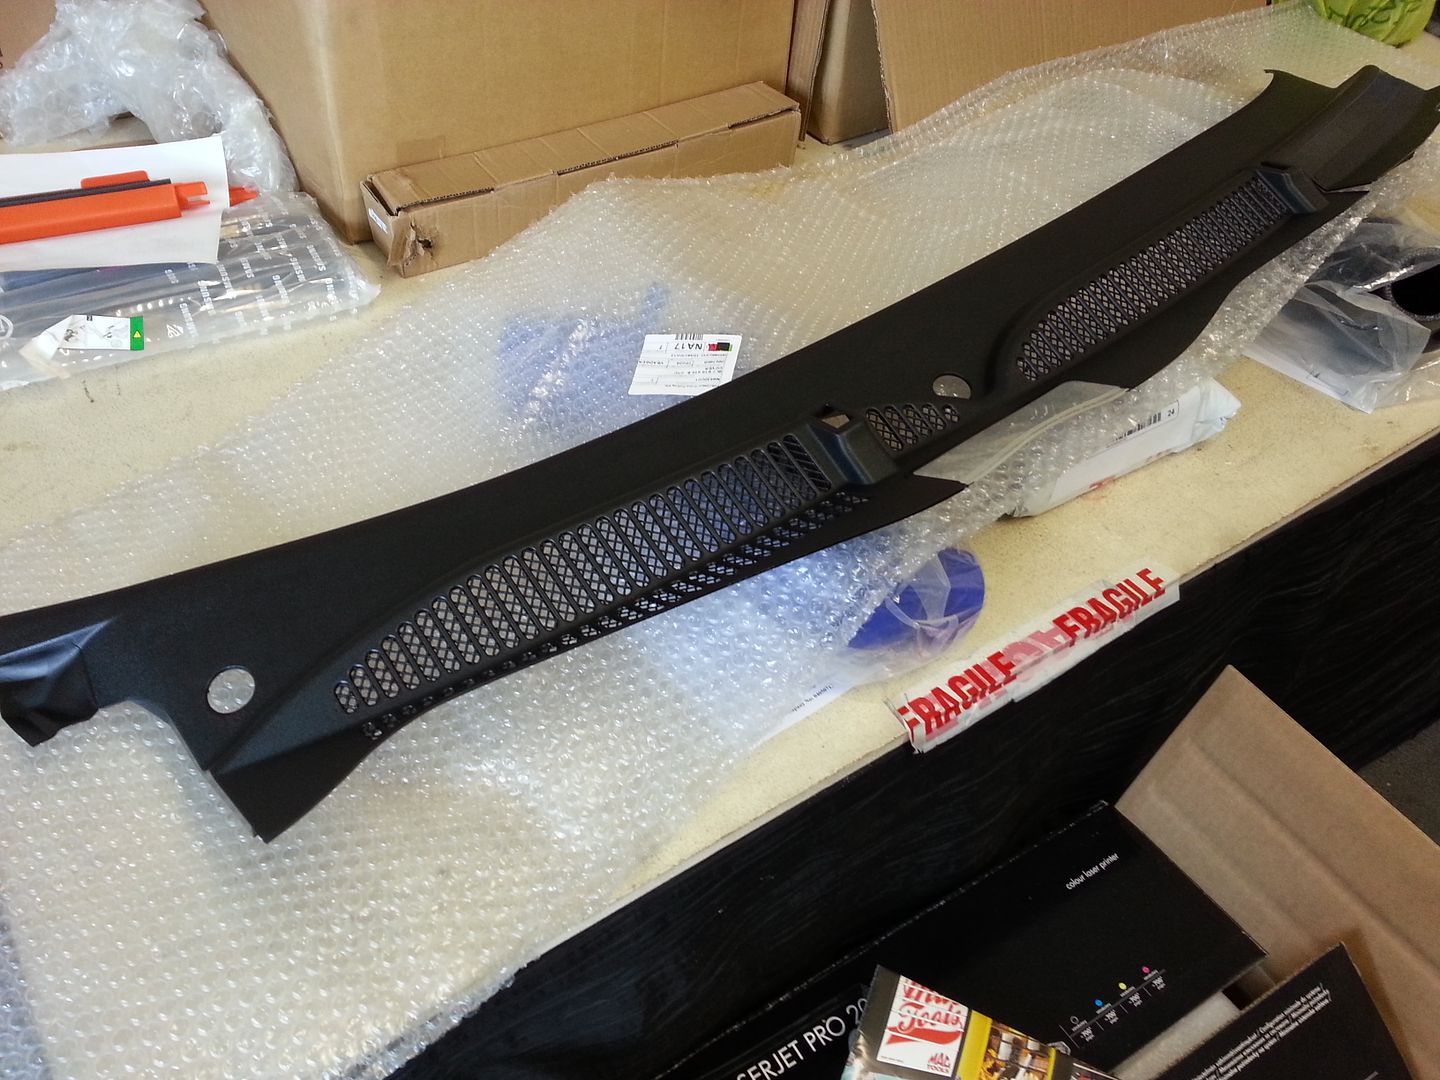
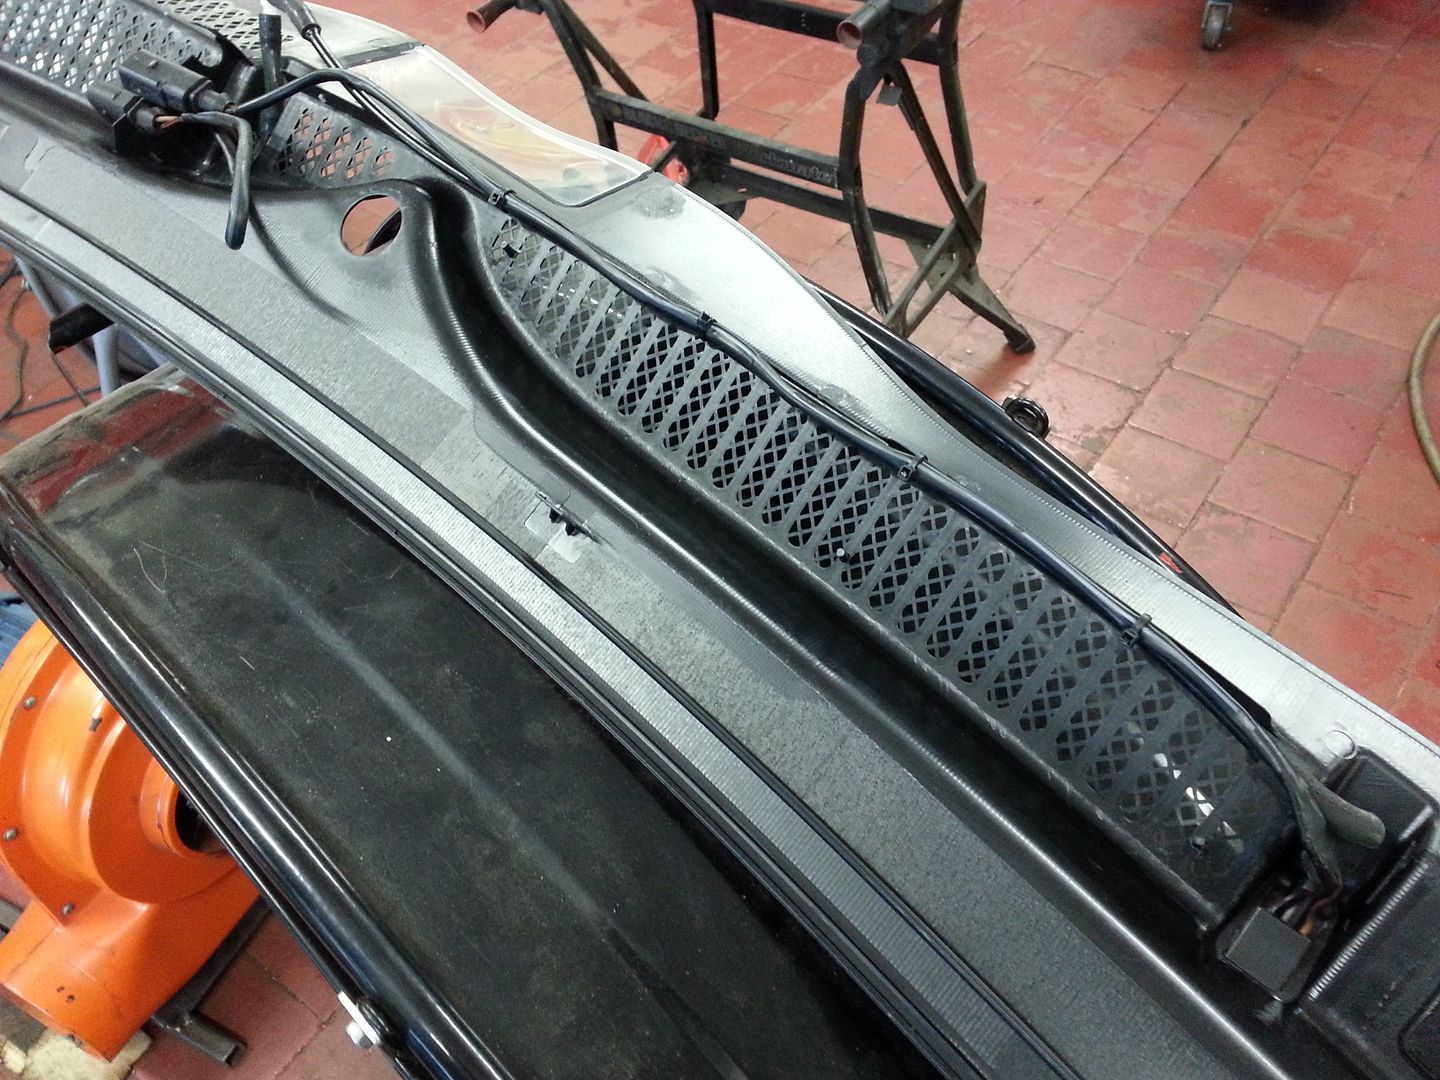
Next job... new scuttle...
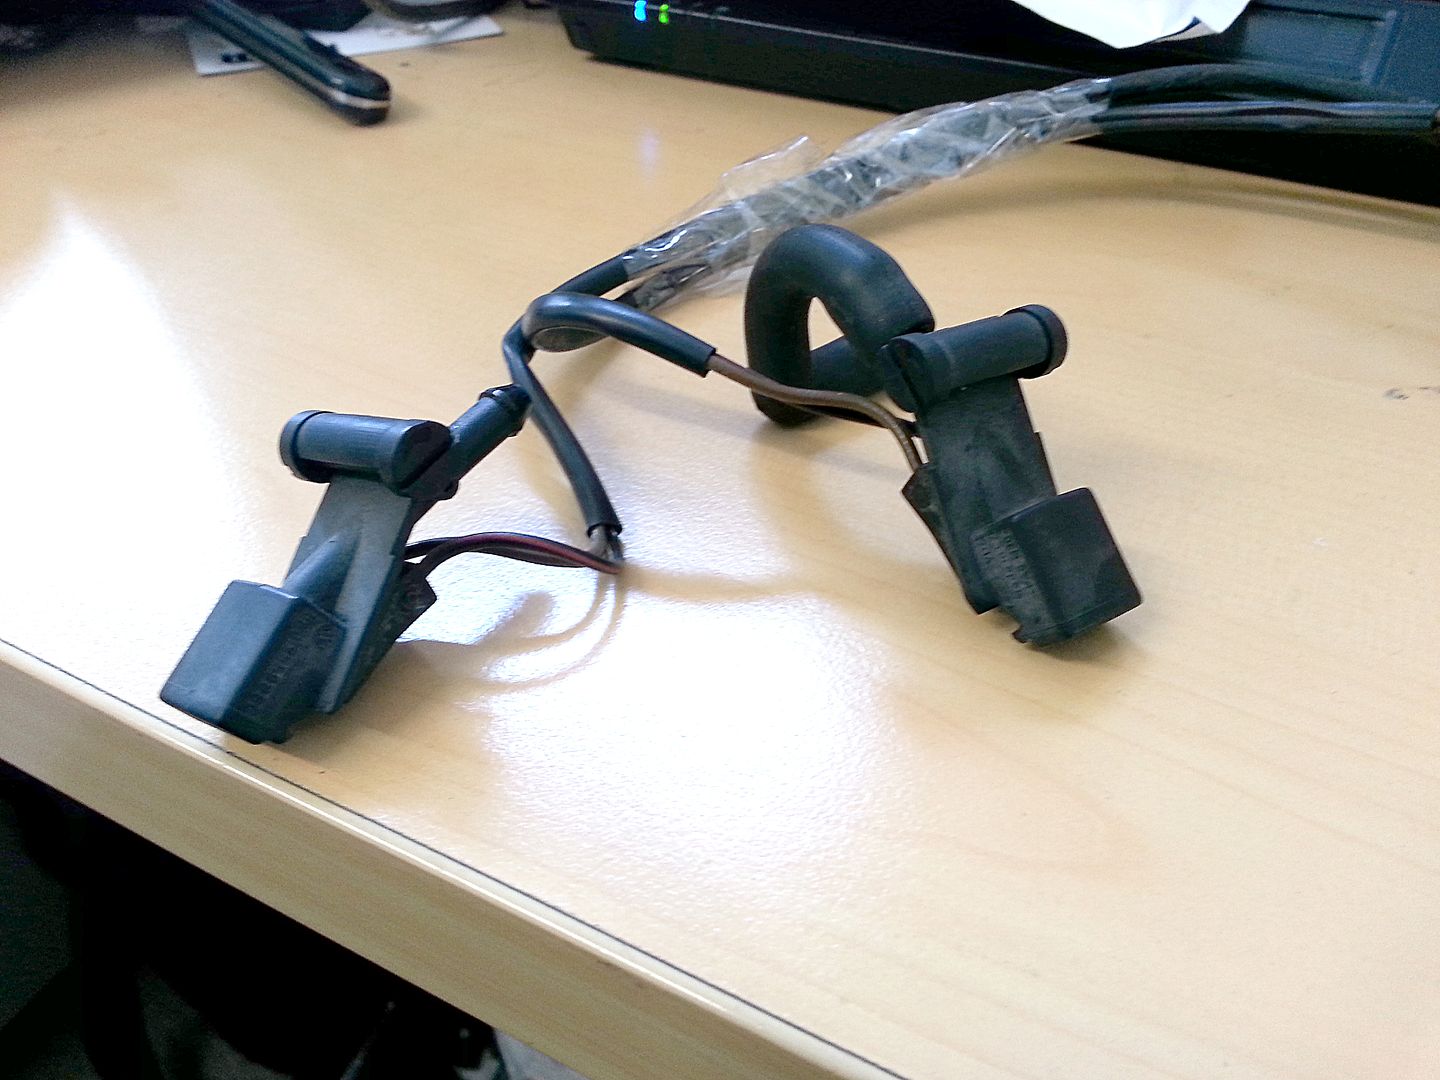
...TT fan washer jets...
TT washers require a little work to fit... hole needs widening and lengthening...
...the hose fitting is a different angle to S3 ones...
...so a hot air gun, careful heating and a 3mm drill....
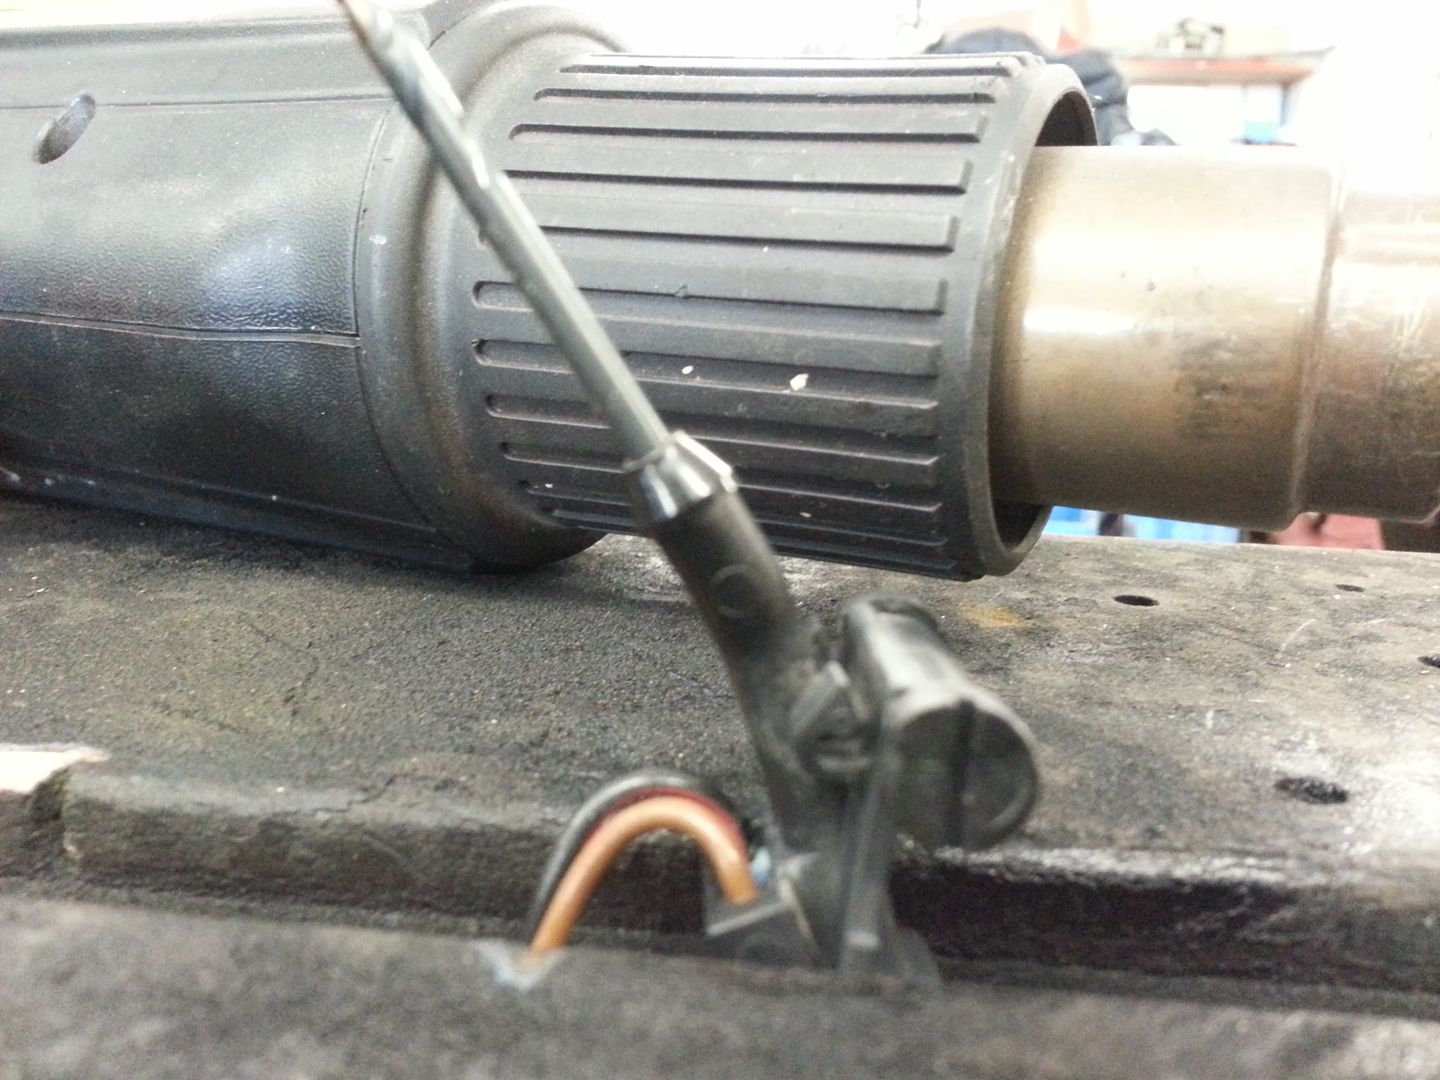
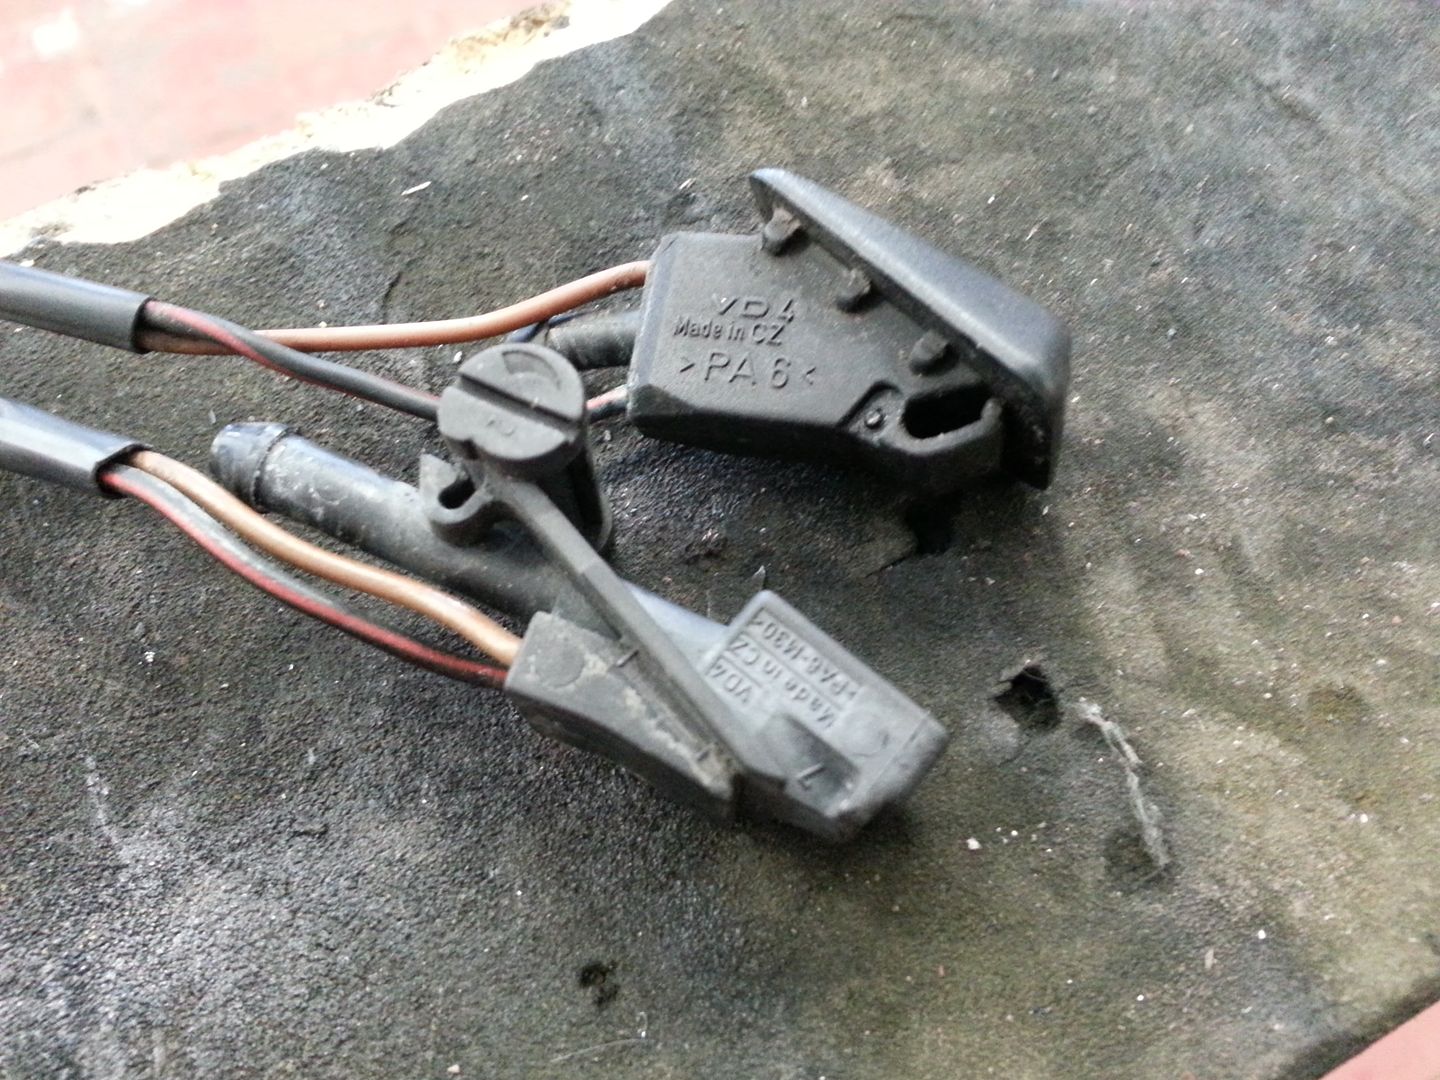
..extended the wiring on one of the jets...
Fitted it on and wow... well impressed with the way they get fluid on the screen... great upgrade... will try and get a vid of them working tomorrow...
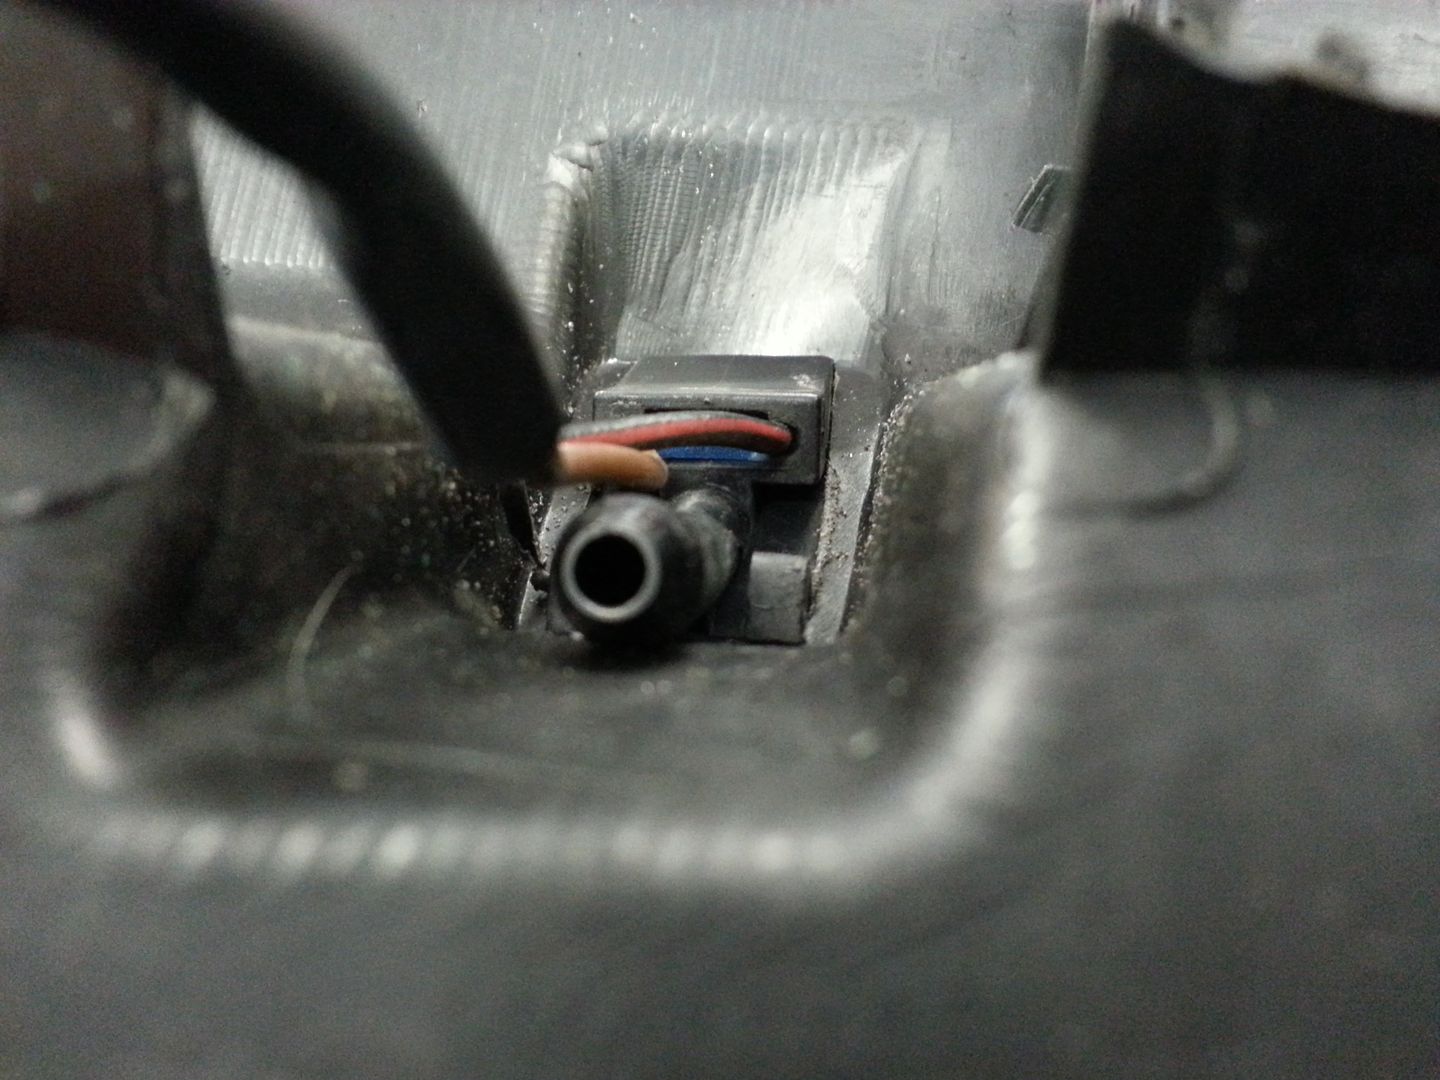
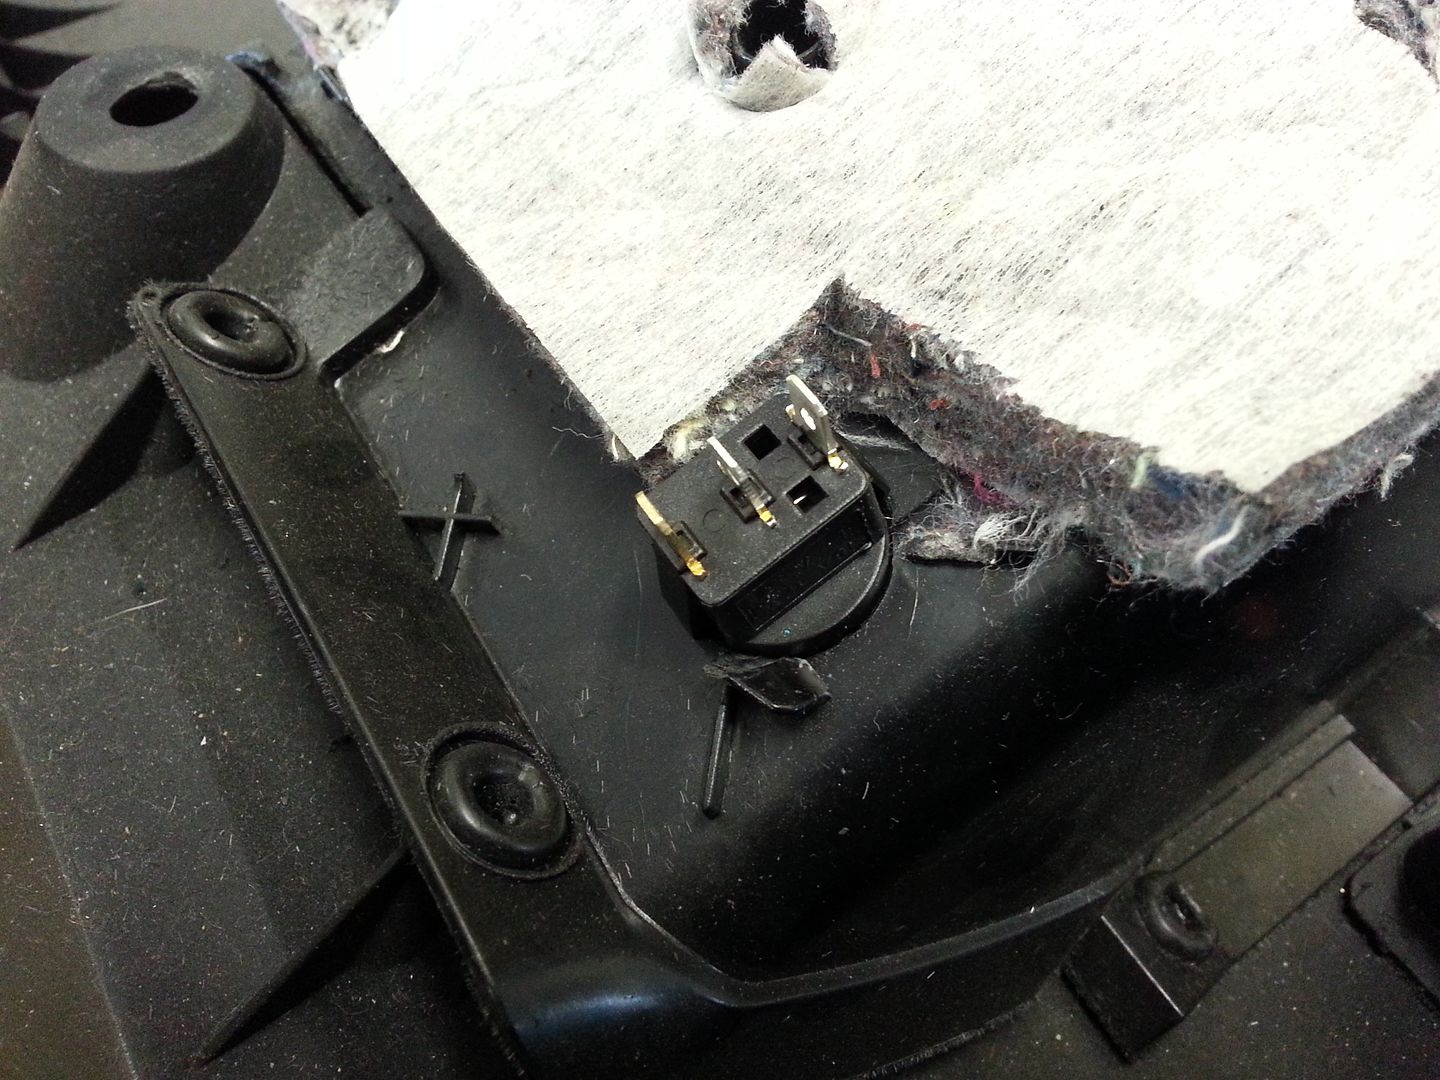
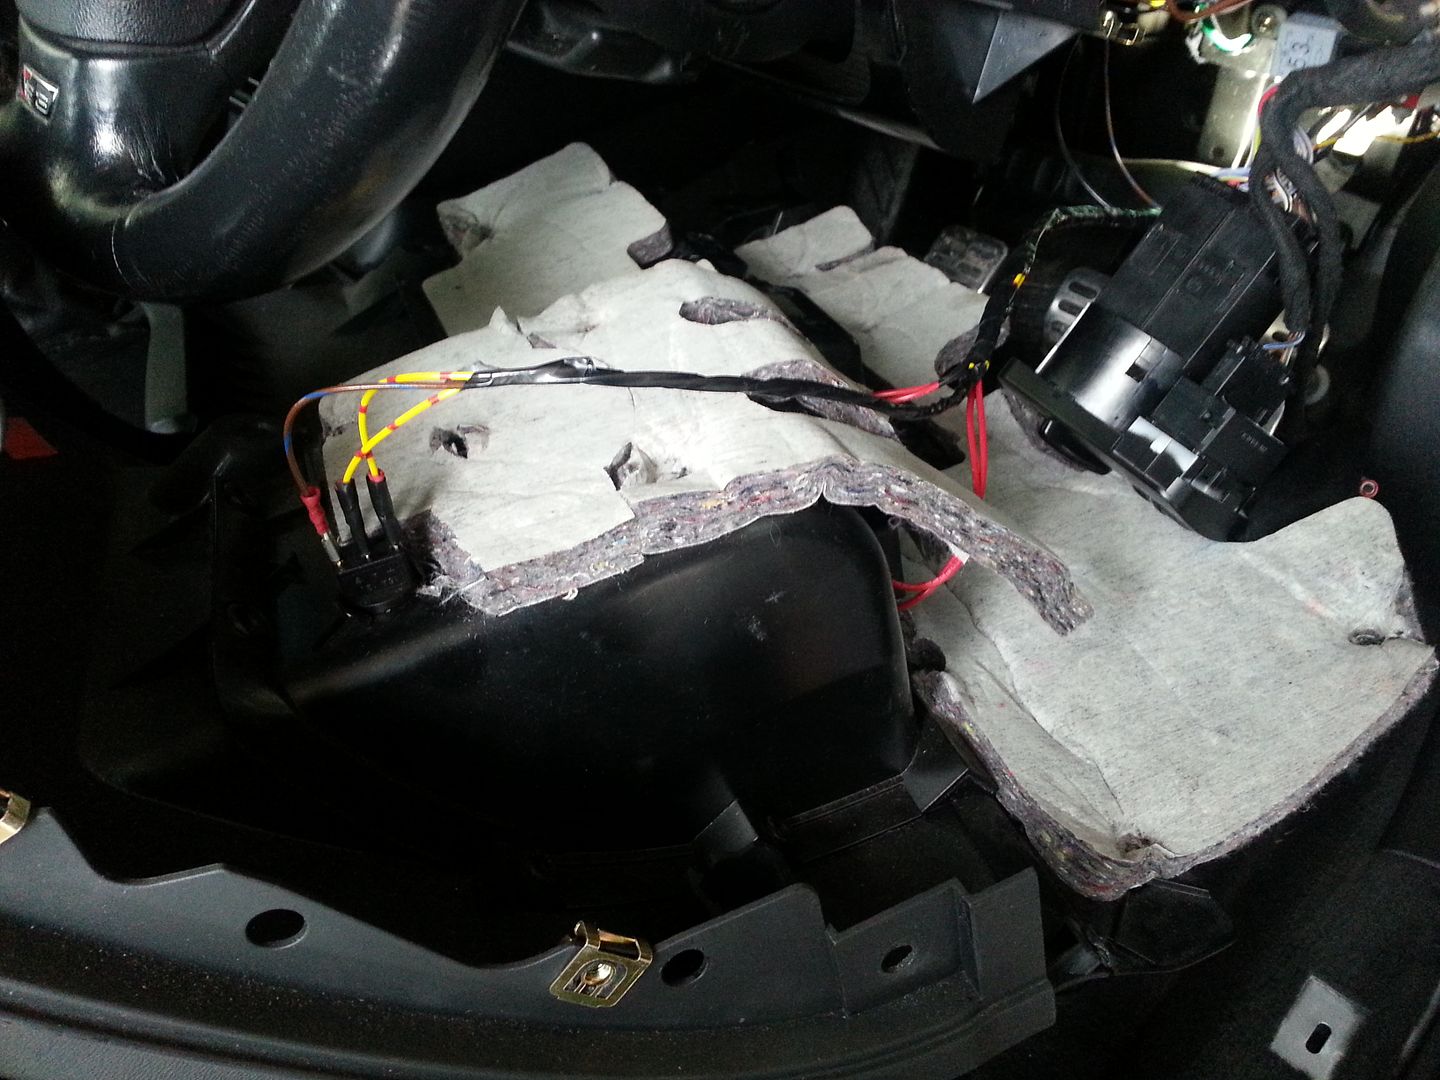
Next job was to start the wiring for the WMI pump and the inline fuel pump as I am rewiring that to run from a relay... bought a 2-way fuse holder so I could sort easy access to the fuses in case the pump one went, that way I don't need to remove half the dash to sort it... removed the lower drivers side dash panel...
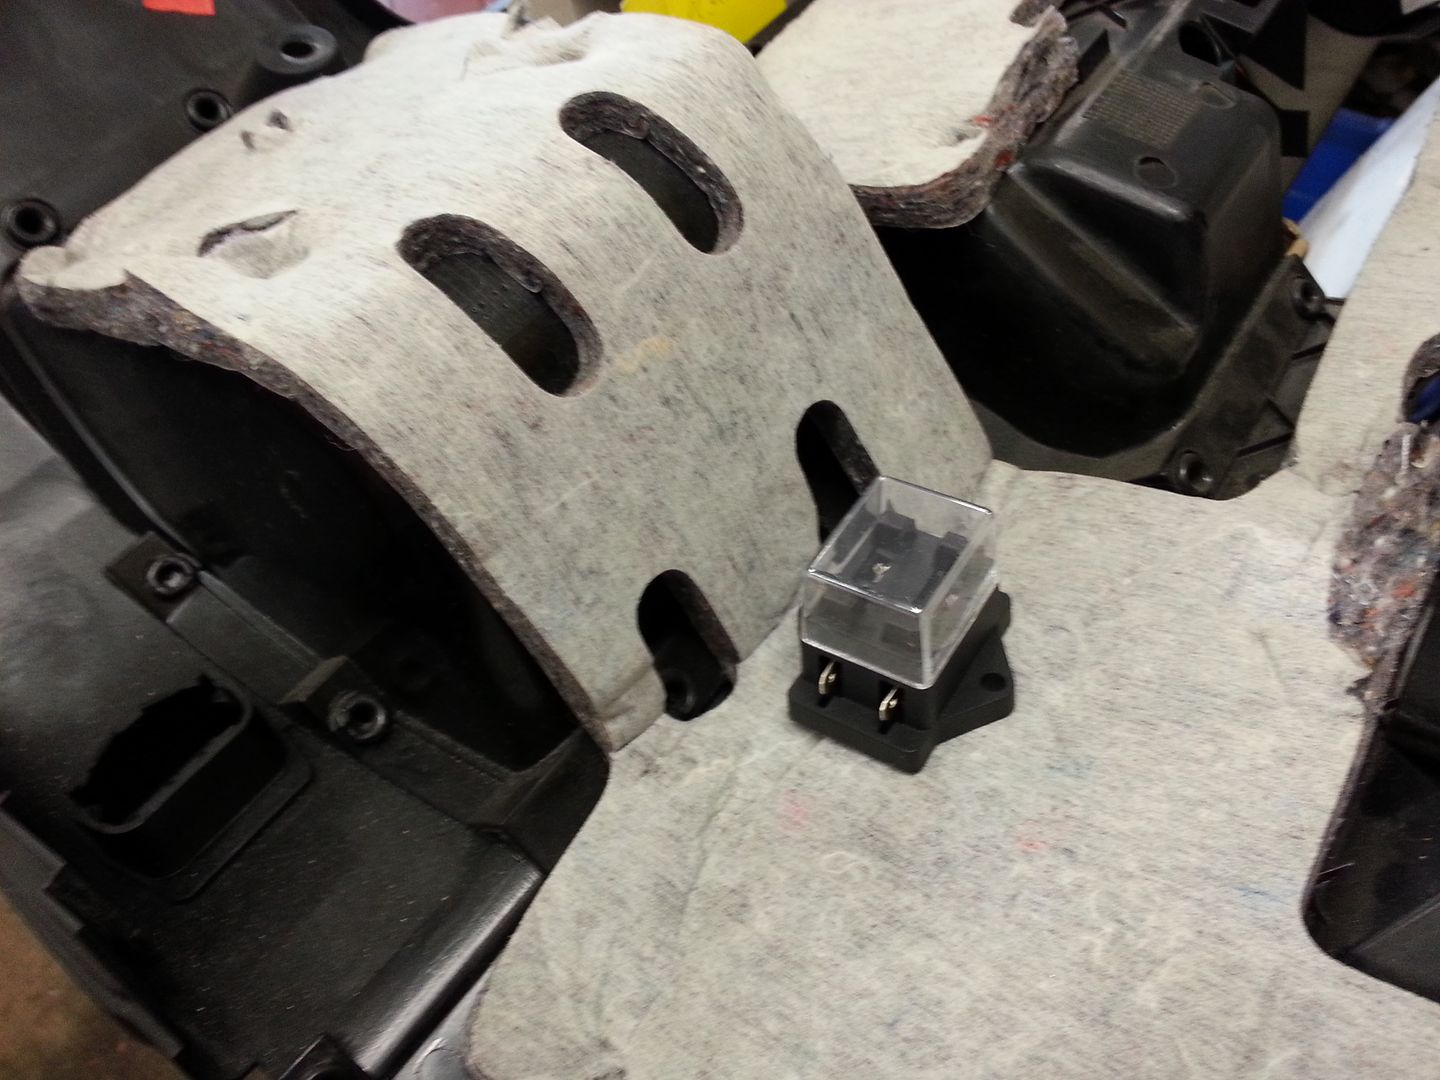
Marked up and cut a hole for the fuse box and mounted this in the back of the little cubby...
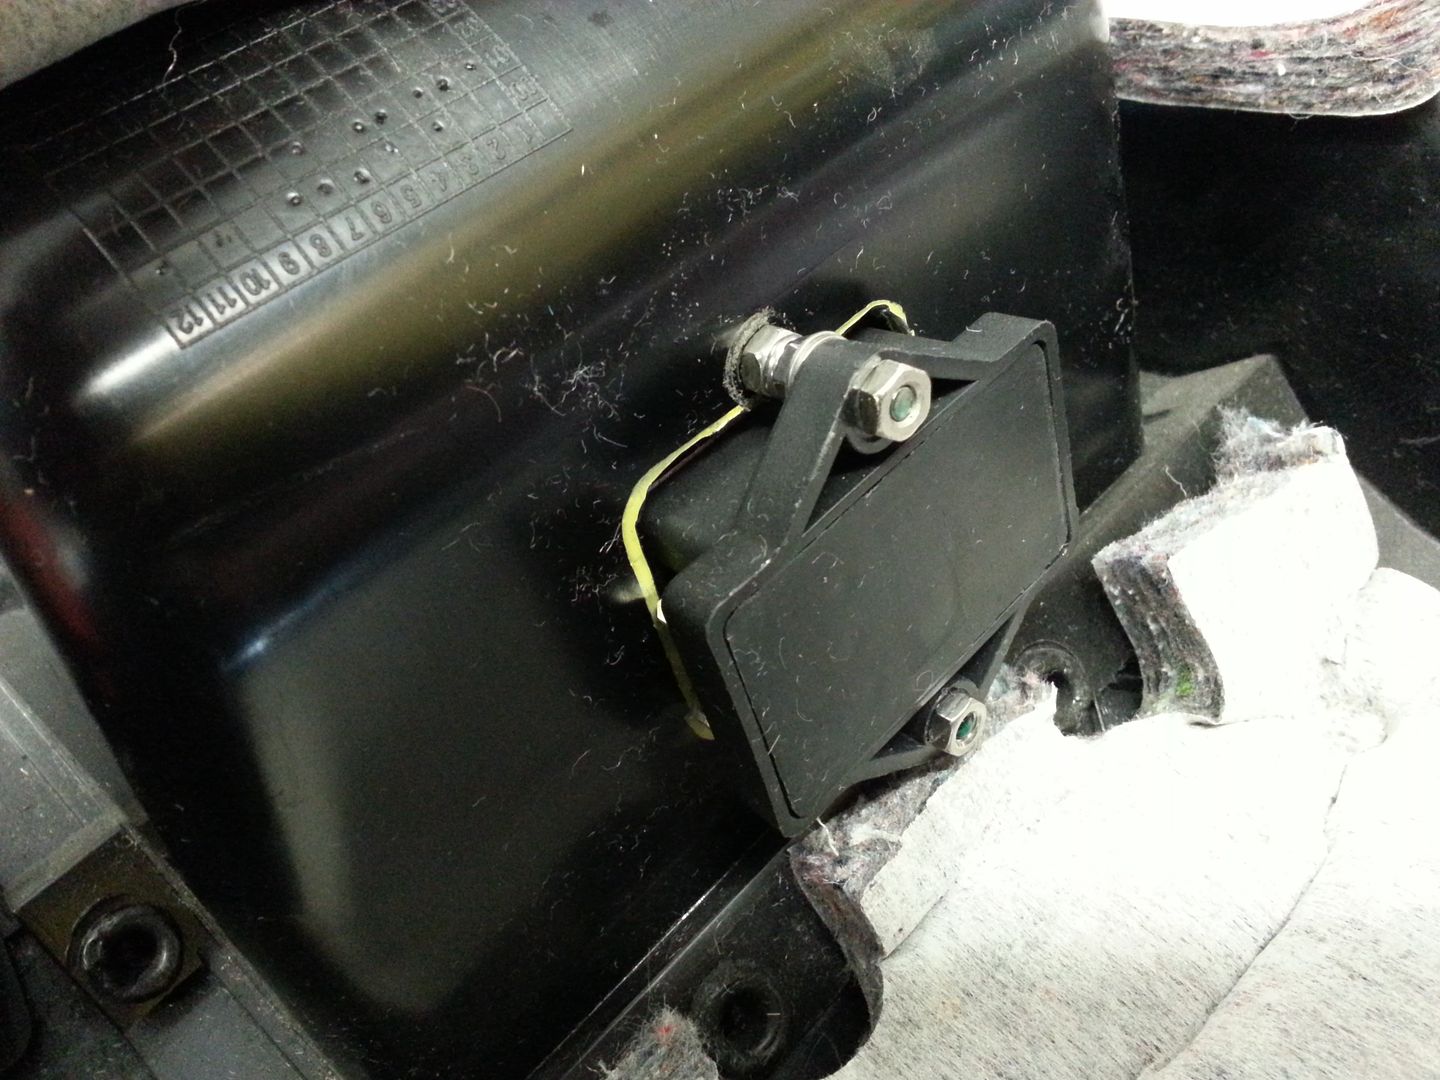
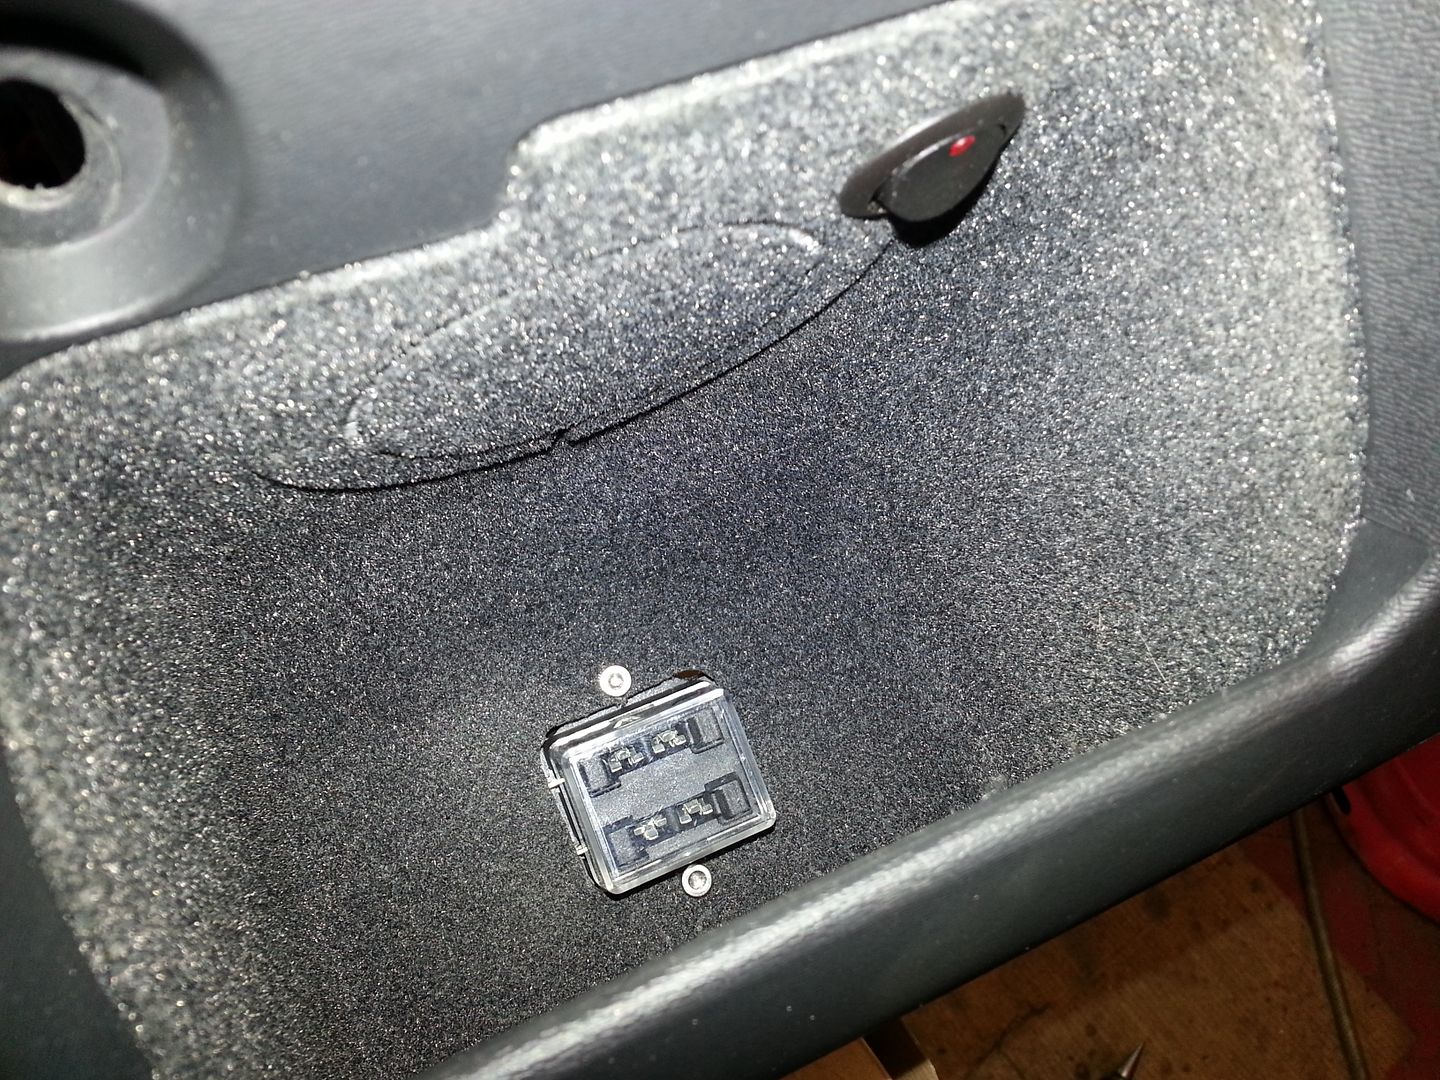
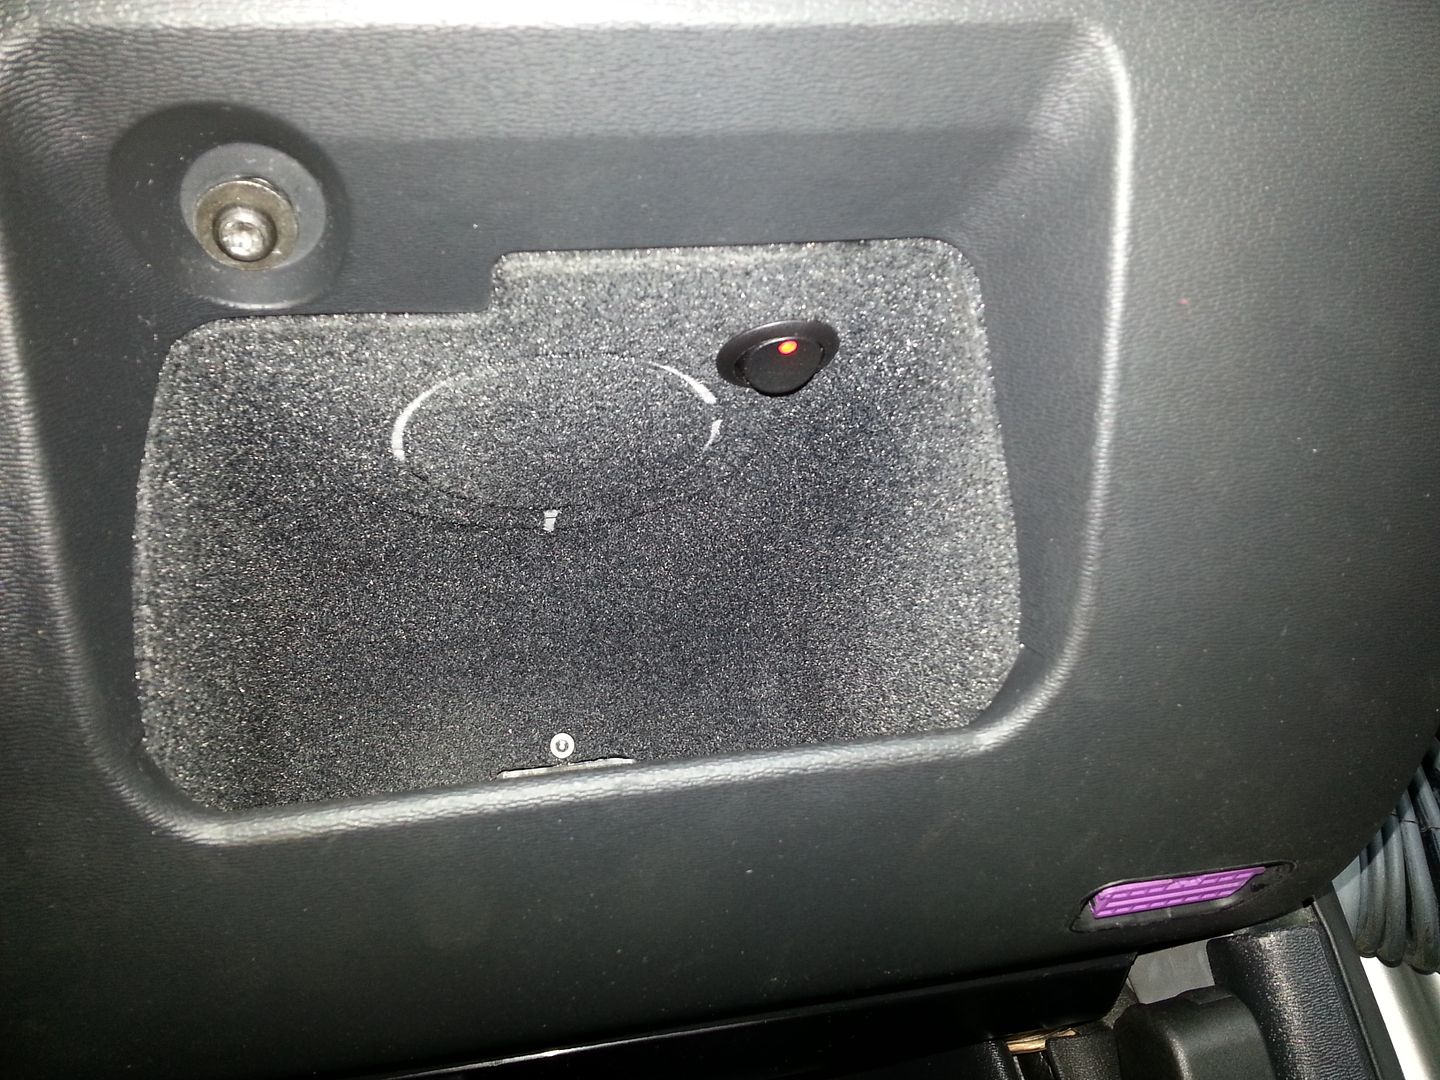
...also fitted a switch so I could 'arm' the WMI as and when I needed too...
...and the finished article...
Rest of the wiring to do next and hooking up of the pressure switch for the WMI...
<tuffty/>
First job was to replace the small dogbone bush... instructions are supplied so won't bother with the detail so pics should do
There was an increase in vibration on idle but this has settled now... with VT road mounts, a yellow bush and now this bush there is of course going to be increased vibrations and engine noise... its the price of power or at least effective use of power... but when cruising there is nothing really noticeable and thats fine with me...
Next job was to run the hose for the WMI... interior apart... again!...
...drilled a smaller hole next to the one that the opposite side of the pollen filter...
...getting busy in the cable trunking...
Not fitted the pump yet as I need to run the wires and work out which side of the battery to fit it... that will come later as will fitting the nozzle which I have decided will go initially in the FMIC outlet... I am looking at using a dual nozzle system as have seen one of these work rather well... I may even look at staging delivery too...
Next I polished the headlights again as they were showing signs of going a bit yellow again... this time however I have bought some Lamin-x to act as a UV shield... also had some LED sidelights from Trups to fit...
...after a couple of passes with the DA...
Applying the Lamin-x..
...and done ready for trimming...
Refitted..
...and next the passenger side
LED sidelights...
...old 'blue' bulbs...
Next job... new scuttle...
...TT fan washer jets...
TT washers require a little work to fit... hole needs widening and lengthening...
...the hose fitting is a different angle to S3 ones...
...so a hot air gun, careful heating and a 3mm drill....
..extended the wiring on one of the jets...
Fitted it on and wow... well impressed with the way they get fluid on the screen... great upgrade... will try and get a vid of them working tomorrow...
Next job was to start the wiring for the WMI pump and the inline fuel pump as I am rewiring that to run from a relay... bought a 2-way fuse holder so I could sort easy access to the fuses in case the pump one went, that way I don't need to remove half the dash to sort it... removed the lower drivers side dash panel...
Marked up and cut a hole for the fuse box and mounted this in the back of the little cubby...
...also fitted a switch so I could 'arm' the WMI as and when I needed too...
...and the finished article...
Rest of the wiring to do next and hooking up of the pressure switch for the WMI...
<tuffty/>
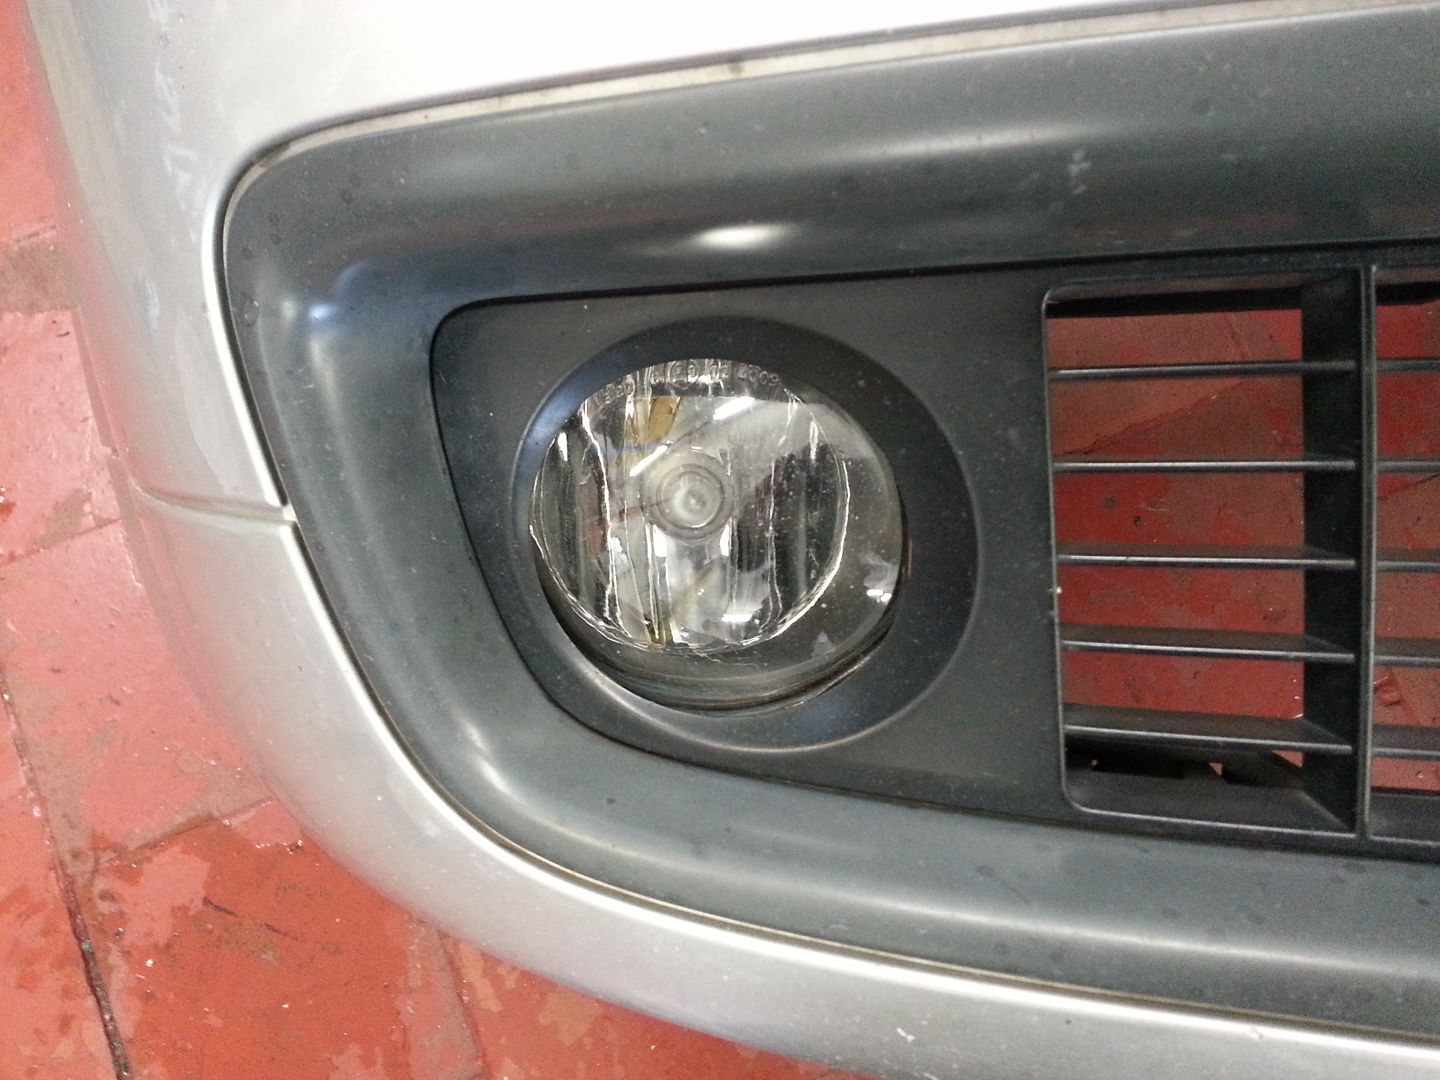
After the success with the headlights I had a go at the foglights too... I have read up on some techniques for this as they are glass but I don't have a coarse enough cutting compound to give it a go at the moment so decided just to do a few passes with the coarsest compound I had and while still showing signs of pitting they were a lot clearer so applied a little lamin-x over them too...
Before...

...after...
Found a spare few hours to get the wiring started too.... wired up the inline fuel pump to a relay and wired up the WMI control wiring ready to fit the pump and tank...
Useful wiring posts.... yellow is ignition live but this cuts on turning the engine over so no use for the fuel pump... reds are permanent lives...
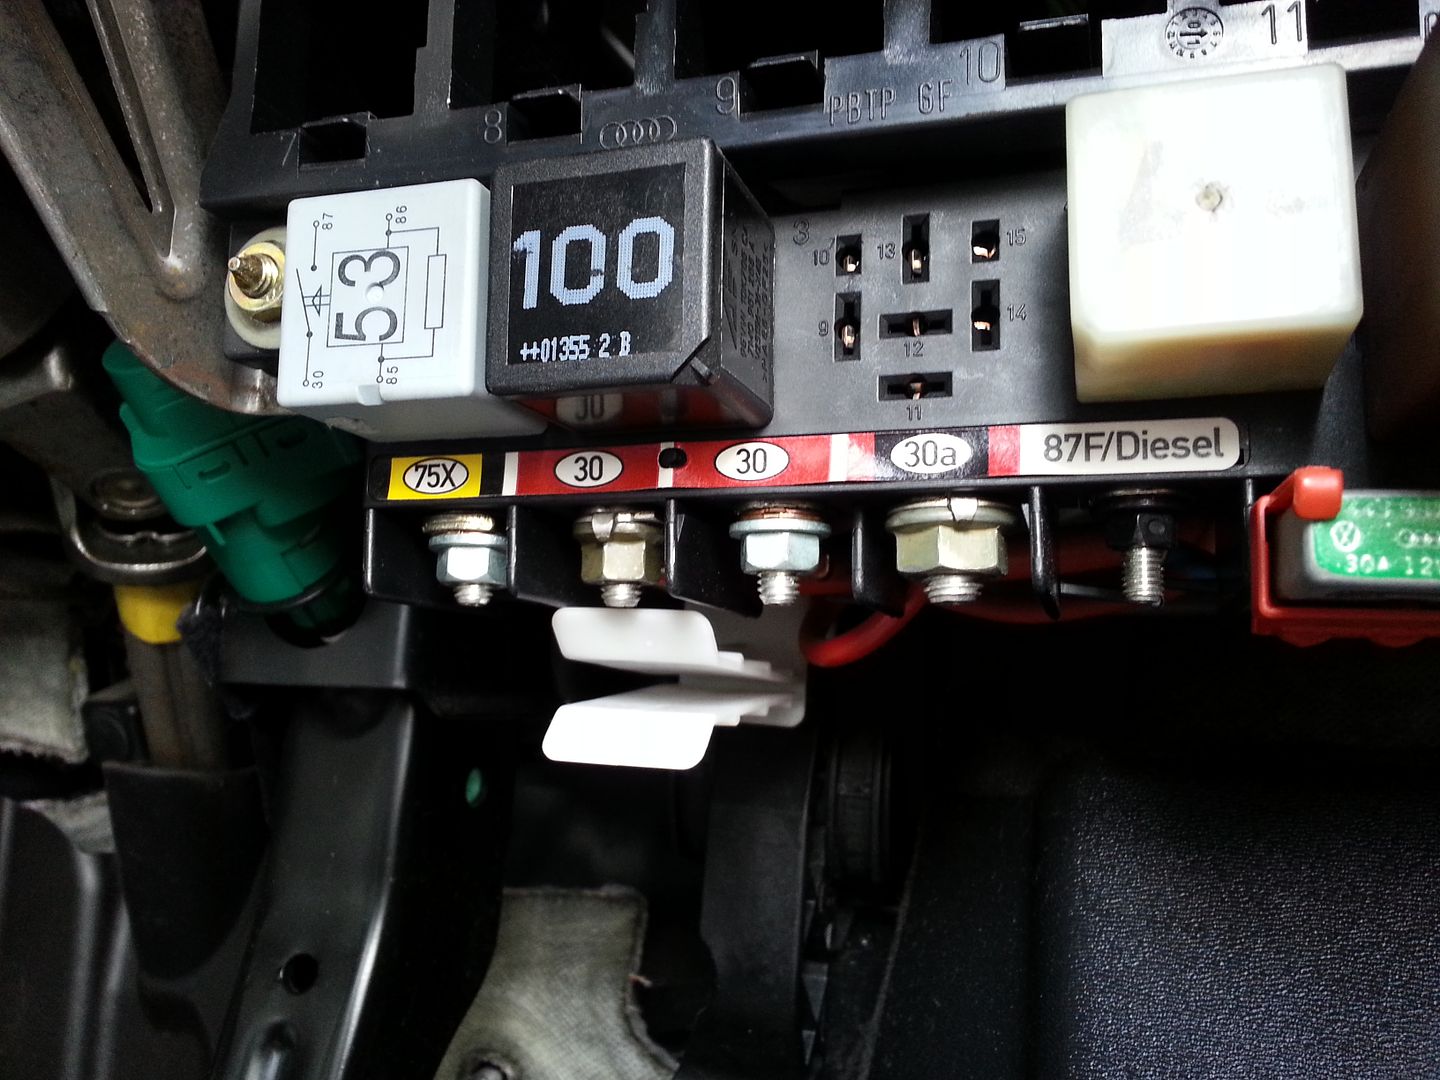
For the pump I decided to use the fused side of the intank fuel pump as a trigger for the relay...
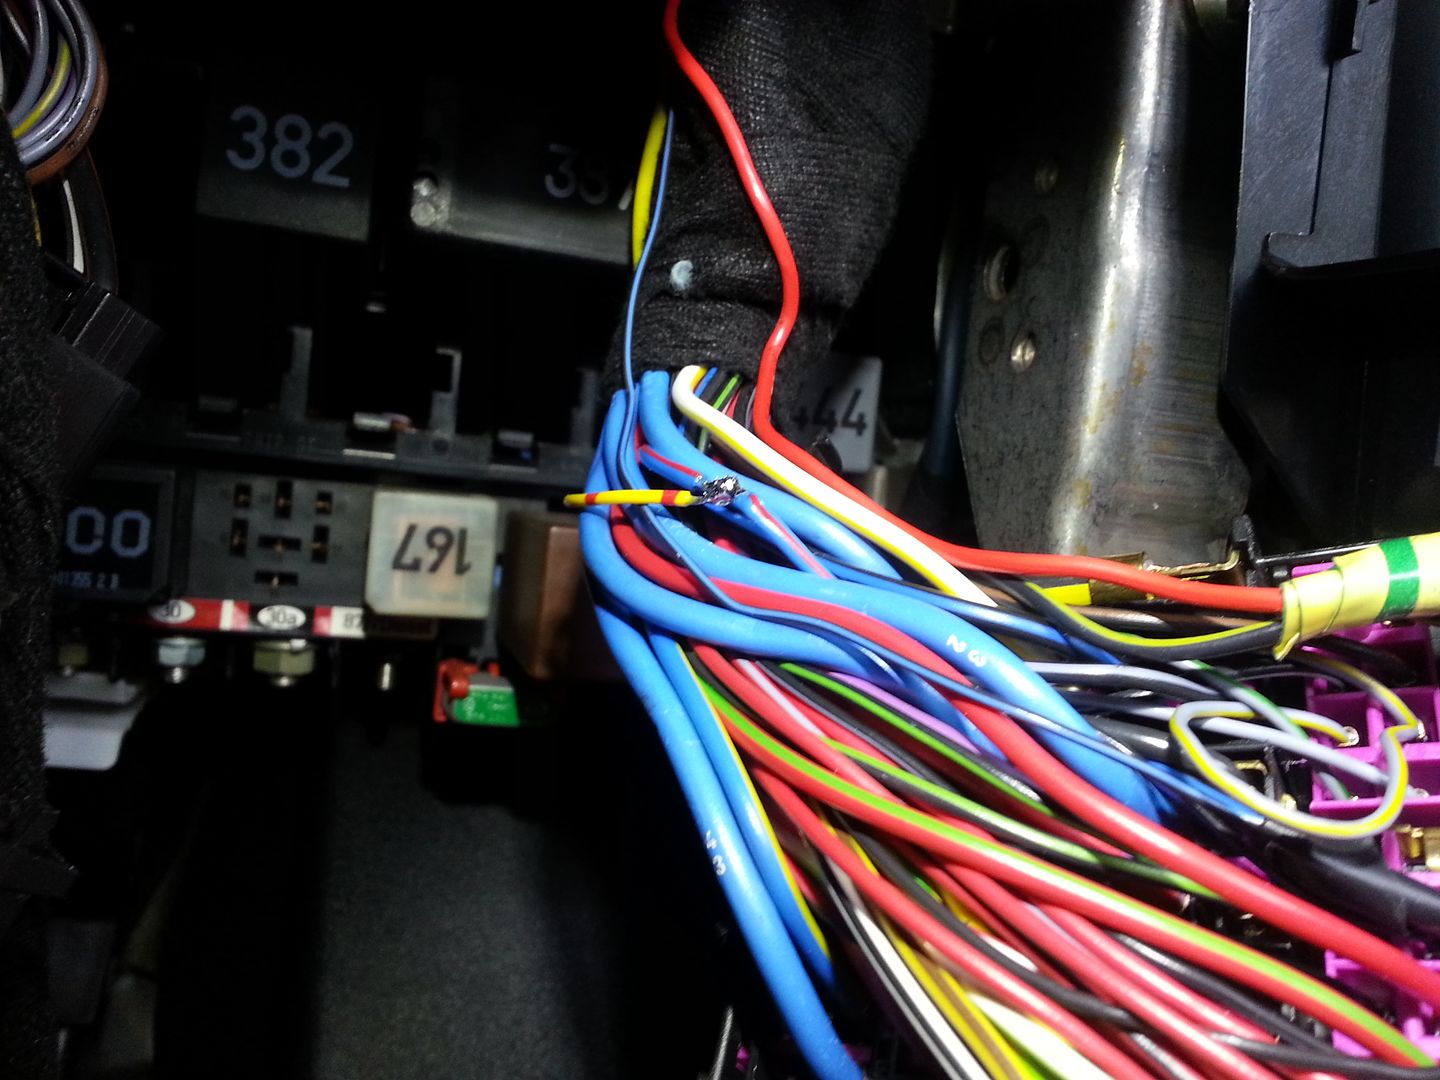
Wired the relays in, used the yellow ignition live post for the WMI as this doesn't matter if it looses power during engine start and used the permenant post next to it as this had the thickest red cable going to it... this supplies the +12v for both the inline fuel pump and the WMI pump...
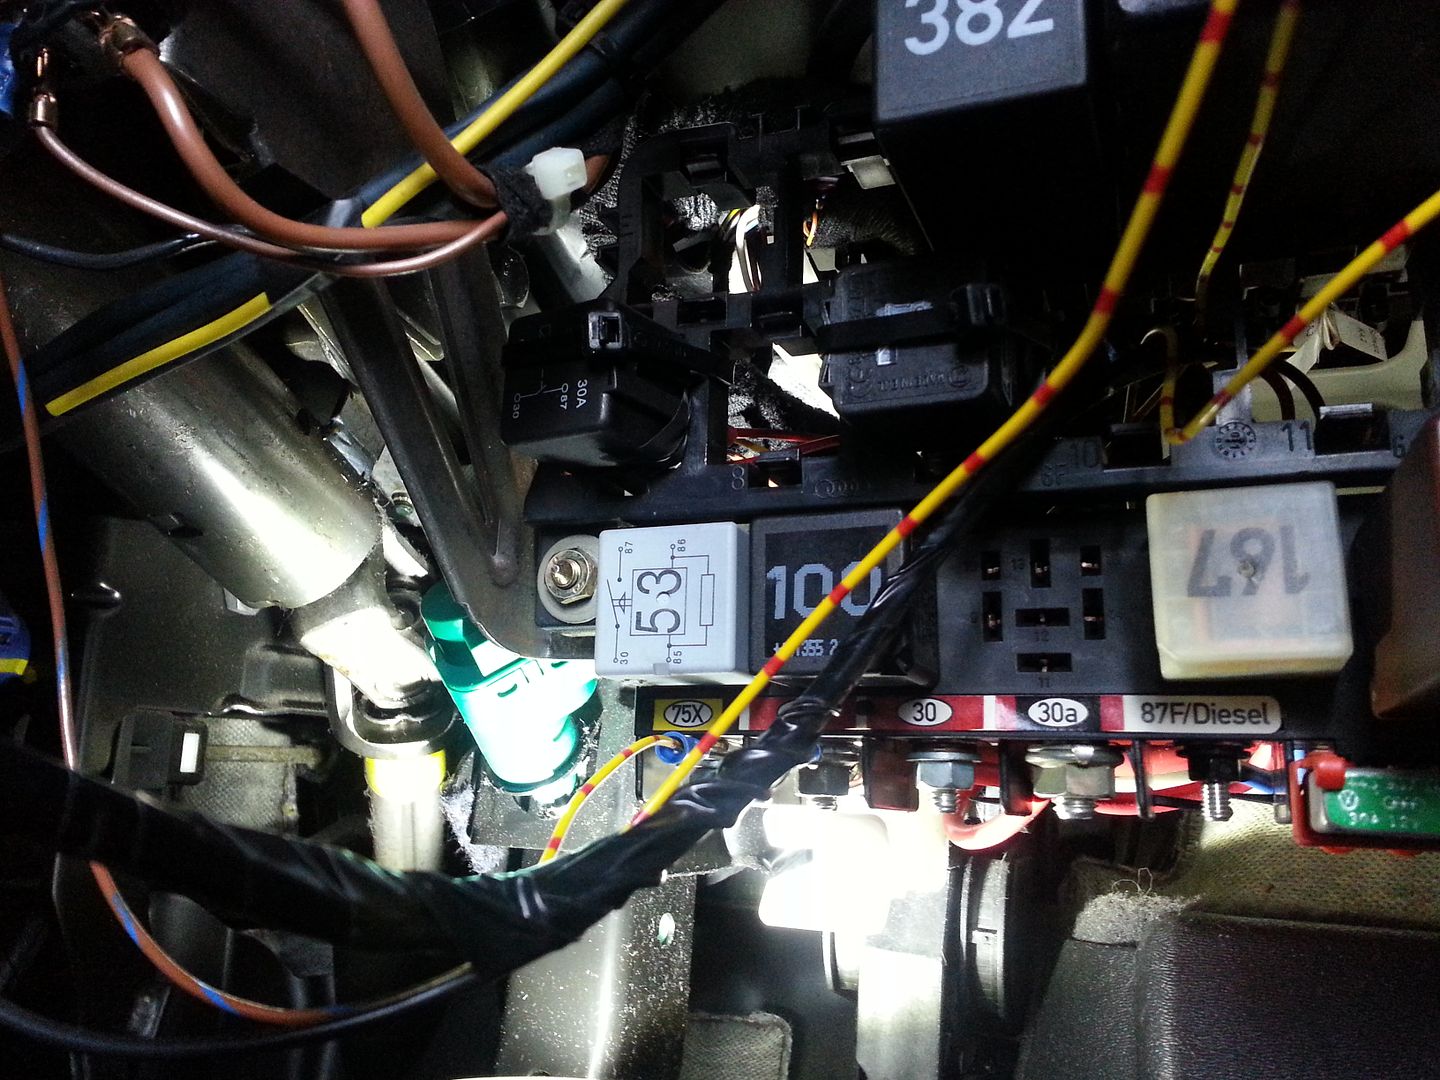
Loomed up to go to the fuse box I had previously fitted and wired up the switch so I could switch WMI on and off as needed...
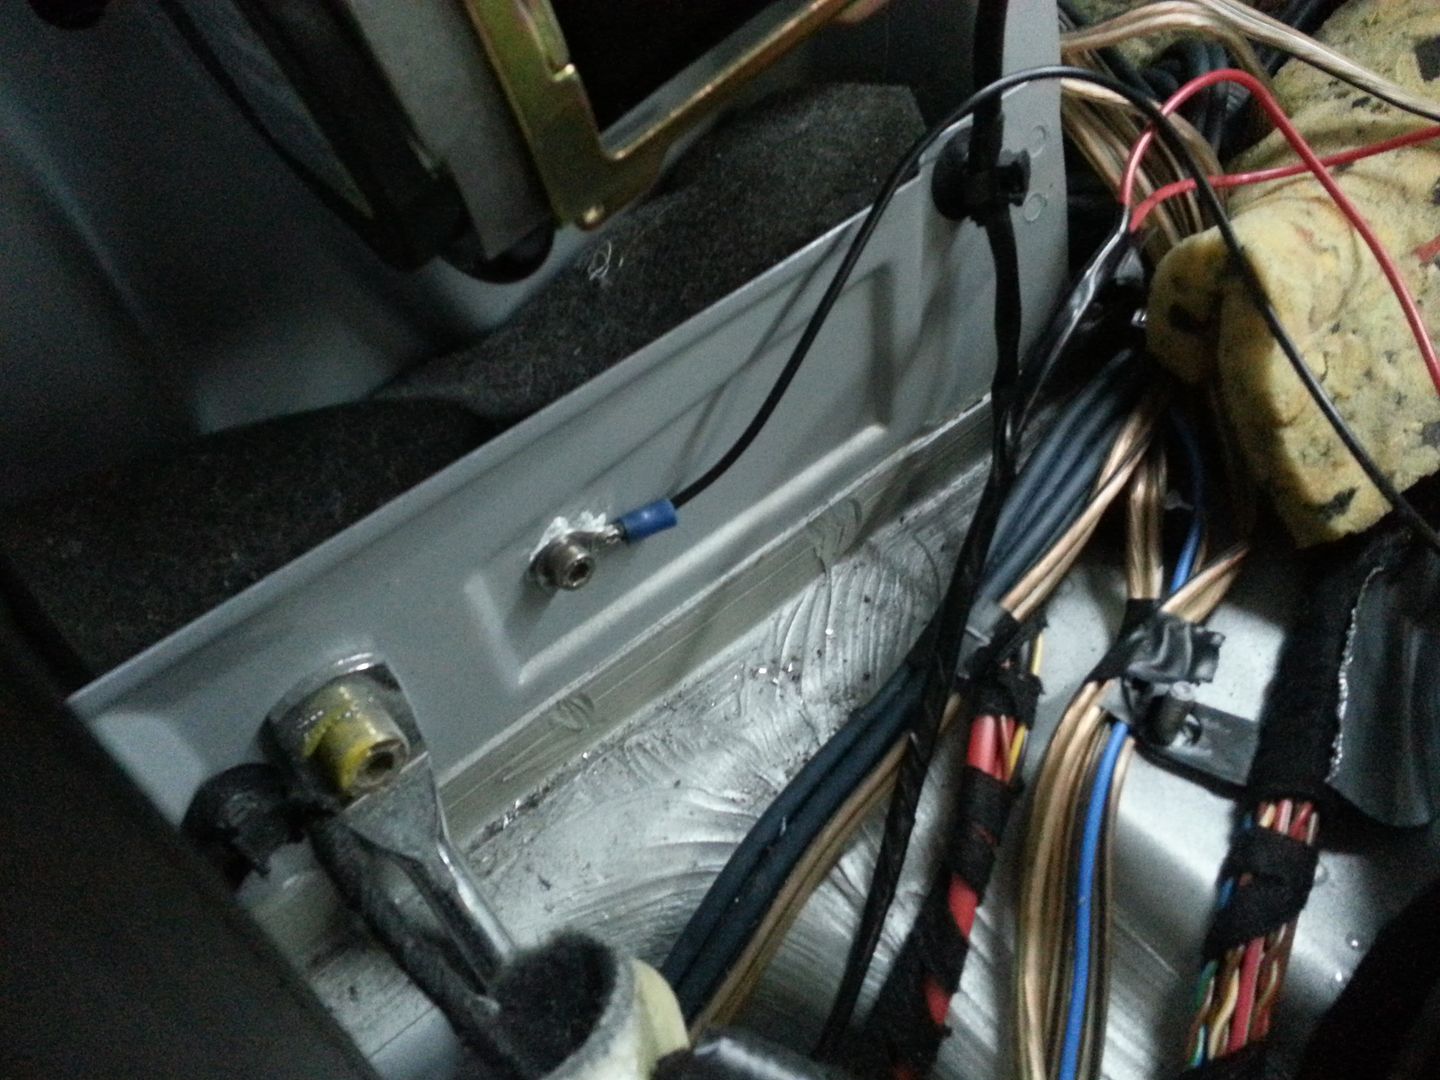
Earthed the inline fuel pump securely too as the original earth looked like it had got a little warm... soldered all the connections too be sure...
Even though the WMI pump is not yet fitted I did test the setup prior to refitting the dash panel... pressure switch is set for 18psi...
Thats about it for now... back to actual work tomorrow but now that most of the ground work is done then the rest of the WMI install won't take long to finish... just need to work out what I am doing with the boot now
<tuffty/>
Before...
...after...
Found a spare few hours to get the wiring started too.... wired up the inline fuel pump to a relay and wired up the WMI control wiring ready to fit the pump and tank...
Useful wiring posts.... yellow is ignition live but this cuts on turning the engine over so no use for the fuel pump... reds are permanent lives...
For the pump I decided to use the fused side of the intank fuel pump as a trigger for the relay...
Wired the relays in, used the yellow ignition live post for the WMI as this doesn't matter if it looses power during engine start and used the permenant post next to it as this had the thickest red cable going to it... this supplies the +12v for both the inline fuel pump and the WMI pump...
Loomed up to go to the fuse box I had previously fitted and wired up the switch so I could switch WMI on and off as needed...
Earthed the inline fuel pump securely too as the original earth looked like it had got a little warm... soldered all the connections too be sure...
Even though the WMI pump is not yet fitted I did test the setup prior to refitting the dash panel... pressure switch is set for 18psi...
Thats about it for now... back to actual work tomorrow but now that most of the ground work is done then the rest of the WMI install won't take long to finish... just need to work out what I am doing with the boot now
<tuffty/>
that is some amount of work going on there mate, thumbs up to yourself and bill and everyone else involved in this build. i wish i could even understand all of those logs etc but i really dont (although would love to learn) haha.
read this whole thread from start to finish and really enjoyed it, very detailed with lots of pics of progress, ill be keeping an eye on this very closely and may even ask lots of questions too
i think bill should expect a call when i have my ibiza on the road, seems like a very trustworthy man and hugely knowledgable on these engines.
great work there bud, keep it up
Looking nice Tuffty. How you getting on with the meth install. The 70mm TB on the to do list too.
Looking nice Tuffty. How you getting on with the meth install. The 70mm TB on the to do list too.
Funny you should mention it mate
Managed to grab a couple of hours today to get a little more done....
Marked up the FMIC outlet for the WMI nozzle boss...
Bill worked his magic and a boss appeared... I then drilled and tapped it to take the nozzle...
My WMI kit is made from a combo of AEM and Devils Own parts as I already had a pump and Bill had some other spare bits lying about so I took the one way valve out of the AEM nozzle holder as I was using a DO check valve and fitted it with the smallest nozzle... idea being that I would rather have a proper atomised mist of meth to help cool stuff down and aid consistency... if it looks like I need more volume of meth then I will look to fit a second fine nozzle further up the pipe work... twin nozzle setups seem to work quite well if done right...

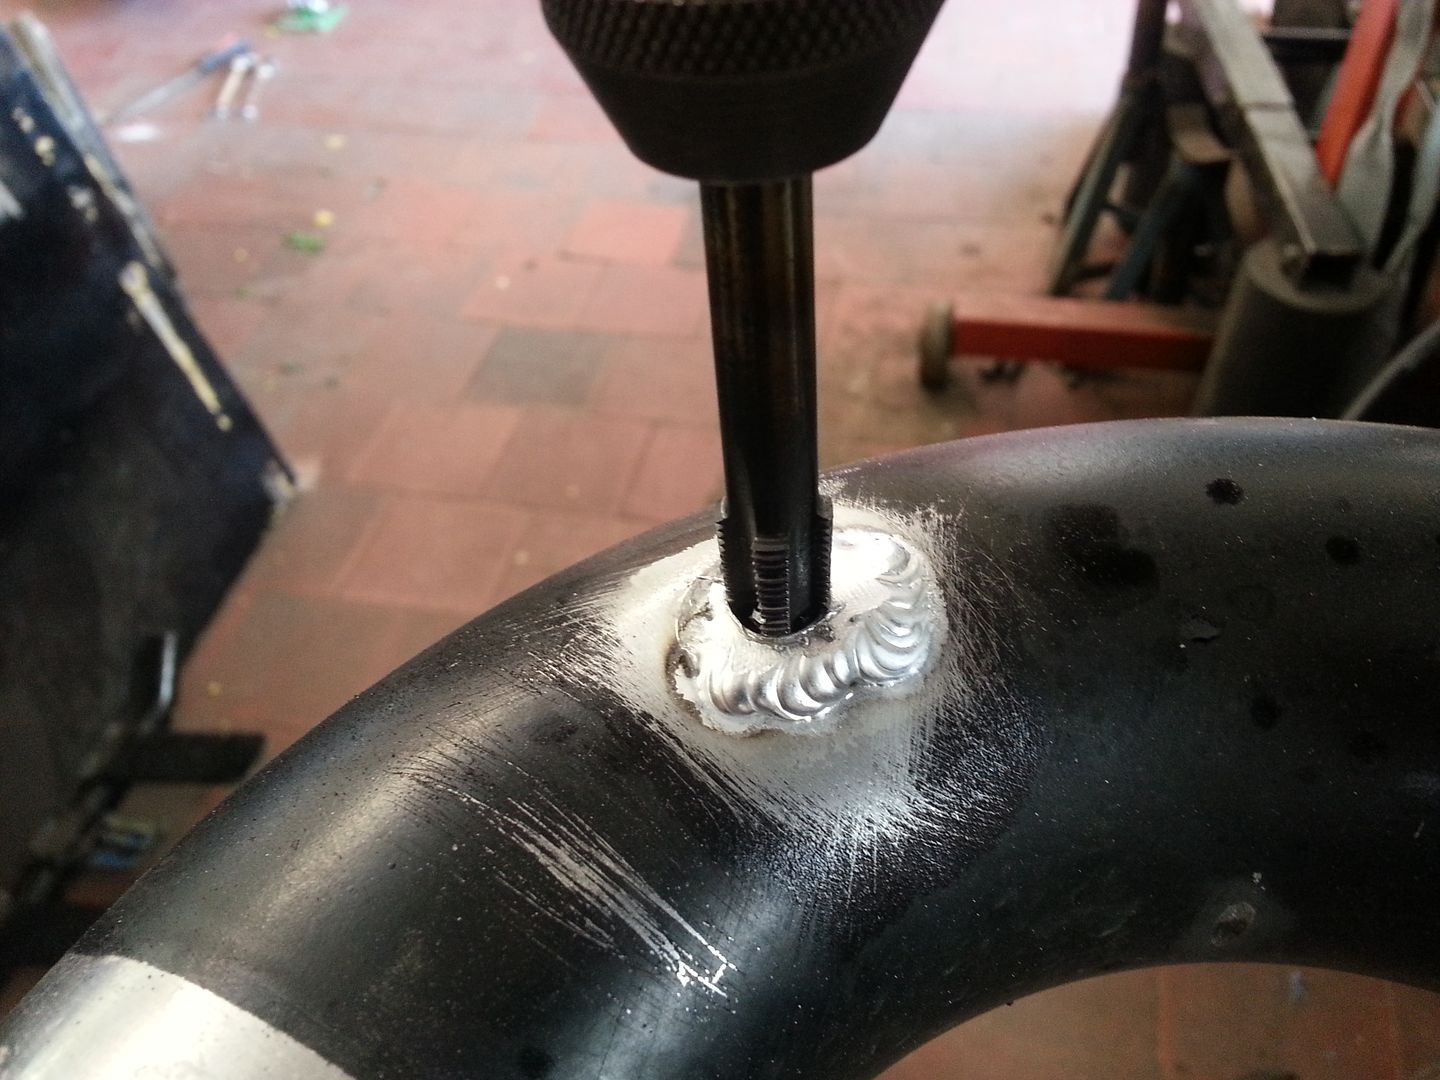
Bill also worked his magic on a small alloy tank I bought which while small should be fine for my needs... blocked up the 'supplied' hole as I wanted the tank to sit low and Bill welded a boss on the end so I could fit an outlet
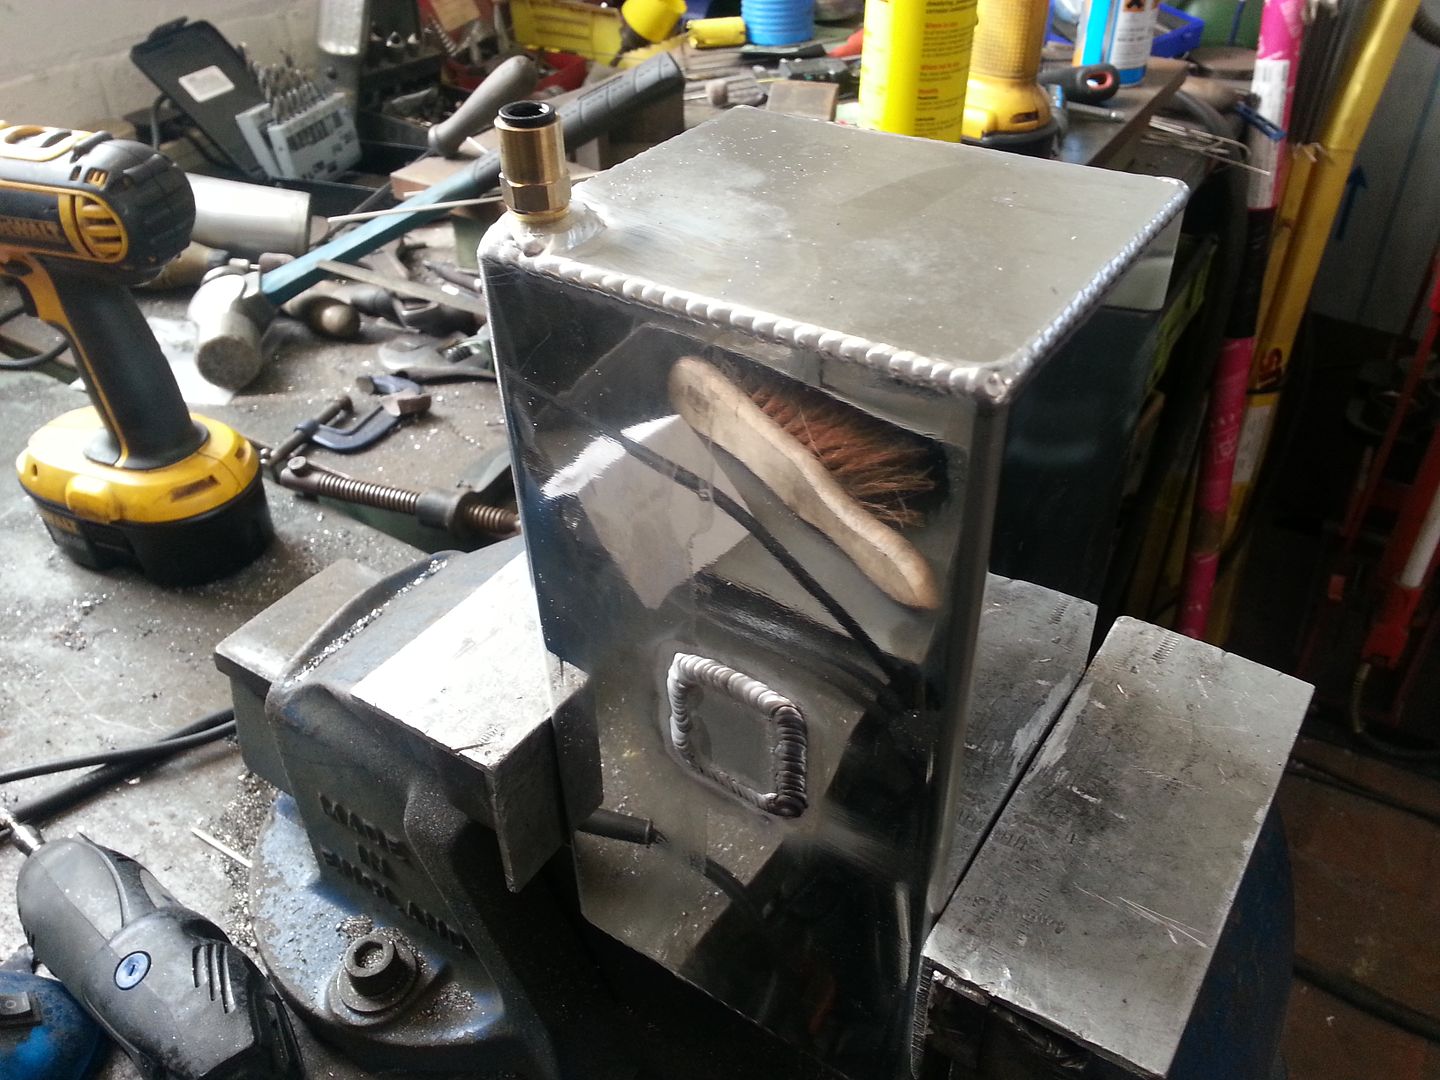
Made up some brackets to support the tank and this is the final layout....
Just need to actually fit the brackets, tank and pump and its job done
<tuffty/>
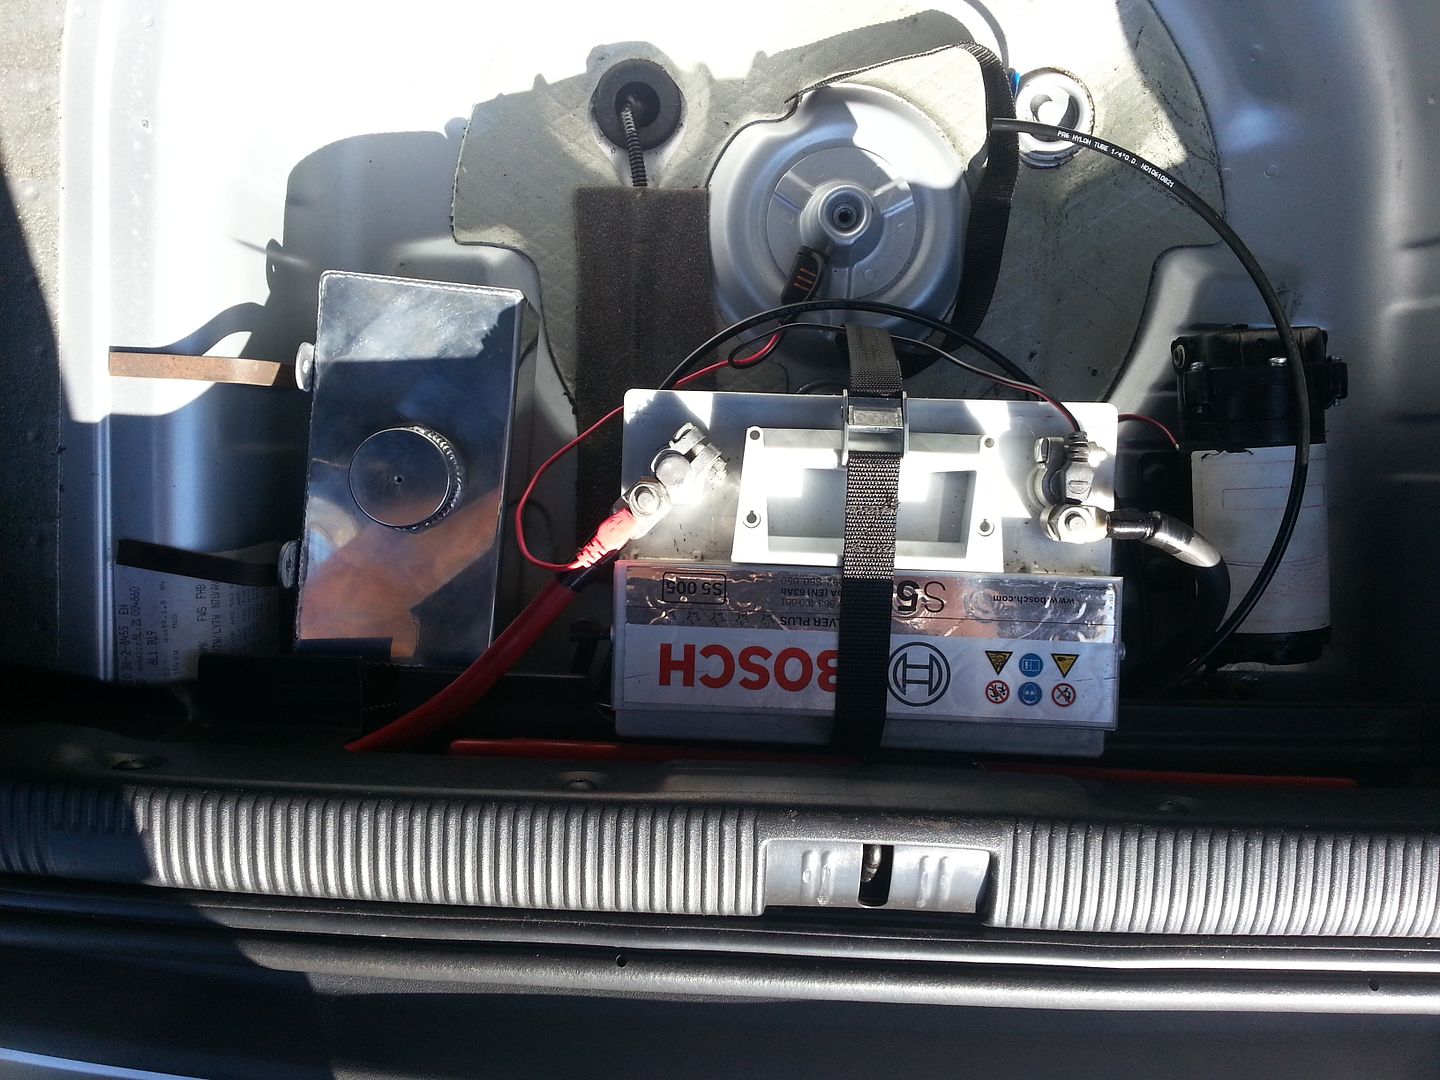
So finally after owning a WMI kit for over 2 years I have actually got it fitted and working...
First of course I de-blinged the pump and the tank...
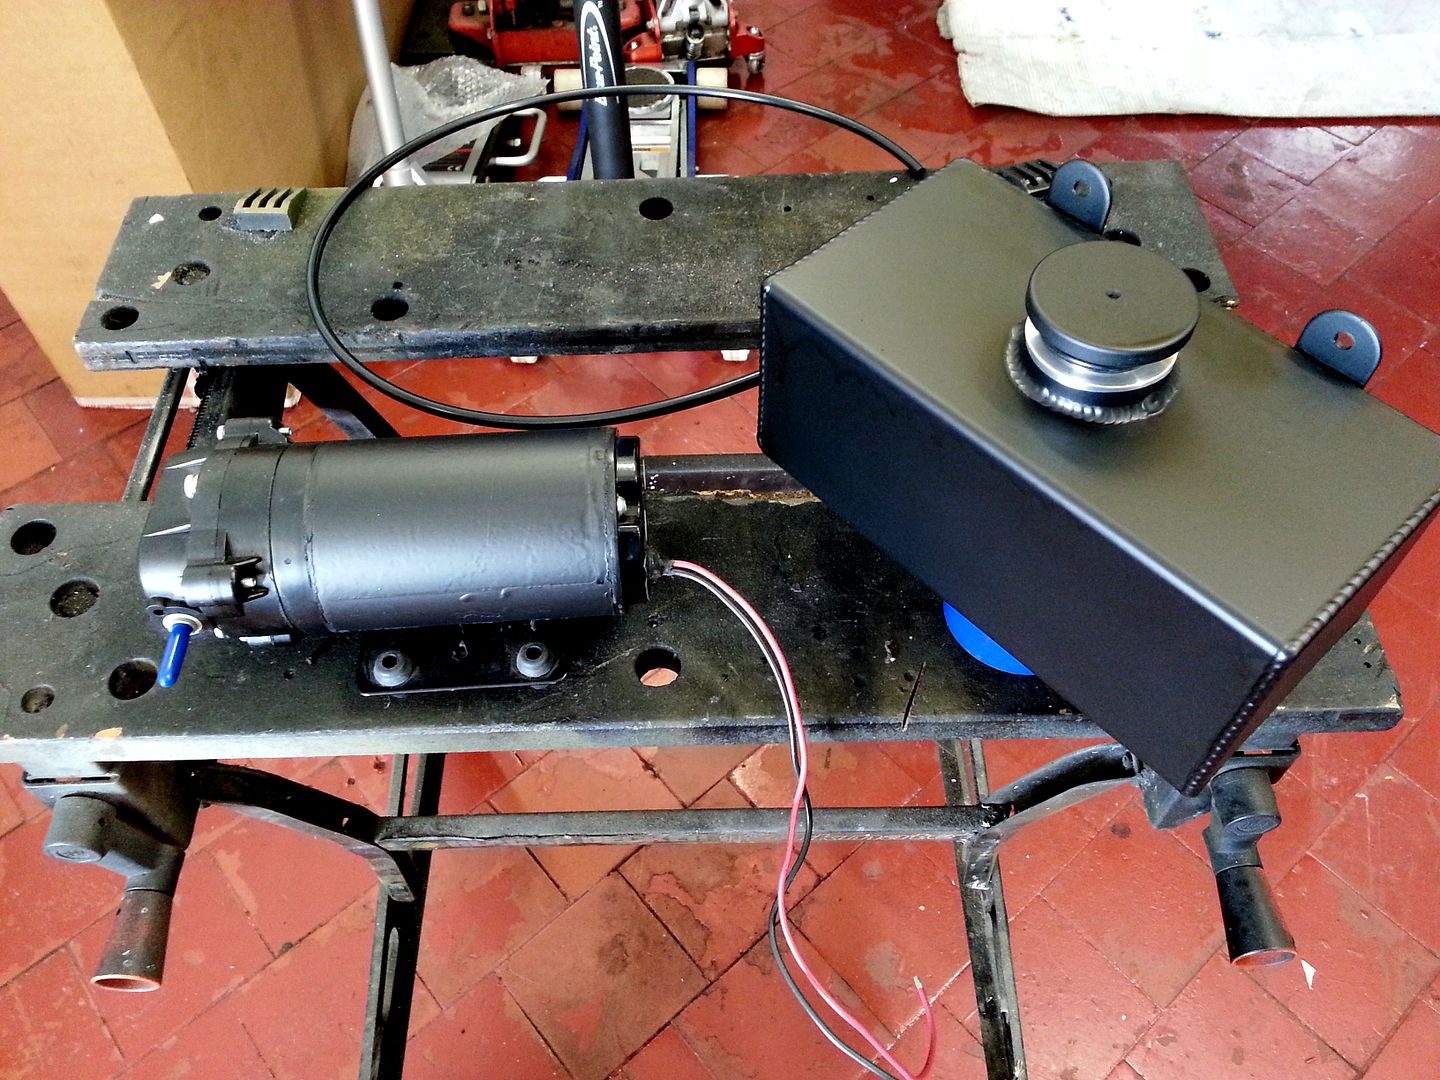
Fitted the pump and made brackets for the tanks... piped it all up and wired the pump....
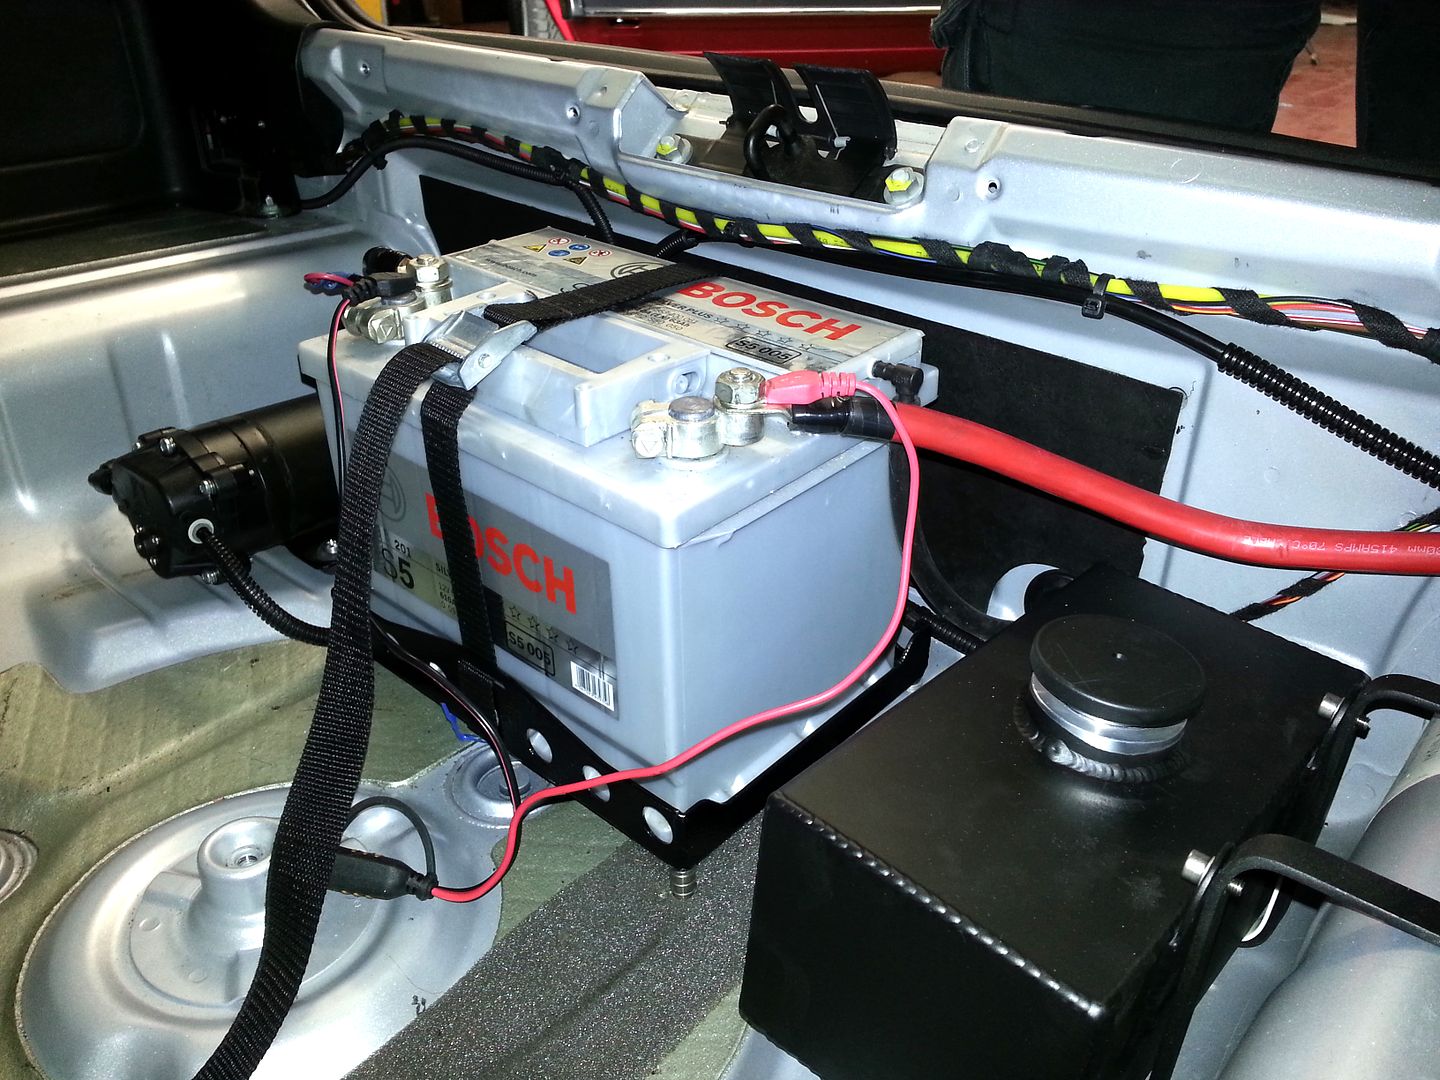
Had a leak initially from the tank pipe as I hadn't pushed it home far enough but once sorted all was good...
Quick test on the way home from Bill's... ambient was 20 degrees... on cruise IAT's sat at 22/23 degrees.... 'armed' the system and gave the car a blast in third to properly load her up... didn't log with VCDS but fired up the 'Torque' app on my sammy S3....
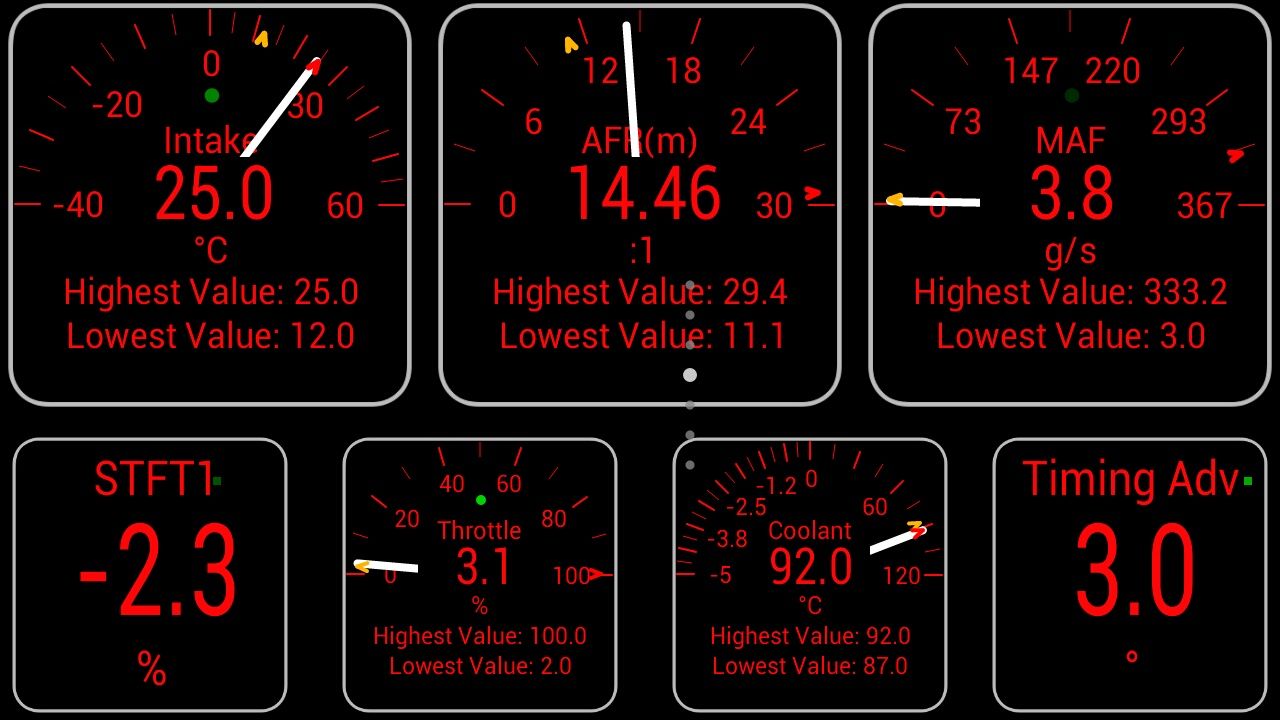
The 25 deg was from idling while parked up taking the screen shot... you can see the minimum figure of 12 degrees... exactly the result I was looking for out of this... normally IAT's would increase to 30/35 degrees in 20 degree ambient under boost but the results so far are very good... I gave the car another burst and had the same result... the car felt strong too... she has felt a little lethargic since the weather got warmer which is to be expected but the WMI appears to be doing exactly what I fitted it for... happy bunny
<tuffty/>
First of course I de-blinged the pump and the tank...
Fitted the pump and made brackets for the tanks... piped it all up and wired the pump....
Had a leak initially from the tank pipe as I hadn't pushed it home far enough but once sorted all was good...
Quick test on the way home from Bill's... ambient was 20 degrees... on cruise IAT's sat at 22/23 degrees.... 'armed' the system and gave the car a blast in third to properly load her up... didn't log with VCDS but fired up the 'Torque' app on my sammy S3....
The 25 deg was from idling while parked up taking the screen shot... you can see the minimum figure of 12 degrees... exactly the result I was looking for out of this... normally IAT's would increase to 30/35 degrees in 20 degree ambient under boost but the results so far are very good... I gave the car another burst and had the same result... the car felt strong too... she has felt a little lethargic since the weather got warmer which is to be expected but the WMI appears to be doing exactly what I fitted it for... happy bunny
<tuffty/>
It's taken me about a week and a half to read this build thread, and its amazing!! Your attention to detail is immaculate. Extremely jealous, and love the WMI update
Had an s3 myself, but through getting board and not having the money or the knowledge to modify (as wasn't a big thing to do to s3's back then) I got rid for a Renault 5 GTT, but have missed her ever since, hence the very "poor man's" version of the s3, the LCR maybe one day I can afford another
Again though, fantastic build!!
Had an s3 myself, but through getting board and not having the money or the knowledge to modify (as wasn't a big thing to do to s3's back then) I got rid for a Renault 5 GTT, but have missed her ever since, hence the very "poor man's" version of the s3, the LCR
maybe one day I can afford another Again though, fantastic build!!
Lovely work Tuffty, the boot install looking particularly sweet. Now then the science part..... what nozzle and how much meth are you actually injecting (have you timed it for a minute's flow into a measuring jug).
It's taken me about a week and a half to read this build thread, and its amazing!! Your attention to detail is immaculate. Extremely jealous, and love the WMI update
Had an s3 myself, but through getting board and not having the money or the knowledge to modify (as wasn't a big thing to do to s3's back then) I got rid for a Renault 5 GTT, but have missed her ever since, hence the very "poor man's" version of the s3, the LCR
Again though, fantastic build!!
Thanks dude... appreciated...
Lovely work Tuffty, the boot install looking particularly sweet. Now then the science part..... what nozzle and how much meth are you actually injecting (have you timed it for a minute's flow into a measuring jug).
Thanks Carl... I am using the smallest supplied AEM nozzle... not sure on flow rate but the documentation suggests 155ml/min from a 150psi pump...
Either way it appears to be working... will need to do some road logging though for something more definitive as a car on the dyno inherently runs hotter...
<tuffty/>
If your using a progressive boost controller it will be ideal for your Big turbo setup because boost is built steadily across the rpm rather than a spikey ko4 etc and so the dose age will be nice and measured. Although a nuisance to pull the bumper again to test flow you need to know what volume per min your actually injecting. Do this by manually triggering it into a measuring jug for a minute dead. Your car will happily consume around 450ccl per min and I think your injecting more than 155ml at the mo. When testing ensure the car is running at idle so the test utilises full 14.5 volts to the pump rather than the standard 12.5-13v standing battery volts as it makes a fair difference to flow.Thanks dude... appreciated...
Thanks Carl... I am using the smallest supplied AEM nozzle... not sure on flow rate but the documentation suggests 155ml/min from a 150psi pump...
Either way it appears to be working... will need to do some road logging though for something more definitive as a car on the dyno inherently runs hotter...
<tuffty/>
I'll send you a link to a good calculator latter where you can input your injector duty cycle etc to determine ideal wmi ccl dosge for max benefit.
Not using a progressive controller... using a boost switch at 18psi... not tuning for WMI just using it to drop IAT's which its currently doing... will do some tests on the road and on the dyno but have seen power drop and other issues running too much meth and hp vs nozzle ration isn't always right...
Happy enough that the smallest nozzle is actually making an impact... will log at some point to see if there is a point where effectiveness drops off in which case I'll consider going dual nozzle...
The thought process behind the current setup is fairly simple... small nozzle, full pressure of the pump from the get go means better atomisation and absorption rates with less chance of residual mix loitering in the pipework or potentially to damage the throttle body which is known to happen...
Primary objective is minimum WMI to control IAT's which it appears to be doing really not fussed about dialling in more timing or anything...
<tuffty/>
Happy enough that the smallest nozzle is actually making an impact... will log at some point to see if there is a point where effectiveness drops off in which case I'll consider going dual nozzle...
The thought process behind the current setup is fairly simple... small nozzle, full pressure of the pump from the get go means better atomisation and absorption rates with less chance of residual mix loitering in the pipework or potentially to damage the throttle body which is known to happen...
Primary objective is minimum WMI to control IAT's which it appears to be doing
really not fussed about dialling in more timing or anything...<tuffty/>
Interesting day out today... went the TT Forums North vs South dyno day at Powerstation...
Bill took the Lupo of course
In preparation of course I cleaned the car... she was looking pretty damn good despite my somewhat epic fail of over wet sanding the **** lacquer job from the 'warranty' paint work I had done...

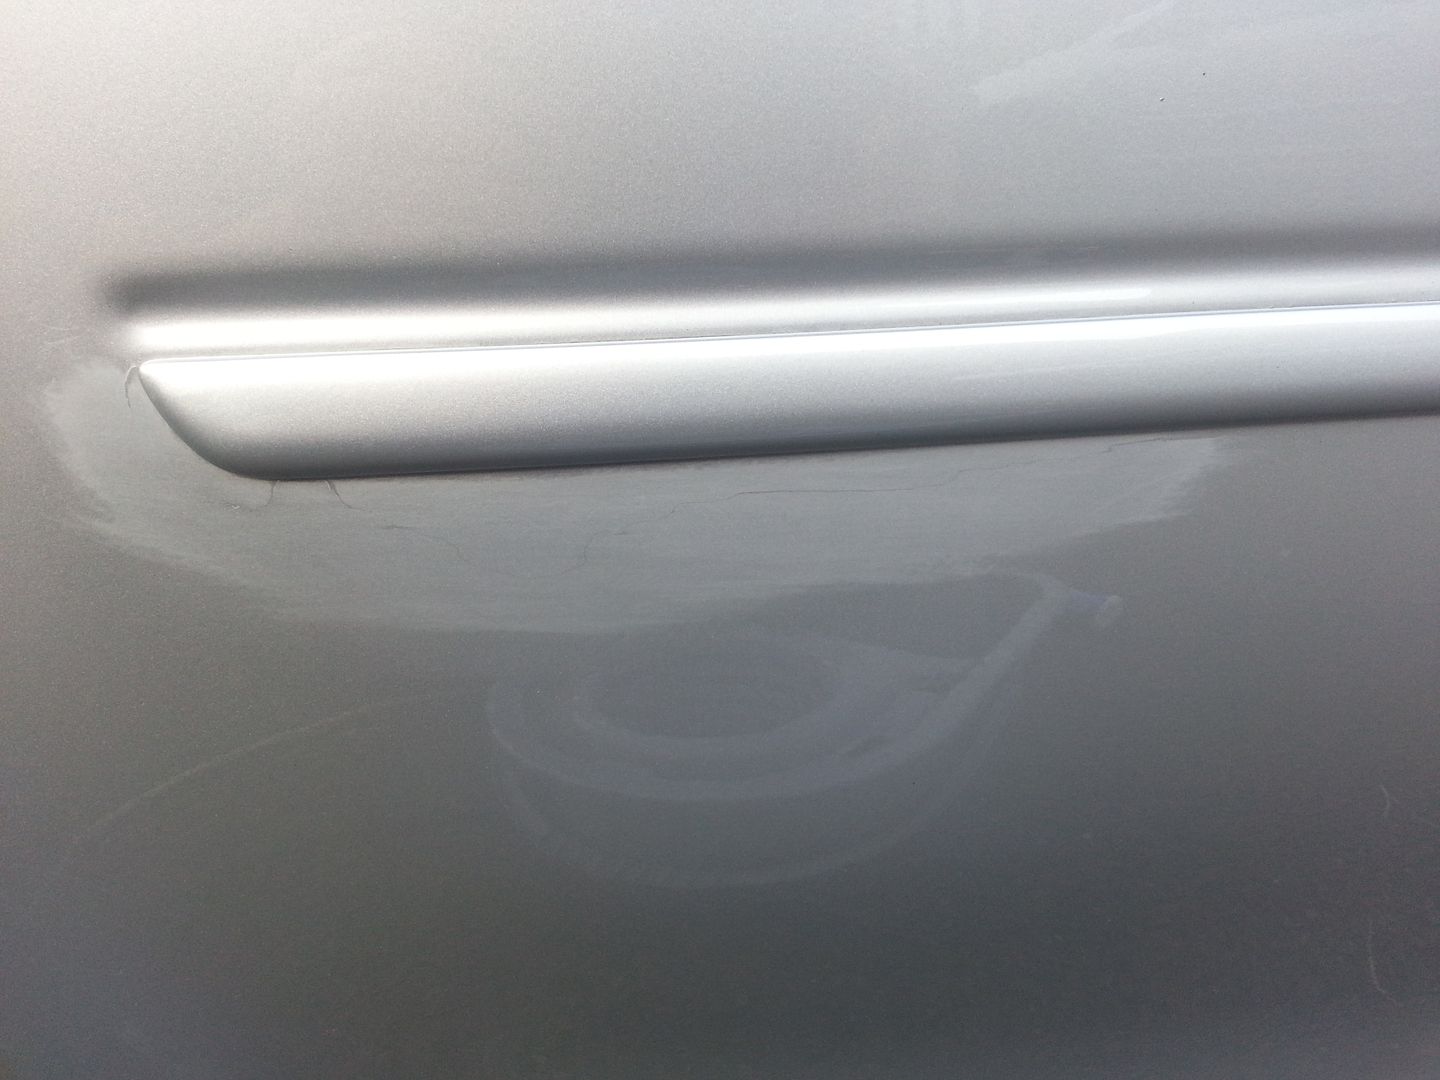
Over did the bit where the lacquer had peeled away from the original paint and broke through
...so for now I have just slapped some touch up over it and will address it later... despite that the rest came up fine.... ah well
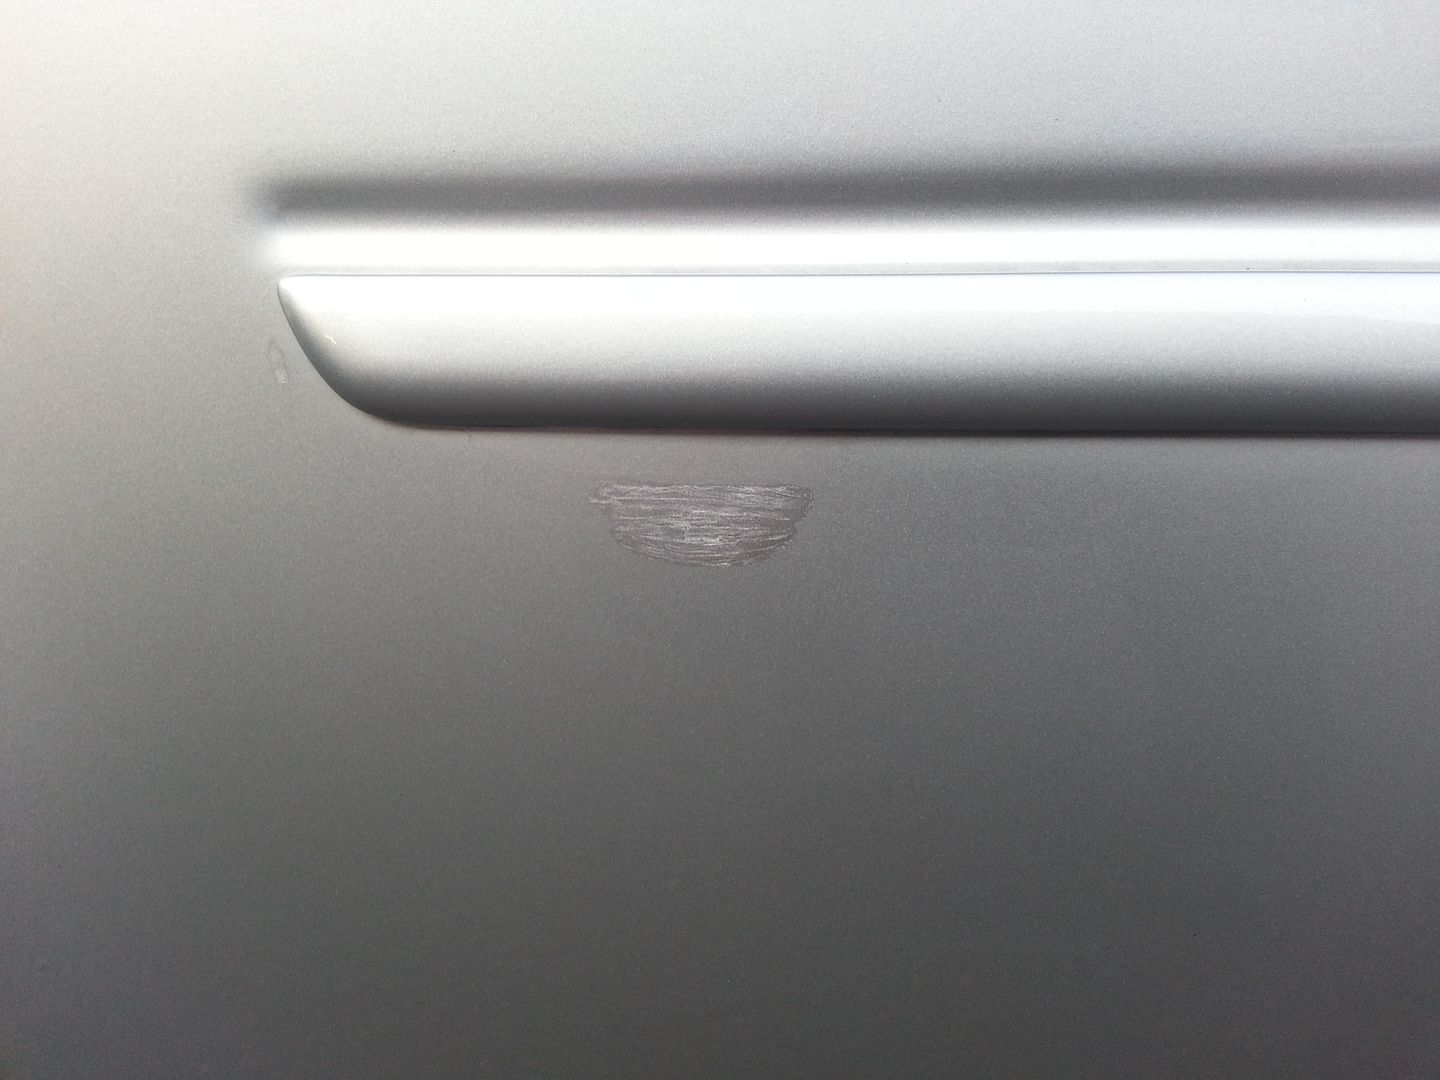
Still she came up ok in the end...
Anyhoo... back to the dyno day... I hadn't intended to run my car but after a little badgering from Hollie and Bill (no pun intended) I ran her up...
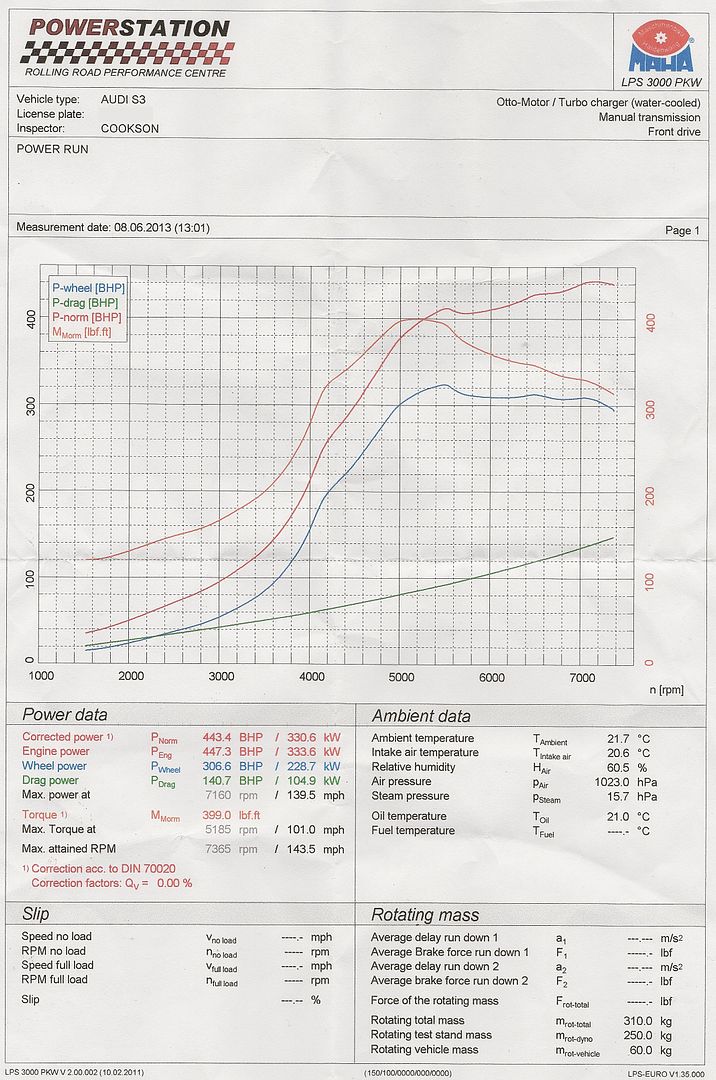
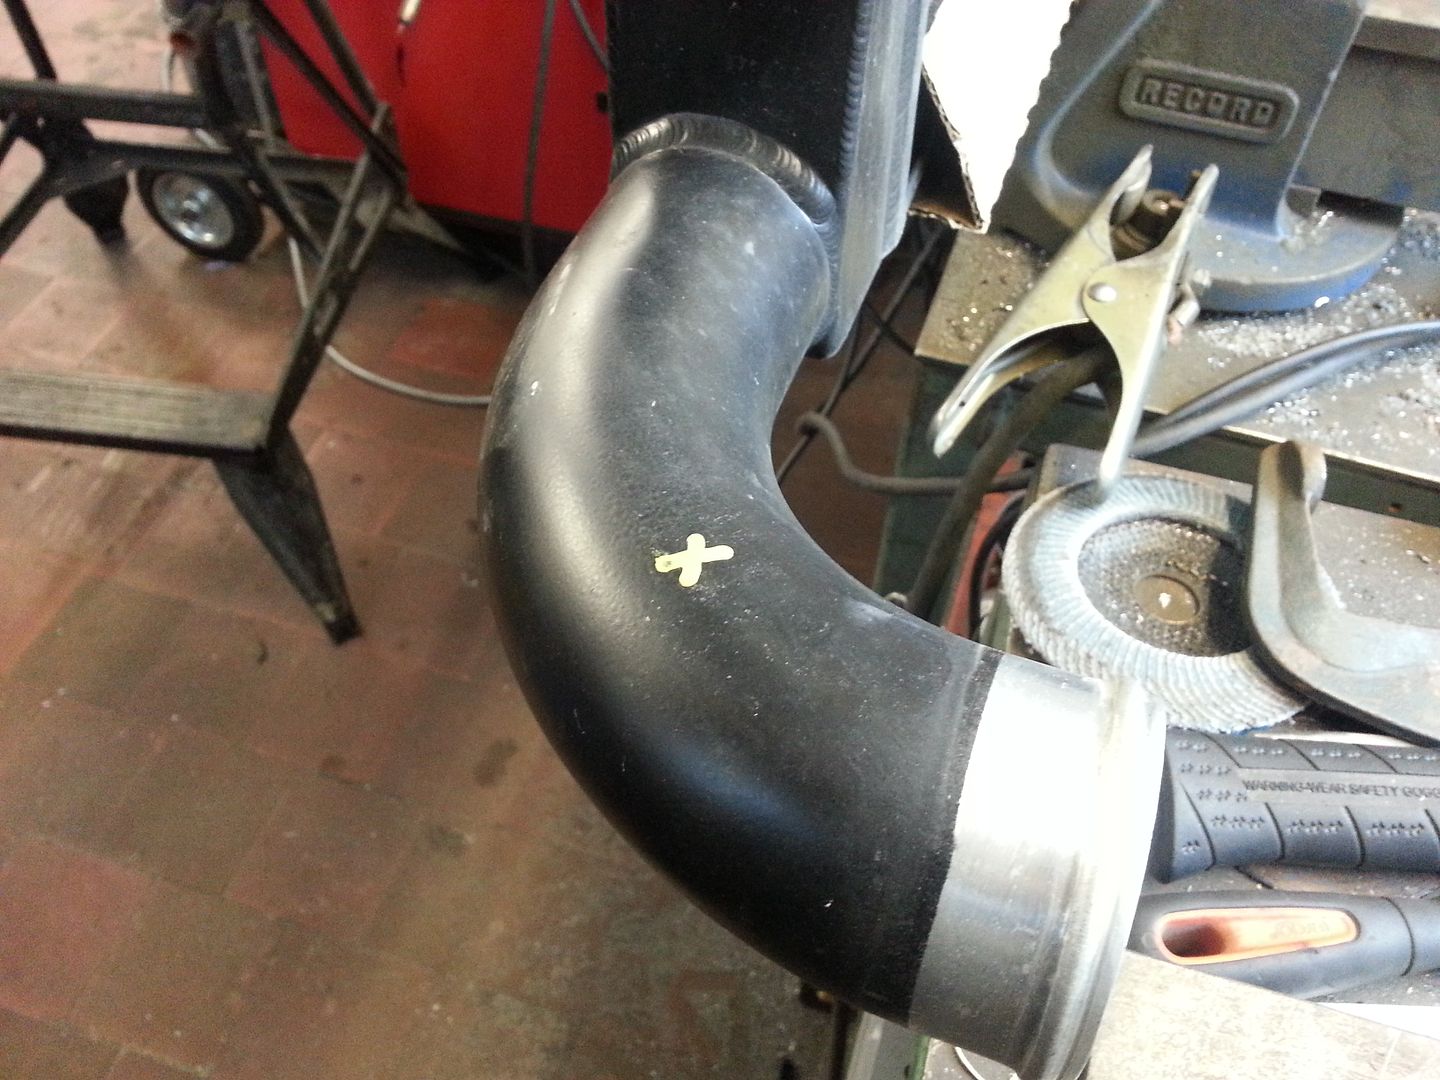
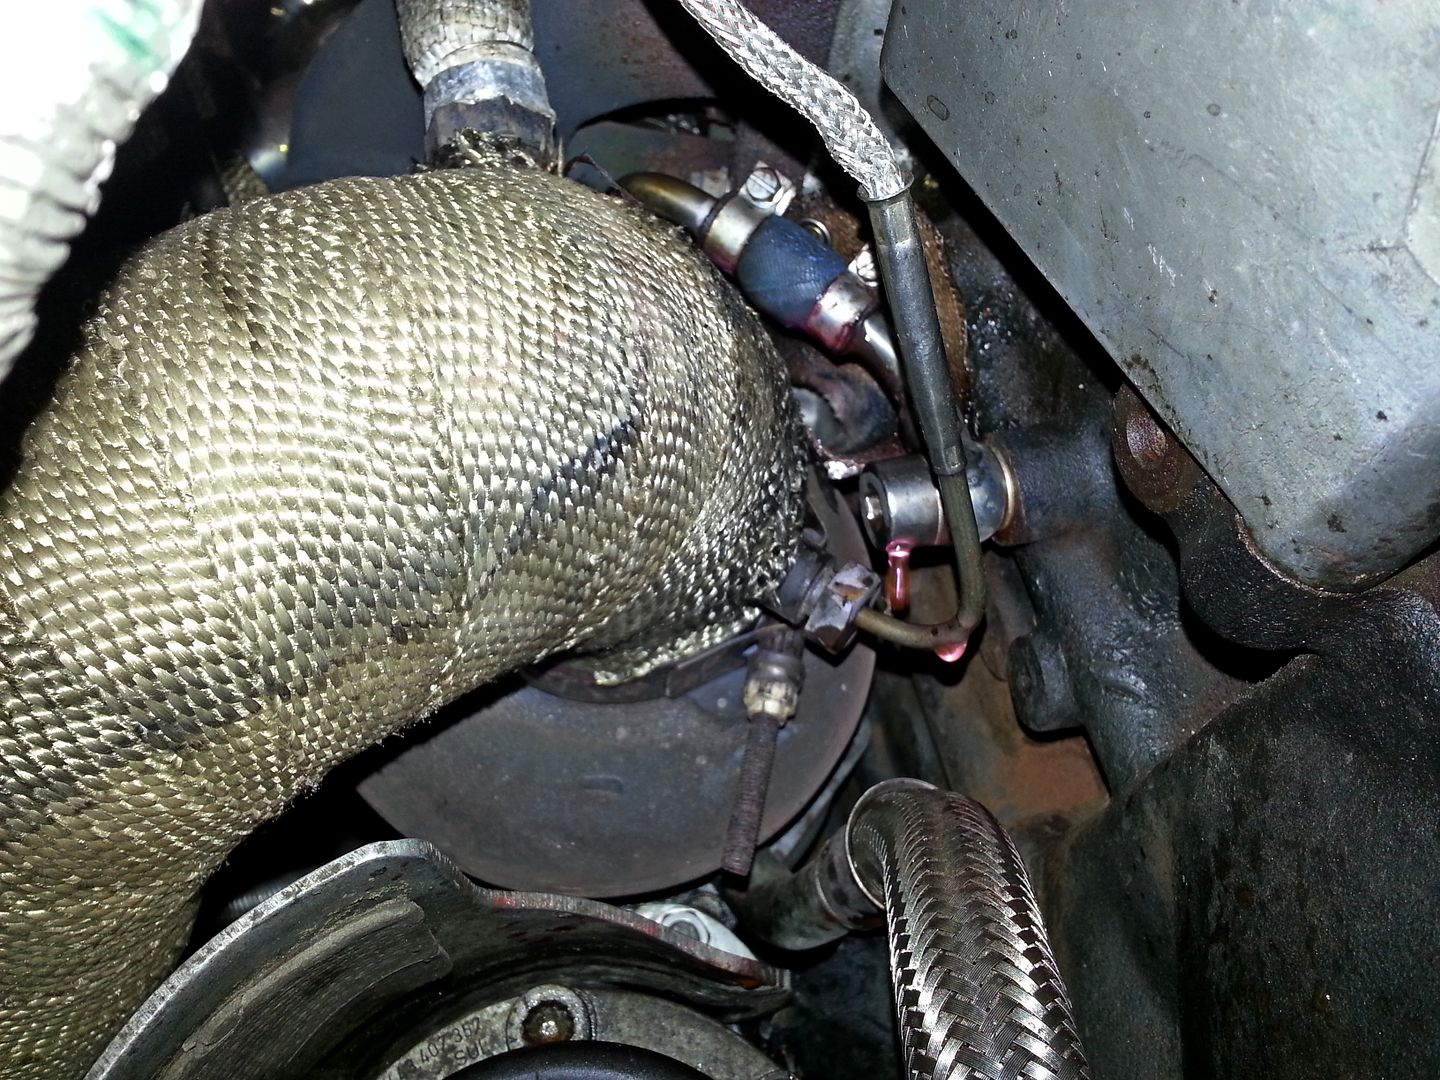
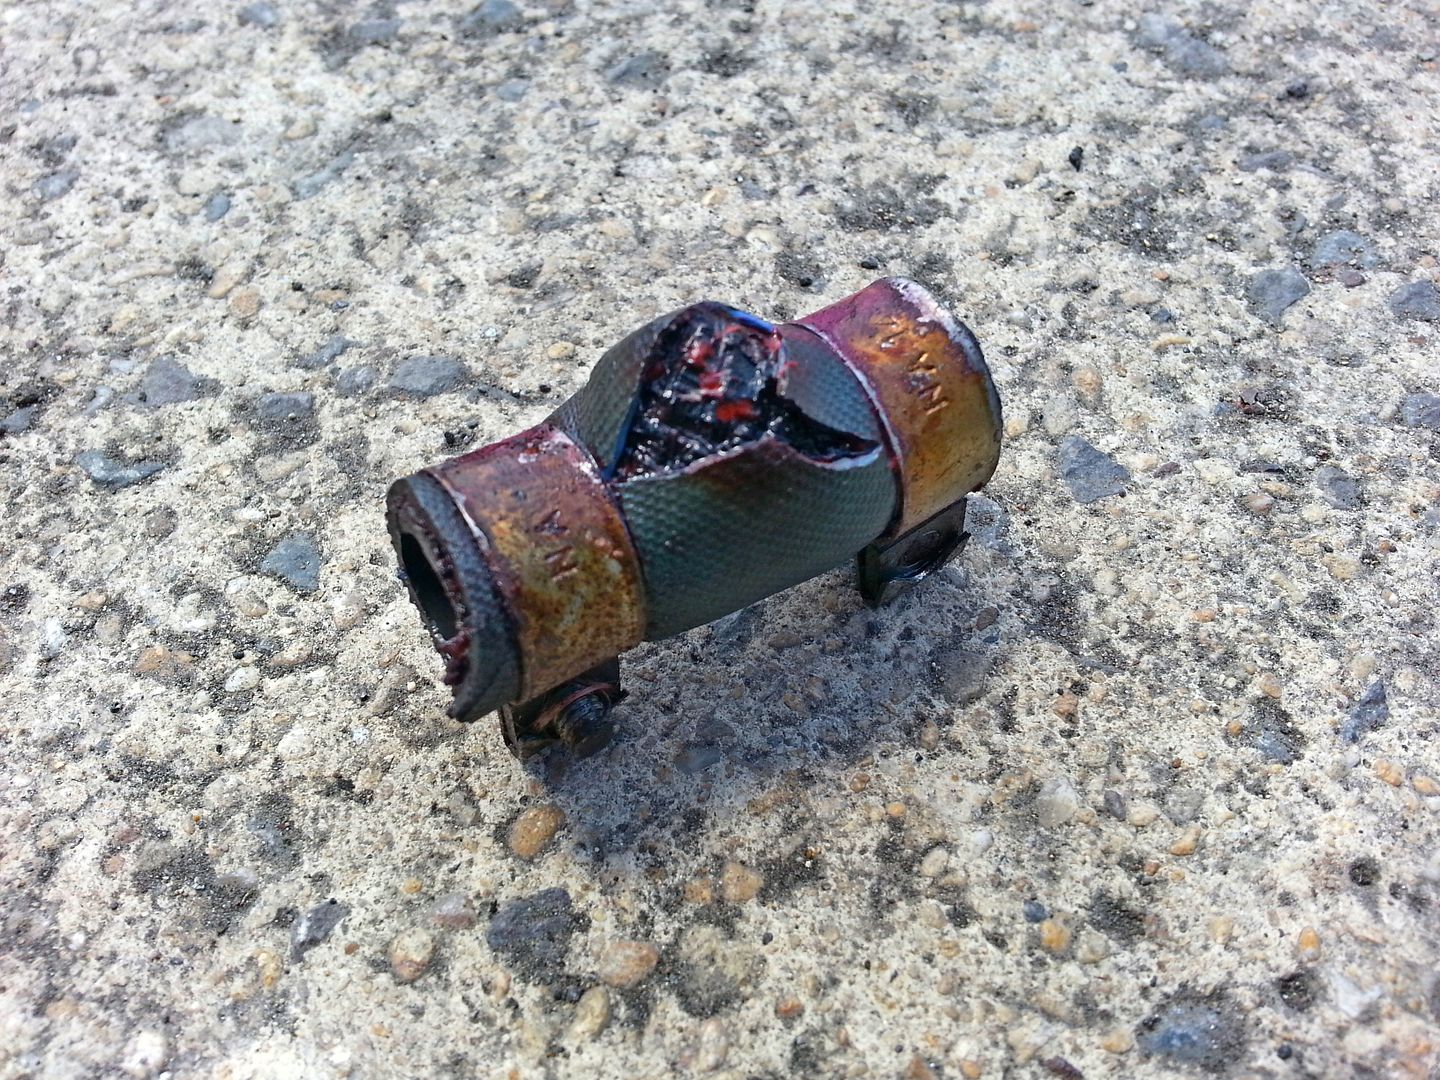
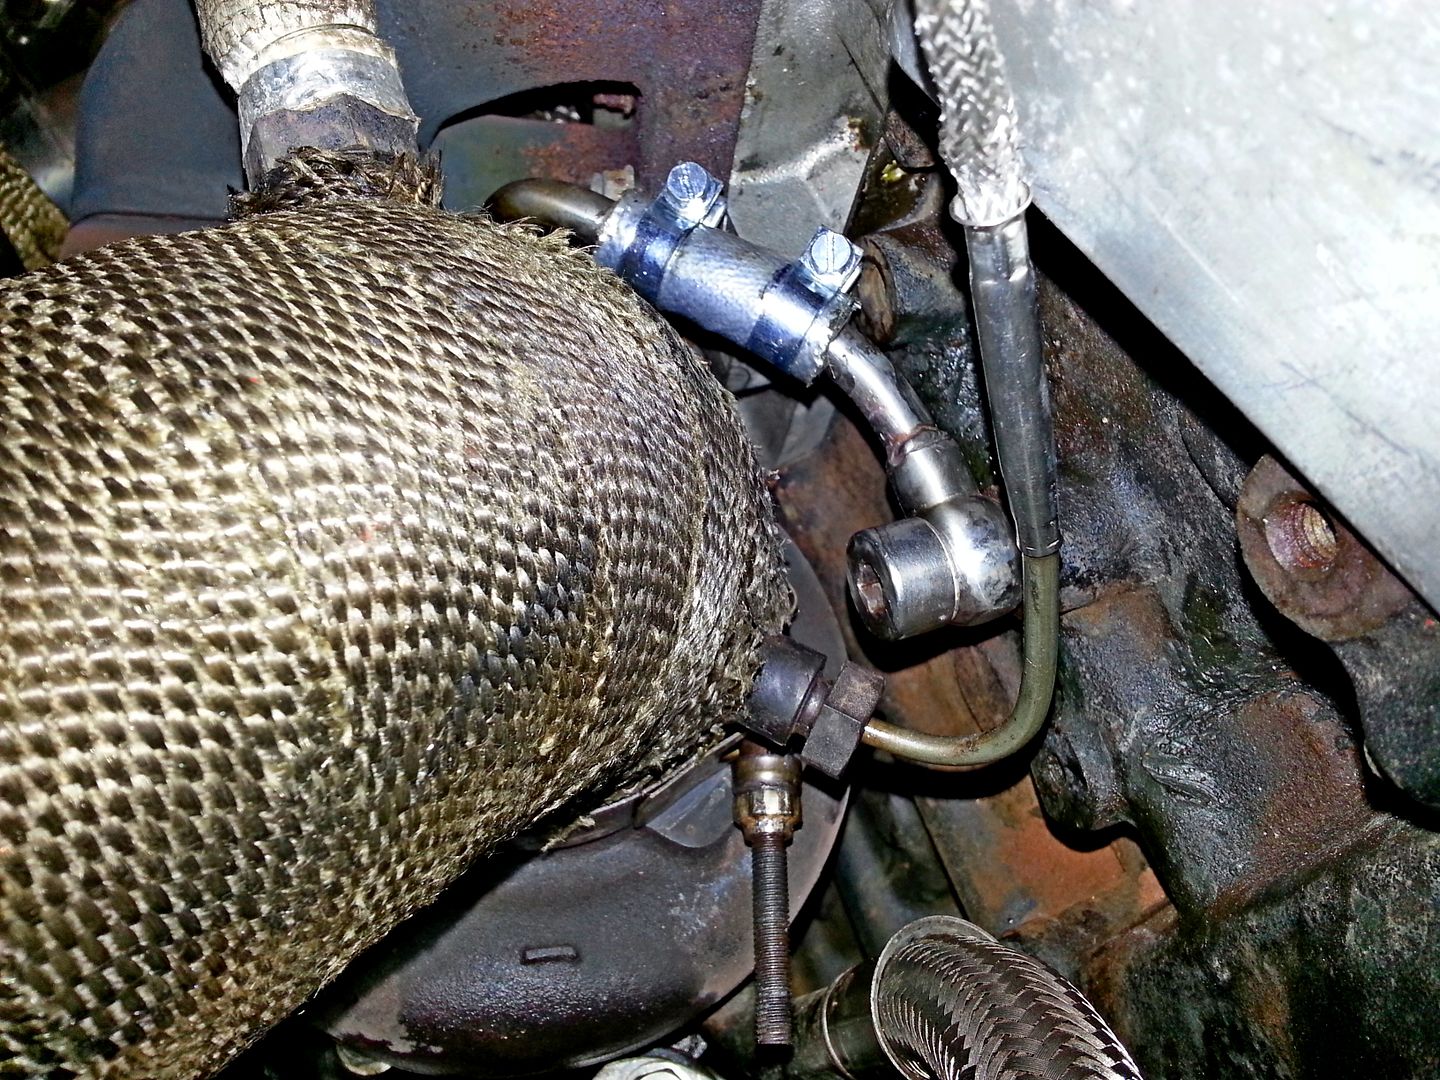
The runs on Powerstations dyno are very long... seems the dyno puts a lot of load on the car as the poor old girl was glowing a good one... for what ever reason they ran the car again and sadly this lead to the coolant hose behind the turbo decided to let go and piddle coolant over the glowing hotstuff... this lead to loads of white smoke and a small fire on the downpipe... marvellous!!!
The pipe in question is a stainless hard pipe but has a high pressure heat resistant rubber section to join the two halves together... (right of the picture below)
Not an easy fix and topping up with water just poured out the bottom again... brilliant!...
Thankfully Bill being the super hero that he is donned his Badger Man outfit and came to the rescue...
Hopefully should be a case of remove driveshaft and downpipe and I'll have access to sort it out...
Cars... gotta love um and todays lesson is (the same as all the others tbh)... heatshielding, heatshielding, heatshielding... anything that is likely to melt probably will
Engine will be out soon for 'some work' so I am going to address some of the issues like this to up the reliability factor...
<tuffty/>
Bill took the Lupo of course
In preparation of course I cleaned the car... she was looking pretty damn good despite my somewhat epic fail of over wet sanding the **** lacquer job from the 'warranty' paint work I had done...
Over did the bit where the lacquer had peeled away from the original paint and broke through
...so for now I have just slapped some touch up over it and will address it later... despite that the rest came up fine.... ah well
Still she came up ok in the end...
Anyhoo... back to the dyno day... I hadn't intended to run my car but after a little badgering from Hollie and Bill (no pun intended) I ran her up...
The runs on Powerstations dyno are very long... seems the dyno puts a lot of load on the car as the poor old girl was glowing a good one... for what ever reason they ran the car again and sadly this lead to the coolant hose behind the turbo decided to let go and piddle coolant over the glowing hotstuff... this lead to loads of white smoke and a small fire on the downpipe... marvellous!!!
The pipe in question is a stainless hard pipe but has a high pressure heat resistant rubber section to join the two halves together... (right of the picture below)
Not an easy fix and topping up with water just poured out the bottom again... brilliant!...
Thankfully Bill being the super hero that he is donned his Badger Man outfit and came to the rescue...
Hopefully should be a case of remove driveshaft and downpipe and I'll have access to sort it out...
Cars... gotta love um and todays lesson is (the same as all the others tbh)... heatshielding, heatshielding, heatshielding... anything that is likely to melt probably will
Engine will be out soon for 'some work' so I am going to address some of the issues like this to up the reliability factor...
<tuffty/>
Nice power run Tuffty, the leak is just there to test you. You'll have that sorted in no time at all. The wmi must have earned its stripes in this weather too. I've got myself into trouble with wet sanding too its easy to get carried away. Cut it back with grit 1500, rebuff, relaccer and rebuf with machine.
Any other nice metal there today.... did the lupo hold its own also.
its easy to get carried away. Cut it back with grit 1500, rebuff, relaccer and rebuf with machine.Any other nice metal there today.... did the lupo hold its own also.
Nice power run Tuffty, the leak is just there to test you. You'll have that sorted in no time at all. The wmi must have earned its stripes in this weather too. I've got myself into trouble with wet sanding too
Any other nice metal there today.... did the lupo hold its own also.
Hollies TT was there, a 3.2 V6turbo TT with a DSG box (although it didn't run), an R8 and a shed load of other TT's including a couple of TTRS's
Bill ran the Lupo on the dyno today just to check and shock actual horror two back to back runs netted 300hp on the nose consistently... that makes mine 400hp in reality which considering how hot she got I was more than happy with...
In other news.... got the car on the ramp today and as suspected it was the rubber joiner... looking at it now I am thinking 'why the hell did I do that!' but you live and learn... irony being if a customers car came in like that I would most likely point out that its not a very good idea lol...
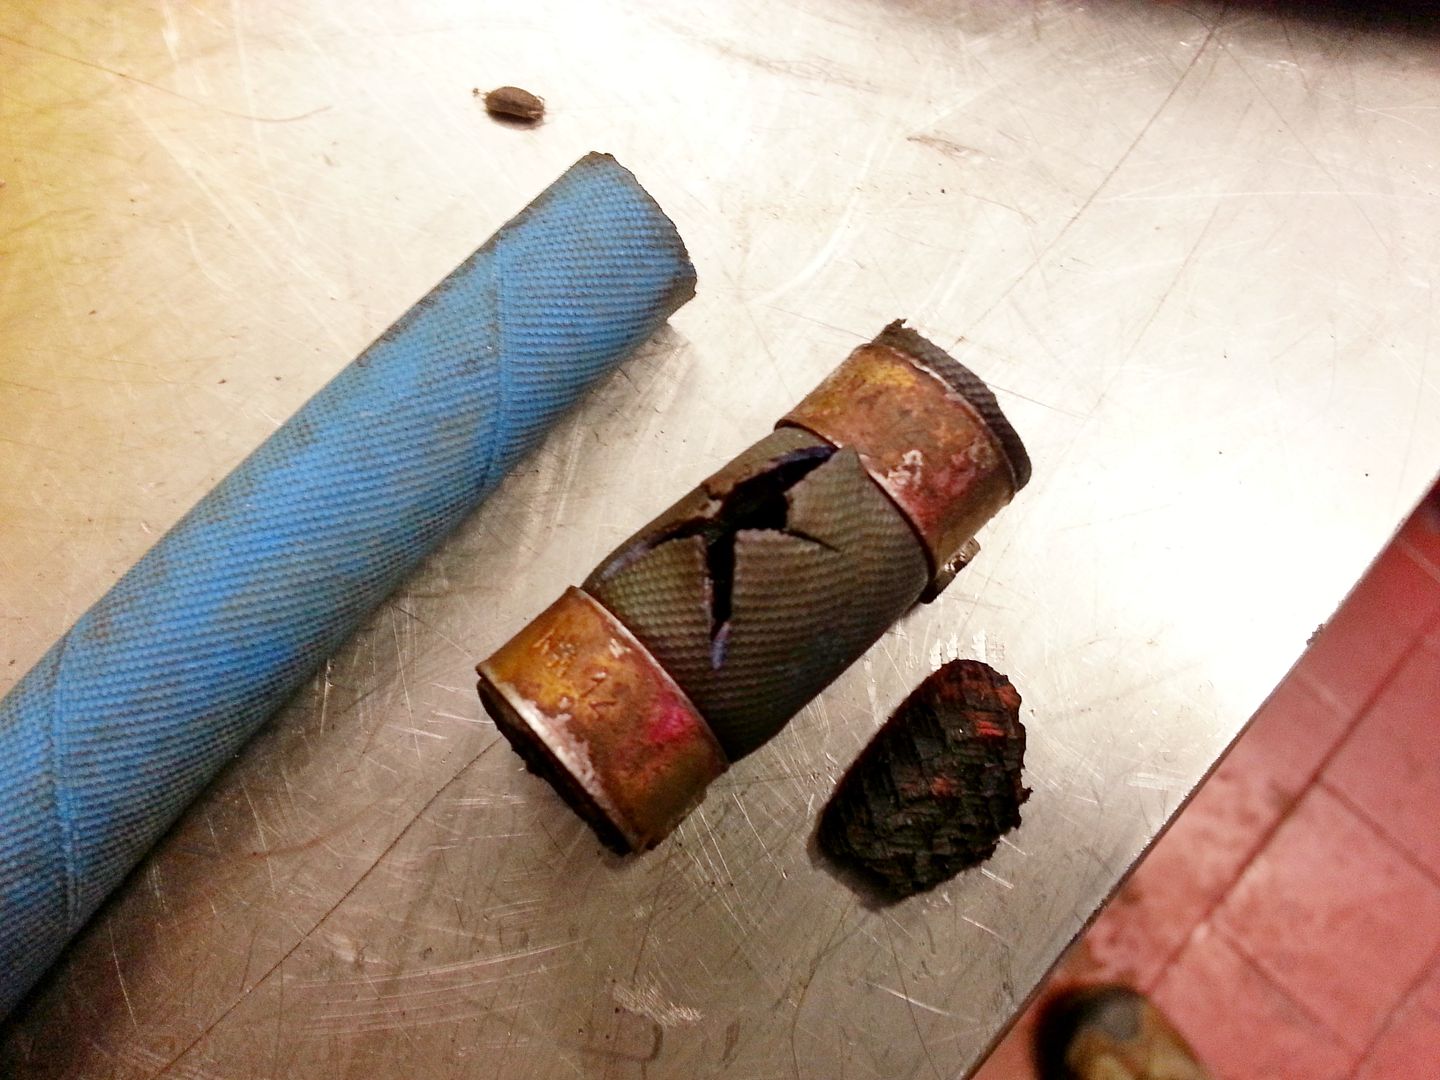
New bit of hose this time with extra heat protection...
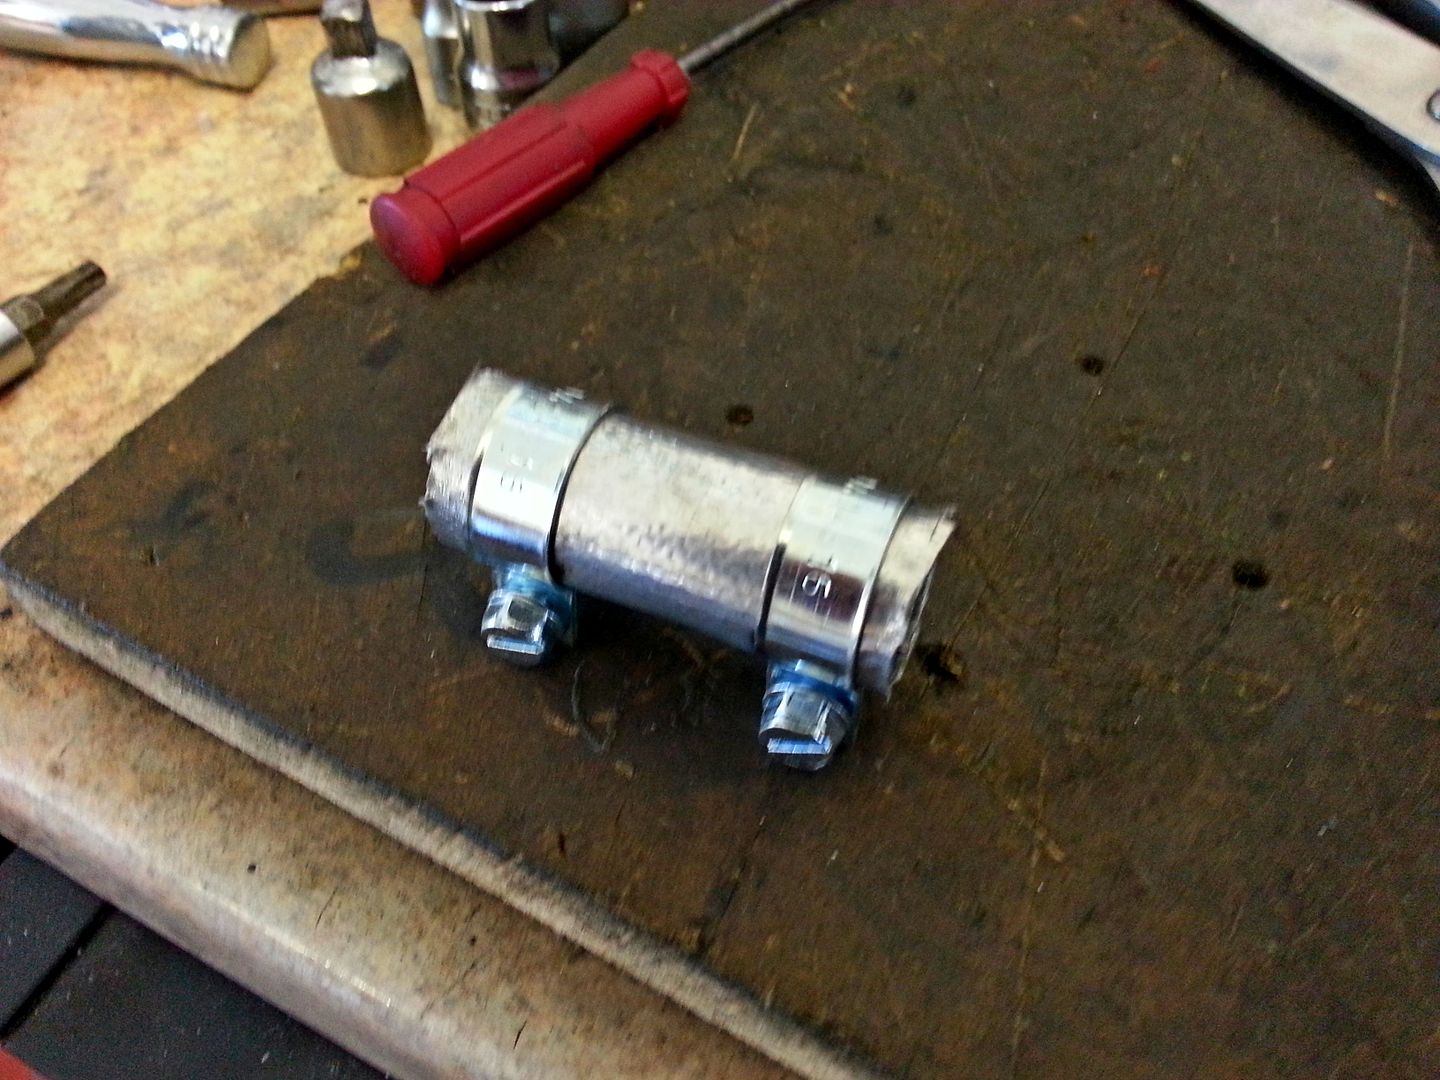
...and finally (when everything has cooled down after the leak check) a bit of ceramic backed stuff...
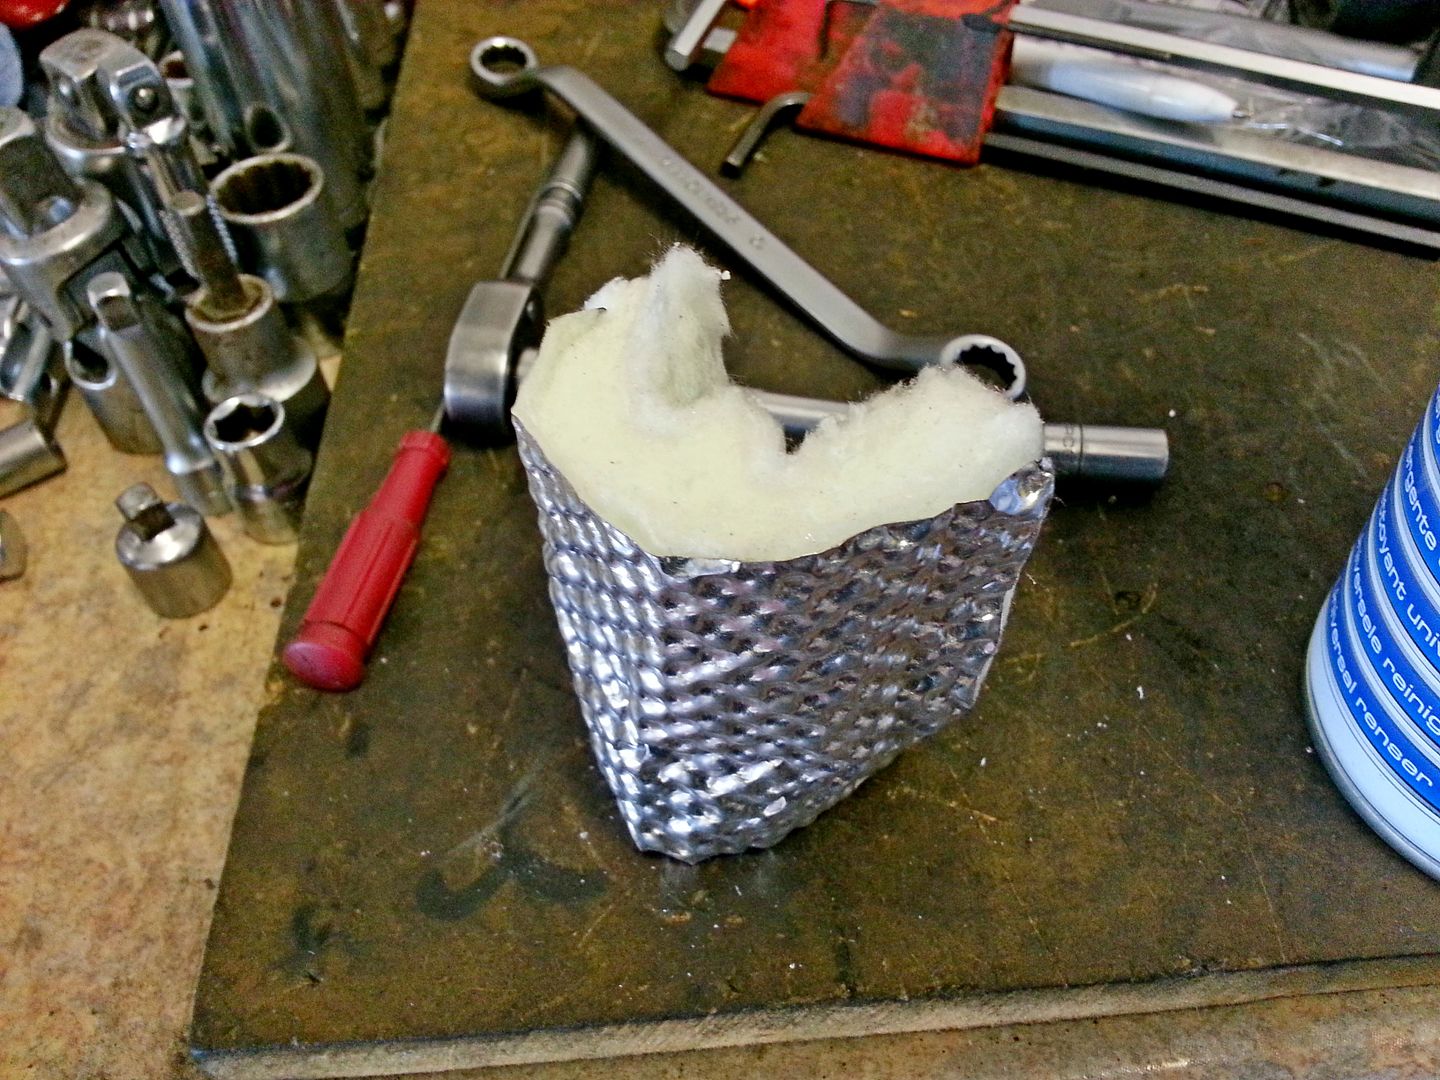
This of course is a sort term fix... I am under no illusion that I need a full hard pipe there and thats what will happen (plus some other planned tweaks) when the engine comes out for 'some work'
Moral of the story is never to under estimate how hot these things get and heatshielding plus other preventative measures are your friends
She is leak free now at least and shouldn't have this issue again before the engine is out... yay!
<tuffty/>
I like how the 'bodge' solution is probably 100% better than how most other 'tuners' would let things leave their workshop
Similar threads
