Cupra bush fitting gone REALLY wrong

platofan

Active Member
Oct 12, 2009
218
0
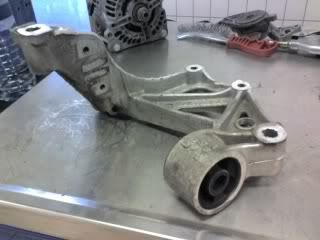
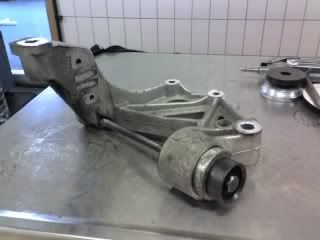
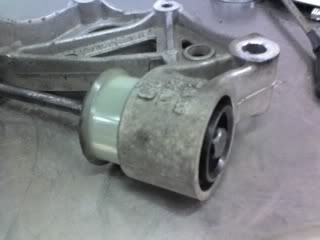
I put the bush in with the tool and it went in perfectly but the wishbone was hassle so I removed the console, put the wishbone in and put in back in situ.

Now for some reason two of the hole in the console don't match up, the arb bracket is out and the wishbone bolt won't go in!

Have I bent the console with the ratchet strap or something?

Thanks
 

dicky FR

Active Member
Jul 26, 2009
127
0
Ebbw Vale, South Wales
Ratchet strap?

He prob used a ratchet strap as either a press or to hold it up in situe.

For the op to bend the console would take a fair bit of presure i used a 500 tonne press at work to press mine out and in lol a bit overkill but i work in heavy industry.
With enough fidling i should line up fine. Pics would help though
 

Ash_238

Active Member
Aug 25, 2009
236
0
Have you pressed the bush flush with the back of the console?

They are a nightmare, but such an improvement over the original ones.
 

platofan

Active Member
Oct 12, 2009
218
0
Yeah the tool made it completely flush with the back, I think i'll take it all apart on Sat and start with the wishbone bolt, the arb and then if anything is still not lining up i'll get the wooden block and mallet out.

Used the ratchet strap to try and push the wishbone into the bush and may have bent it by literally 1-2mm I reckon. Then I realised you don't even need the ratchet strap if you take the console off. :cry:

As it stands, the two big bolts on the console go in fine but the 2 inbetween (the smaller, longer ones) won't. Though I can see half the holes on the other side of the console.

Seriously though, with the spacers and bolt tool, getting the bushes into the console was soooo much easier than expected. Easiest part of the whole process really. :)
 

techie

Skoda Techie
Mar 22, 2003
5,438
5
Worcs
The thinner bolts are for the steering rack, you dont need to just move the rack do you?
 

Hauptmann

Guest
The problem is most likely that the hex pin on the wishbone is not fully in the console bush. You need to put some lubricant on the pin (washing up liquid will do) to help it slide in.

When fitting the console be sure to fit the wishbone bolt first (the horizontal bolt at the front) and tighten it up to pull the console forward and into position. Then fit to the two console-to-chassis bolts (18mm head). Loosely tighten them and then fit the two smaller 16mm head bolts (these locate the steering rack).
Finally lower the car to the ground and torque the bolts.
Once the console is in position you can fit the ARB bolts. Do the lower one from the front with the car on its wheels (so that your socket with extension passes under the driveshaft) and then the upper bolt with the car raised (so socket passes OVER the driveshaft).

PS - you will not have bent the console - the force required to do this is tremedous and you couldn't do it with hand tools.
 

techie

Skoda Techie
Mar 22, 2003
5,438
5
Worcs
Id agree with the above but seen a few cracked in a press before now.

Which is why i've always done them like this...

console4.jpg

console3.jpg

console2.jpg

console1.jpg


Then put the Cupra bushes in the vice after giving the console a damn good clean up.
 
Last edited:

platofan

Active Member
Oct 12, 2009
218
0
Thanks for the tips, i'll try taking it out and putting it back together again. Only used a ratchet and it did sod all for pushing the hex into the bush so hopefully I haven't bent it and i've just lined it up gammy. :)

The long bolt holes are just to one side of the subframe but the two large chassis ones are in fine so something just needs to move a little. Having said that, the last bolt I tried to put in was the w/bone bolt and it won't go so i've obviously put them back in the wrong order. :redface:
 

platofan

Active Member
Oct 12, 2009
218
0
Ok cheers guys, bolts were obviously put back in the wrong order as I took it all apart then started with the wishbone and it all went back nicely.

Then done the whole thing again on the other side + new balljoint and it took 3 hours, still long but better than 6 hours for the other side.

Car feels firm now, love it. :D
 
Genuine SEAT Parts and Accessories.