DIY Timing (cam) Belt Change Cupra TDI

Nath.

The Gentlemans Express
Jan 1, 2006
8,620
16
EASTLEIGH, HAMPSHIRE
Agree with bassound :yes: If his way of doing it causes a problem he has the ability to fix it.

Dealers use new bolts for arse covering more than the quality of the job IMO

All bolts are strech bolts, that's how they work isn't it?

For me it depends how streched they are / how many times they have been used.

New strech bolts for a cylinder head.........yes, an engine mount........I doubt it.

BTW I'm not a car mechanic/tech but I am in the same sort of business.

Also, I can't see anything about tippex in Bassound's posts :shrug:
 
Last edited:

MJ

Public transport abuser
Apr 22, 2008
5,508
13
Manchester
m.facebook.com
04102009393.jpg

The pins probably the most useful tool of the lot, you will need the tensioner tool if it only has 2 slots and no allen key hole - most of the 1.9tdi pd tensioners have allen key holes, it tends to be the older tdis and 2.0tdis that only had the slots in them.
 

Viking

Insurance co's are crap.
May 19, 2007
2,317
4
Near Richmond, North Yorks
Agree with bassound :yes: If his way of doing it causes a problem he has the ability to fix it.

Dealers use new bolts for arse covering more than the quality of the job IMO

All bolts are strech bolts, that's how they work isn't it?

For me it depends how streched they are / how many times they have been used.

New strech bolts for a cylinder head.........yes, an engine mount........I doubt it.

BTW I'm not a car mechanic/tech but I am in the same sort of business.

Also, I can't see anything about tippex in Bassound's posts :shrug:

Yes, all bolts stretch when they're tightened. However, TTY bolts are designed to break (as pointed out in the previous post by MJ) at a specific point. If you tighten the bolts to the required torque they stretch to the yield point. At this stage they stretch no further and are stressed to the required breaking point. Some measure of elasticity has already been lost at this point so the bolt will never return to its original length.

Now what happens when you stretch something? It gets thinner, just like an elastic band. So, tightening the same bolt again to the required torque puts it into the yield point and then some. Okay so it still holds, but the stresses required to shear the bolts in the event of a frontal impact are drastically reduced.

So now instead of the engine dropping and saving the driver/passenger compartment from intrusion in the event of a frontal impact, you now have a situation where a minor impact will have the same effect. Hit a large pot hole, and the bolt shears.

It's not an issue of elongation of the bolts, it's an issue of reducing the stresses required for them to fail as designed.

Edit: And fair enough if Basssound wants to do it his way. All I'm saying (and another poster aswell) is that advising others who ask for instructions to do it the same way is not the way forward. You may not like the argument, but wrong advice should always be accompanied with a disclaimer that it may not be the best way (or the correct way).
 
Last edited:

Nath.

The Gentlemans Express
Jan 1, 2006
8,620
16
EASTLEIGH, HAMPSHIRE
So are they stretch bolts, sheer bolts or both?

Agree, advising others who ask for instructions to do it the same way is not the way forward.

Was Bassound advising or just telling us how he did it? Either way, the OP can now make a choice. Whatever way he chooses to do it is fine with me.
 
Last edited:

Viking

Insurance co's are crap.
May 19, 2007
2,317
4
Near Richmond, North Yorks
They are Torque To Yield bolts, usually incorrectly referred to as stretch bolts because they stretch beyond their initial design when used. They would be more accurately described as shear bolts than stretch bolts though, I would think.
 

MJ

Public transport abuser
Apr 22, 2008
5,508
13
Manchester
m.facebook.com
Probably about £3-6 per bolt.

Sorry, 39p per bolt in the chassis and 79p per bolt into the monting and 1.97 for the bolts in the mount that fasten to the block.
 
Last edited:

dirk1978

Active Member
Mar 25, 2009
85
0
Nice write-up on Briskoda, thanks for the link.

This http://www.justanswer.com/questions/2czlq-easy-change-cam-belt-seat-ibza-1 is quite good for the values of stuff.

It actually seems fairly easy. Not sure I get why the cam is unlocked from the sprocket, but I'm sure I'll find out. I'll take some pics as I do it too.

basssound - I understand where you're coming from, I try and use a bit of common sense here and there, but also on these kind of engines you can't really take chances so I've ordered the timing set, just to ensure I get a perfect line-up and I don't lose any power at all :)

I've done a few Vauxhall 2l 16v cam belts, Isuzu 1.5TD and my Passat 1.8T belt twice. The Passat was a breeze - just take the front end of the car off, take the cam belt off, put the new one on, line it up and pull a pin out of the new auto-tensioner. Brilliant. Got it one tooth out the first time though, felt a bit sluggish :)

The pictures I've seen for this job remind me the most of the Isuzu 1.5TD in my old Corsa rather than the 1.8T though.

C20XE:
main.php


VAG 1.8T:
main.php
 

basssound

Active Member
May 31, 2007
286
0
Rotherham, South Yorkshire!
Agree with bassound :yes: If his way of doing it causes a problem he has the ability to fix it.

Dealers use new bolts for arse covering more than the quality of the job IMO

All bolts are strech bolts, that's how they work isn't it?

For me it depends how streched they are / how many times they have been used.

New strech bolts for a cylinder head.........yes, an engine mount........I doubt it.

BTW I'm not a car mechanic/tech but I am in the same sort of business.

Also, I can't see anything about tippex in Bassound's posts :shrug:

Cheers fella, TBH I was coming at this from the wrong angle.
As you said, if I had any problems I could easily solve this even if it's just a case of the timing been out.
Stretch bolts do have a tolerance and for the engine mount bolts to be changed when removed is totally up to you.

Also when did I mention tippex, there's very large easily visible marks on everything
and when I removed my belt covers and fitted the cam pin, the crank was out by about 1-2 degrees, I moved the crank into the correct position and fitted everything, jesus she feels alot better now and pulls some what easier!
 

dirk1978

Active Member
Mar 25, 2009
85
0
Cheers fella, TBH I was coming at this from the wrong angle.
As you said, if I had any problems I could easily solve this even if it's just a case of the timing been out.
Stretch bolts do have a tolerance and for the engine mount bolts to be changed when removed is totally up to you.

Also when did I mention tippex, there's very large easily visible marks on everything
and when I removed my belt covers and fitted the cam pin, the crank was out by about 1-2 degrees, I moved the crank into the correct position and fitted everything, jesus she feels alot better now and pulls some what easier!

I used to use an old mechanic - the kind of bloke that had seen everything with cars. Absolute common sense about everything. He used to do head gaskets and wouldn't replace the head bolts even if they were stretch bolts. He wouldn't torque them either, he would do them up until he felt they were starting to break and then stop. Never had a single car come back with a blown gasket after that.

So normally, I wouldn't think twice about changing the mounting bolts, I just wouldn't do it. I've never replaced crank bolts on my own cars either. But in this circumstance after reading that the bolts are designed in such a way that they shear in an accident and there are reports of engines dropping after the bolts have been taken out and put back in then it probably makes sense this time. I've booked time with the wife to do the job next Sunday so I can swing round the stealers in the meantime.

Oh yeah I've never replaced a sump bolt either, probably changed oil on my cars hundreds of times over the years and never had one leak ;)
 

basssound

Active Member
May 31, 2007
286
0
Rotherham, South Yorkshire!
Yeah things such as sumps bolts ect... don't require changing, just the copper washer if it's split or really squashed.
Heads bolts are stretch bolts and have a tollerance but to reach that they have got to be used a few times so doing an single head gasket is sound.
IMO head bolts have to be torqued down and in sequence but if it'son the older stuff and he's done it bofore then so be it ;)
 

Nath.

The Gentlemans Express
Jan 1, 2006
8,620
16
EASTLEIGH, HAMPSHIRE
I used to use an old mechanic - the kind of bloke that had seen everything with cars. Absolute common sense about everything. He used to do head gaskets and wouldn't replace the head bolts even if they were stretch bolts. He wouldn't torque them either, he would do them up until he felt they were starting to break and then stop. Never had a single car come back with a blown gasket after that.

So normally, I wouldn't think twice about changing the mounting bolts, I just wouldn't do it. I've never replaced crank bolts on my own cars either. But in this circumstance after reading that the bolts are designed in such a way that they shear in an accident and there are reports of engines dropping after the bolts have been taken out and put back in then it probably makes sense this time. I've booked time with the wife to do the job next Sunday so I can swing round the stealers in the meantime.

Oh yeah I've never replaced a sump bolt either, probably changed oil on my cars hundreds of times over the years and never had one leak ;)


The sump sealing ring doesn't need to be replaced, you can heat it up till it glows with a blow torch and then quench it in water. this makes it supple and will seal perfectly again next time. It can be done a few times.

BTW I know a sump ring is only pence but it's a good tip if you're stuck and you can't get a new one.
 

dirk1978

Active Member
Mar 25, 2009
85
0
Did this yesterday. Not a massive job, just a couple of awkward bits that took longer than they should. It took me about 4 hours in total, which isn't bad as I was taking a few pics, I hadn't done a PD before and I hadn't really done anything on this car besides changing the oil filter before.

The 2 major slowdowns I had were:

1. The dogbone rear engine stabiliser. The bolt couldn't come out the side of the gearbox, there wasn't enough room. I had to manipulate the bracket a bit to get the bolt out. Took about half an hour of fiddling.

2. Mid bolt on the engine mount bracket (the one attached to the block). I couldn't get the engine high enough or low enough to be able to get anything on this bolt. Eventually through some more manipulation I managed to get enough on it to loosen it then hand-remove it with just a socket. Again about 30 mins lost on that one.

Bit of a howto / how I did it here:

This is the belt kit I got. It's a Dayco kit, they're OE to lots of manufacturers and I've used them on lots of stuff before. Very good quality.

P1030803.JPG


The set up of the tensioner confused me, couldn't quite understand what they're trying to do with the strange set up.

P1030804.JPG


Not locked at the back either

P1030805.JPG


All ready to start

P1030806.JPG


And looking at the lack of space at the side

P1030807.JPG


I've never had a car quite as stiff as this before. I didn't expect to see the back off the ground too!

P1030809.JPG


I'll carry on with the rest later :)
 
Last edited:

dirk1978

Active Member
Mar 25, 2009
85
0
Right, on with the action.

Raise up the front of the car. I first chose the seam between sill and the chassis, it soon became apparent this section is pretty soft so I used the 2 bits of box section either side of the exhaust tunnel to jack up and then put axle stands there. I took both wheels off as I planned on cleaning them so put them under each sill in case it all comes crashing down with me underneath!

Lovely 4-pots :)

IMAG0028.jpg


IMAG0036.jpg


IMAG0030.jpg


Next, take the undertray off and the NS wheel arch cover. Fairly easy, just about 20 T-something torx screws.

Very odd looking undertray

IMAG0031.jpg


Then pop the rubber centre cap cover off the crank pulley to expose 4 6mm allen bolts. Coat them in penetrating fluid and they should come right off. You can take that metal intake pipe off while you're there too.

IMAG0032.jpg
 
Last edited:

dirk1978

Active Member
Mar 25, 2009
85
0
I'm afraid the frequency of photos taken started to decrease as my selfishness to get to the job done took hold. But I'll describe as best as possible.

Once the 4 crank pulley bolts are off you can start removing a few bits from the top. Engine cover of course, coolant header tank, fuel filter and what looks to be some sort of vacuum controller near the strut. Move them all out of the way and be prepared to lose a little coolant. Once moved out of the way you should have unrestricted access to the auxiliary ribbed belt and be able to put a socket/spanner on the auto tensioner while you pull the belt off. You can also unclip the top timing (toothed) (cam) belt cover and take it off. Take the crank pulley off too.

IMAG0033.jpg


I didn't take the glow plugs out, if you want to then it will be easier to turn the engine over by hand but it's not essential if you're feeling strong.

The next bit is taking the N/S engine mount off. This is where the engine needs to be supported either from underneath using a jack or above using an engine support. The engine support route will definitely be easier, I had a nightmare trying to get the amount of travel I needed out of my jack. I had to use 2 pieces of wood, 1 above and 1 below and then the engine keep on leaning back into the bulkhead too much. I think this was because I took the dogbone mount off, it I would have left this on it would have supported the engine a little more and perhaps allowed me more access to the engine mount bolts which were bugger to get to.

IMAG0035.jpg


Anyway, take the dogbone mount off, or don't. I'd try it without taking it off next time I did this job and see how it goes. Then support the engine in your chosen way and take the N/S engine mount off, then the bracket on the body, then the bracket on the engine.

Final part of the access disassembly is to take the 
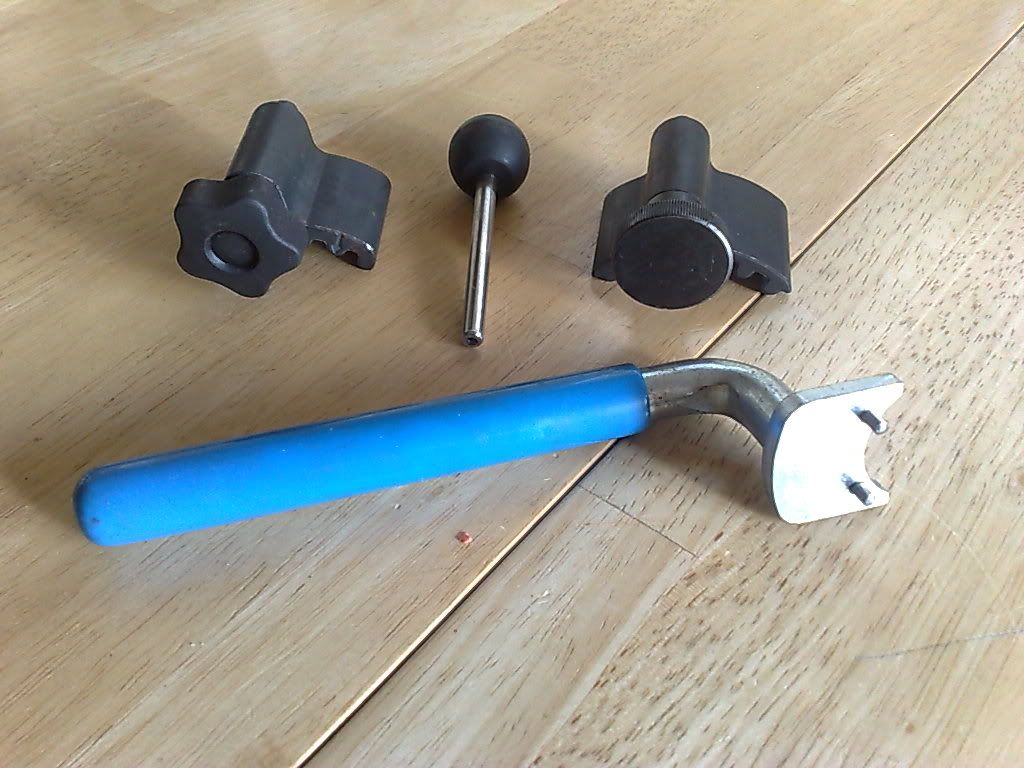
lower belt covers off (2 sections). 6 10mm hex-head screws later and you can see the whole timing belt. Get your timing kit ready. This (3978 £13.25) http://www.fast-tools.co.uk/acatalog/Volkswagen.html did me fine.

Turn the engine over using the 19mm(?) crank bolt. Turn clockwise to ensure you're not loosening the bolt at all. It will be hard to turn unless you took the glow plugs out. Turn it until you can insert the crank lock and the 2 prongs on the cam sprocket backplate are lined up with 4Z as in C6 below. The 4Z point has to go in between the prongs (those aren't teeth it's highlighting, it's the back of the cam sprocket. You can only line the crank timing mark up with the lock tool in.

IMAG0034.jpg


Insert the cam locking tool (or 6mm drill bit if you're so inclined) and slacken the 3 bolts on the cam sprocket so the sprocket itself can move freely inside the limits of the bolts.

Slacken the tensioner by turning it anti-clockwise then remove it along with the old roller. Put the new roller on and the new tensioner, still with its locking pin in. Put the tensioner so its notch sits in the slot on the block. The whole assembly can't move from there. Use an allen key (6mm again I think) to turn it as far anti-clockwise as possible with the pin still in then tighten the bolt.

Loop the new belt around in the order of:

1. Cam sprocket
2. Tensioner
3. Roller
4. Crank
5. Water pump

Slacken the tensioner bolt slightly then turn the tensioner clockwise until the pointer is in the middle of the indicator then lock the bolt and tighten. The cam sprocket can turn slightly as the tensioner is tightened and loosed but the cam is locked in place by the cam locking tool.

Nice new teflon coated belt with new roller and tensioner:

IMAG0034.jpg


Lock the cam sprocket 3 bolts, remove the 2 locks and then turn the engine over by hand using the crank bolt. Turn it over a few times until you can lock the crank again and the cam sprocket timing mark lines up with 4Z as before. The tensioner should still be pointing in the middle of the indicator and everything else should still be lined up. If not try starting again.

Once you're happy with everything start putting everything back together. Re-assembly as they say is the reverse of removal but in this case it's fairly easy. You can't put anything back together wrong.

I didn't use new mount bolts as Droitwich SEAT said they don't replace them. I tend to be able to feel torque pretty well so I didn't use my torque wrench for this job, although you obviously should if you're at all unsure.

Sorry for the lack of mid-action pics. The dogbone mount and the NS mount bracket bolt too me much longer than I thought so I had to get a move on. It took me about 4 hours while taking my time and taking a few pics + 2 30 min hold ups so it's not the biggest job in the world. Hope this helps someone.
 
Last edited:

dirk1978

Active Member
Mar 25, 2009
85
0
Hmmm I'm starting to think I've maybe lost a BHP or 2. It still pulls fine and runs fine but I'm sure I can detect a tiny edge it used to have that it now doesn't.

To give me peace of mind I'll need to check the timing. Can anyone suggest an easier way than:

Get the aux belt off
Take the NS wheel off
Take the undertray and wheel arch cover off
Take the crank pulley and bottom belt cover off
Lock the crank pulley
Take the top belt cover off
Check timing mark on the cam sprocket
?

I would love to be able to guarantee it's at TDC without locking the crank. Any way? VAG-COM?

Otherwise I'll have to do as above. I'm sure the cam sprocket timing mark was maybe a degree or 2 retarded but I convinced myself it had to be OK at the time as I had the cam locking tool in.
 

basssound

Active Member
May 31, 2007
286
0
Rotherham, South Yorkshire!
If you locked out the cam with the pin then you should be gauranteed it hasn't moved.
You positive the crank is TDC to the marks on it and the block?
only thing I can suggest is to strip it back down, turn the crank until the marks line up fully,
then see if the cam shaft locking pin slips in, if not then you know the cam is ever so slightly out.
I'll get slated for this but the only way to line it back up is to lock off the crank in the TDC position
and then slacken the three cam bolts, spanner on the cetre bolt and turn the bolt so the cam turns slightly, the pin should go in.
Tighten the bolts and rebuild.
 

dirk1978

Active Member
Mar 25, 2009
85
0
If you locked out the cam with the pin then you should be gauranteed it hasn't moved.
You positive the crank is TDC to the marks on it and the block?
only thing I can suggest is to strip it back down, turn the crank until the marks line up fully,
then see if the cam shaft locking pin slips in, if not then you know the cam is ever so slightly out.
I'll get slated for this but the only way to line it back up is to lock off the crank in the TDC position
and then slacken the three cam bolts, spanner on the cetre bolt and turn the bolt so the cam turns slightly, the pin should go in.
Tighten the bolts and rebuild.

I couldn't tell how far in the pin should go. It felt like it went in a bit past the sprocket but I did wonder at the time how can I be sure it's actually gone in far enough to lock the cam.

That's exactly the way I was gonna do it. The belt is in place, TDC can be got from the crank lock so the only other variable is the adjustable cam sprocket. It would just make a massively easier task if I could get TDC a quicker way than putting the crank lock in.
 

Disco_Biscuit

Ibiza Cupra Tdi PD200
Jul 8, 2007
175
0
I'll get slated for this but the only way to line it back up is to lock off the crank in the TDC position

I couldn't tell how far in the pin should go. It felt like it went in a bit past the sprocket but I did wonder at the time how can I be sure it's actually gone in far enough to lock the cam.

That's exactly the way I was gonna do it. The belt is in place, TDC can be got from the crank lock so the only other variable is the adjustable cam sprocket. It would just make a massively easier task if I could get TDC a quicker way than putting the crank lock in.

Maybe you should have done the job properly and paid £18 for the timing pins, Now that would have been quicker :whistle::rolleyes:

Also why didn't you change the water pump? VAG always recommend changing it, i personally change it to a metal impellor type.
 

dirk1978

Active Member
Mar 25, 2009
85
0
Maybe you should have done the job properly and paid £18 for the timing pins, Now that would have been quicker :whistle::rolleyes:

Er, I did. I've said it a few times in this thread.

Also why didn't you change the water pump? VAG always recommend changing it, i personally change it to a metal impellor type.

I personally find the hysteria around VAG water pumps a little OTT. There was apparently an issue with early 1.8T plastic impeller pumps shattering. I'm yet to see anything from SEAT, or indeed any of VAG regarding water pumps since those original 1.8T's in the late 90's. On some engines where there is a history of the water pump seal breaking when the belt tension is removed then it's a good idea, such as the old GM family 2 blocks but if happens on this car I'll change it, it's not the biggest job in the world.
 
Chris Knott Insurance - Competitive quotes for forum members