
Remove Rear Side Panel?
- Thread starter Fannon
- Start date
You are using an out of date browser. It may not display this or other websites correctly.
You should upgrade or use an alternative browser.
You should upgrade or use an alternative browser.
hey,
you do not need to remove the glass, nor the glass guide, it`s a pretty straight forward operation once you manage to take off the door cover. It`s held in place just with the screws that you can see on the door
thanks, will try that soon
")
First I have to replace the window motor at the other rear door

It should be there to keep the metal parts from vibrating... but what is that styrofoam thing? ..
Tõnu
Door lock replaced. It was easier than I tought... it was a bit harder to remove than the window motor... I had to unscrew the guide so I could move it to make space to remove the door lock but didn't remove it... The window guide has two screws one below the door lock screws and another one you have to remove the two little triangles one in the inside to remove the bolt that secures the outside triangle and the other at the outside is by pushing down (first you have to remove the bolt below the interior triangle), the bolt that secures the guide is below the outisde triangle.
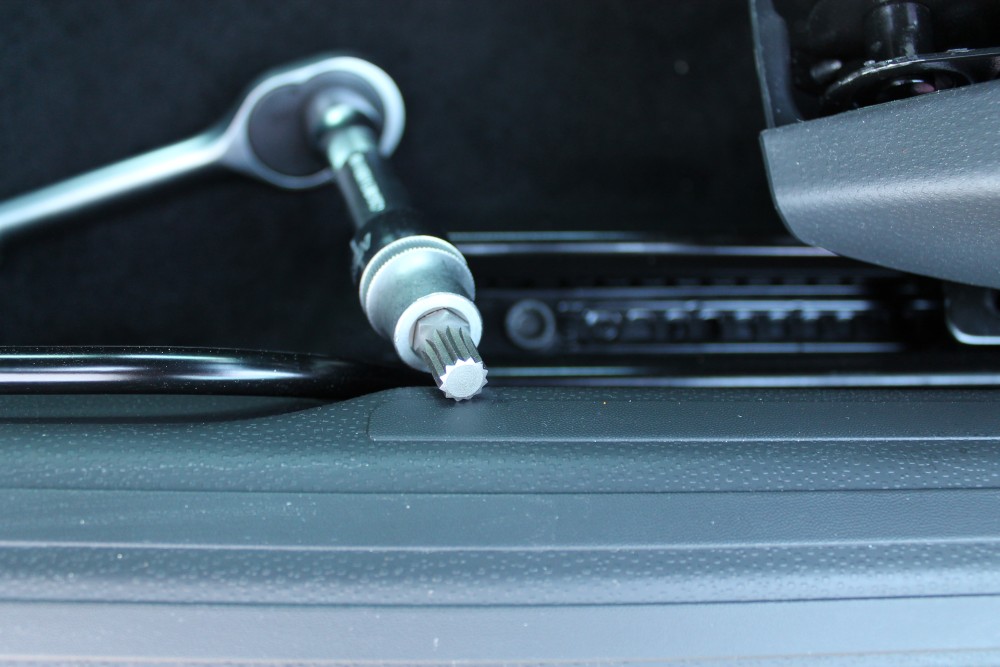
I had to buy a tool to remove the door lock bolts because you can't do it with normal torx.

I had to buy a tool to remove the door lock bolts because you can't do it with normal torx.
Last edited:
Like this one?.. I had to buy a tool to remove the door lock bolts because you can't do it with normal torx.
Tõnu

Hi Spawn, can you upload pictures for the Cupra 3dr 1.8TSI 2016 ? (Front door and rear part for changing the speakers)
Or where can I find the info ?
Thanks.
http://www.seatcupra.net/forums/showthread.php?t=250830
Last edited:
Thanks, I know this one, still it looks hard for just replacing the speakers well until I will have enough from them I will leave it to be.
I am thinking more to add a sub... wonder if it can work with the original HU.
well until I will have enough from them I will leave it to be.I am thinking more to add a sub... wonder if it can work with the original HU.
Thanks, I know this one, still it looks hard for just replacing the speakers
I am thinking more to add a sub... wonder if it can work with the original HU.
My rear speakers have a lot of distortion... it's intermitent, especially when people are talking on the radio, not noticeable on musics as when people is talking.
I've noticed they are different....
front:

rear:

Last edited:
o.k.
Mine is great for now...
Probably damaged them because I was using fade -4, and didn't knew about it...
Last edited:
My rear speakers have a lot of distortion...
How's your sound settings on the head unit, all flat or not? Majority of all speaker failures are caused by wrong sound settings and abusing the volume.
Tõnu
How's your sound settings on the head unit, all flat or not? Majority of all speaker failures are caused by wrong sound settings and abusing the volume.
Tõnu
I was using fade -4... so I think that caused the problem...
Did you manage to picture the rear side for both ?
Do want pictures of the speakers of pictures like a tutorial? I can do that next week because I will probably replace both.
The pics above are not mine.
Last edited:
I was using fade -4... so I think that caused the problem...
A fader by itself doesn't harm speakers, it actually does them good as it cuts the volume on the opposite side - if you set the fader to the rear (ie at -4), it lowers the volume in the front and vice versa. What probably happened is that you turned up the volume too much to compensate the lower volume level in the front to hear something in the front and so your rear speakers suffered.
What I wanted to know before is your sound settings on the headunit - treble, mid, low, any additional boost settings, how these are set. A human ear works in a way that it is most sensitive to mid frequencies and less sensitive to high and low frequencies, thus people tend to boost their highs and lows on the headunit. Any kind of boosting of an audio signal causes distortion that hurts speakers. To make it even worse, there is a volume range between a normal listening level and a level where you can already hear the distortion clearly. Playing your system within that volume range ie inaudible distortion range over longer period of time is what causes speakers to fail. And to make it even more worse if you are listening to a radio a lot - radio stations tend to boost their highs and lows too (see the explanation on how the human ear works above) and that adds up to user's own 'boost settings' on a headunit.
I recommend keeping all treble, mid and low settings and any additional boost settings (called SLA, loudness or similar) there may be flat on a headunit at all times and be sensible with the volume knob - your speakers will love you then.
Tõnu
Last edited:
Well I did this tutorial everything in detail, because the details make all the difference to a good job Any question just ask.
1 - Remove this little panel there, just push it out in your direction... If the little clip stays there after removing, remove it with a pliers.

2 - Remove this. Personaly I found it easy to start at the first picture location and work all around it, once you know all the points at the top are disconected push it in your direction to release the two clips on the last pic. Disconnect the connector


3 - Remove this 3 screws.

4 - Remove the center trim, personally I find easy to start at the location of the first picture, and be carefull wich angle you remove it, do it on your direction, because you don't want to break those on the second pic.


5 - Unscrew those two a bit but don't remove them.

6 - Push the glass up and secure them with tape

7 - Fully remove this 3 bolts (only black bolts).


8 - Push the card up and in your direction to release it.

9 - Now the card is relased but the window leveler is still inside the door. Push the window leveler up and release it at the bottom, be carefull not to scratch the rubber things against the door while pushing up, just push it inside with one finger (1pic). If you don't do this you could damage the rubber and it starts to make noises, metl again metal (last picture)


10 - Push the card down to release the leveler above, unclip the door lock connector so you don't force the wires and your are done, then do what you want to do.


Installing.
1 - Put the door lock connector back, make sure all the wires are on the correct place, if you didn't force anything they should be. Make sure the door handle cable it's on the place.
2 - Put this screw back just a little so it can be secured.

3 - Insert the window leveler above first, again make sure the cable doesn't rub against the door...


4 - Push the window leveler up and insert it inside the door at the bottom. Make sure the bolt lays at it's place.

5 - Do all the bolts in the reverse order and you are done.
Any question just ask.1 - Remove this little panel there, just push it out in your direction... If the little clip stays there after removing, remove it with a pliers.
2 - Remove this. Personaly I found it easy to start at the first picture location and work all around it, once you know all the points at the top are disconected push it in your direction to release the two clips on the last pic. Disconnect the connector
3 - Remove this 3 screws.
4 - Remove the center trim, personally I find easy to start at the location of the first picture, and be carefull wich angle you remove it, do it on your direction, because you don't want to break those on the second pic.
5 - Unscrew those two a bit but don't remove them.
6 - Push the glass up and secure them with tape
7 - Fully remove this 3 bolts (only black bolts).
8 - Push the card up and in your direction to release it.
9 - Now the card is relased but the window leveler is still inside the door. Push the window leveler up and release it at the bottom, be carefull not to scratch the rubber things against the door while pushing up, just push it inside with one finger (1pic). If you don't do this you could damage the rubber and it starts to make noises, metl again metal (last picture)
10 - Push the card down to release the leveler above, unclip the door lock connector so you don't force the wires and your are done, then do what you want to do.
Installing.
1 - Put the door lock connector back, make sure all the wires are on the correct place, if you didn't force anything they should be. Make sure the door handle cable it's on the place.
2 - Put this screw back just a little so it can be secured.
3 - Insert the window leveler above first, again make sure the cable doesn't rub against the door...
4 - Push the window leveler up and insert it inside the door at the bottom. Make sure the bolt lays at it's place.
5 - Do all the bolts in the reverse order and you are done.
Last edited:
Similar threads
- Replies
- 1
- Views
- 464
