
Hi guys,
This is a thread to help you all with Ibiza mk4 audio.
Ok we'll start with the basics.
To understand car audio you need to understand how the wiring works. All ibiza MK4s use ISO blocks. These are two blocks that are a unerversal standard and most new radios come ready out the box with plug and play adapters for them.
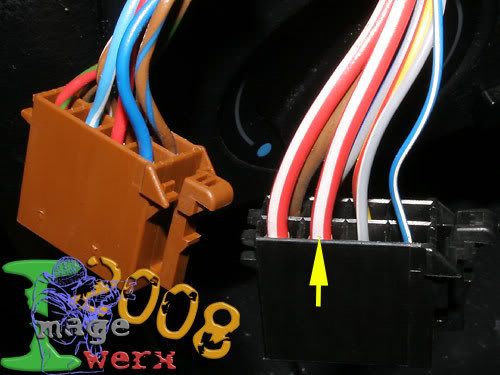
^ISO Blocks
You have room for 8 pins on each block, one block is for speakers (has either 4 or 8 wires and the clip is pefectly in the middle), the other is for the power ect.
For power on ISO you need 3 main cables:
*Ground Cable (black) - Used for the ground for the radio
*Constant Power (yellow)- A 12V source that is constantly live, used to store the memory
*Switched Live (Red) - A 12V source only live when the ignition is one, this is why the radio turns on and off with the ignition.
And it typically has these too:
*Illumination (orange) - This is live when the spotlights are turned on, this is how the radio screen will illuminate (or dim) when the lights are on.
*Remitance (power ant or remote) (blue) - A 12V source that is live when the radio is on.
Tools i recomend for working on this car:
*Multimeter
*Selection of flathead and philips screwdrivers
A crimping tool and bullet connectors
*T20 and T25 torx screwdrivers
*Socket set
The car runs on ISO wiring (with a 3rd larger block if you have steering controls). You will not need any wiring adaptors unless you want to keep the steering controls with a new radio (you will need Connects 2 CTSST002) or buy a radio with iso blocks on the rear and cant get it to fit due to the steering control block (you will need PC2-04 and it also swiched the ignition and constant power over).
Ok so now to change the radio you need to first remove the existing one, to do this, use european release keys. You push them into the slots on the face of the radio and the put pressue to the inside of them and then tug them lightly. This will bring out the radio very easily. When the radio is out, unplug all the plugs on the back and also the ariel. There, that is the radio out.
Right to install a new radio, first unbox everything and remove the cage from the new radio (usually just prize the side clips out using a screw driver). Right, next you will need to do one of two things.
Using a steering wheel adapter: {Plug in the steering control adapter (and also the adapter for the radio for the steering controls)} and plug the ISO to radio cable on and push as many wires down the left hand side of the opening (you will find some space), leaving the end to go in the radio with just enough room to be pulled out the opening (if you are installing a mic or anything then run the cables . Then install the cage (the thin metal holder around the radio). Do this by pusing it into the hole, then using a screwdriver, push the small metal flaps so that the press against the inner side of the opening and this will lock the cage in. Now depandant on the unit you may need a antenna adaper (alpines dont), these are £4.99 from Halfords. If you do need one then plug it in now. Next plug them all into the radio and push into the slot, if it doesnt fit, pull it out again and push down on the cables intill it goes in.
No steering controls: Do the same but miss out the part in {}. On the radios loom, swap over the red and yellow wires, plug the ISO to radio loom straight onto the cars ISO plugs.
Troubleshooting problems:
* Cant get the wiring to go back enough so the radio wont fit - Ok, first calm down, you dont want to break anything! Right you have two options. Either unplug it, remove the cage and then pull out the tray underneath, then try to reposition the wires and install again, or remove the top part of the glovebox (4 t20 screws and remove the side panel of the dash iirc) as this will let you reach round and pull the cables, also a great place to pull through any USB cables ect.
*No power - Its most likely that either something has come unplugged, if not check fuse 10 and also the radio fuse.
*Radio does not save - swap round the red and yellow wires.
*No AM reception - you will need a phantom antenna booster. These connect to the blue remote on the back of the radio and boost the signal for the radio.
*Car fire - your screwed........
Speaker and amplifier jargon!
Ok here is a list of jargon from the basics onwards.
Speakers
*Size - The size of the speaker is the measurements across to the outer most edge of the speaker, including the mounting (this is for car audio). So the cone is typically a little smaller.
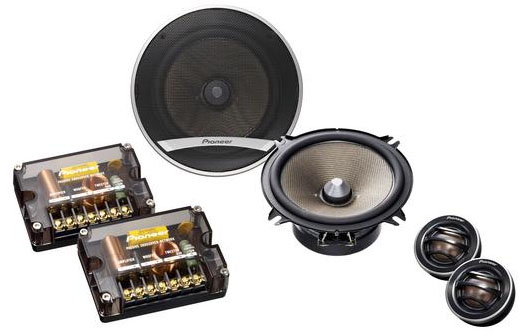
*Component speakers - These are speakers made for better sound quality by having the main cone and the tweeters seperate and having a good crossover. This gives better quality as 1) the main transducer wont have a hole for the tweeter stalk and 2) the tweeters can be positioned in a place to maximise the quality of the audio.
A component speaker
*2way and 3way - This basically means the amount of transducers on the actual speaker, a two way is what most speakers from halfords use with the tweeter built into the main speaker. A 3way have a tweeter and a mid speaker built onto the main speaker.
2 way

3 way

Fitting rear speakers (3 Door)
This is actually suprisingly easy to do.
First off we need to stard by removing the rear seats. Easiest way to do this is with a 17mm socket on an extention and a flathead screwdriver. Start with the lower bench, just pull up the front edge and then release the wire frame from the hooks, then pull them out the vehicle. Next unto the center 17mm bolt holding the middle seatbelt down, when removed store all the parts in a safe location! Then fold the rear seats down taking out the headrests on the way down. With the seats folded down look at the corner edges where the seats attach to the chassis and you will see a yellow hook , just push it back with the flathead and pull that side of the seat up, then with one movement pull that side of the seat towards the front of the car whilst pulling it out towards the side of the car. Do the same for the other car and bung it all into a spare room to keep it all clean!
Now have a cup off tea, if this is you first speaker change you've done well so far!
Right here comes the fun part, I took pics to help aid the learning process!
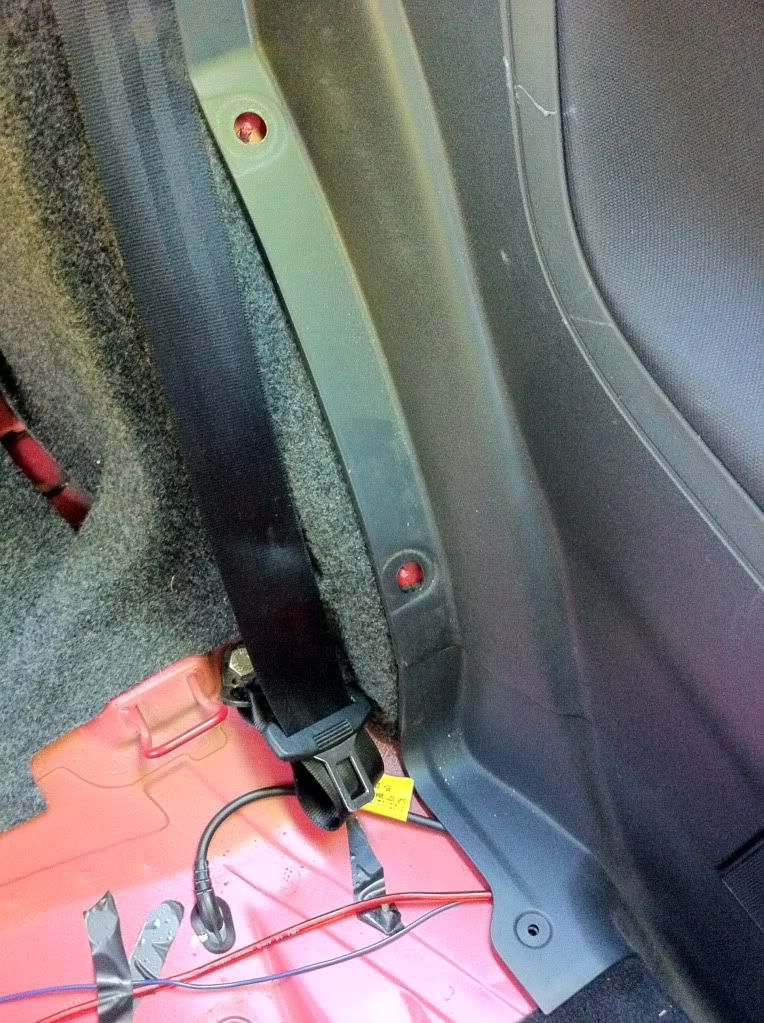
First remove these clips:
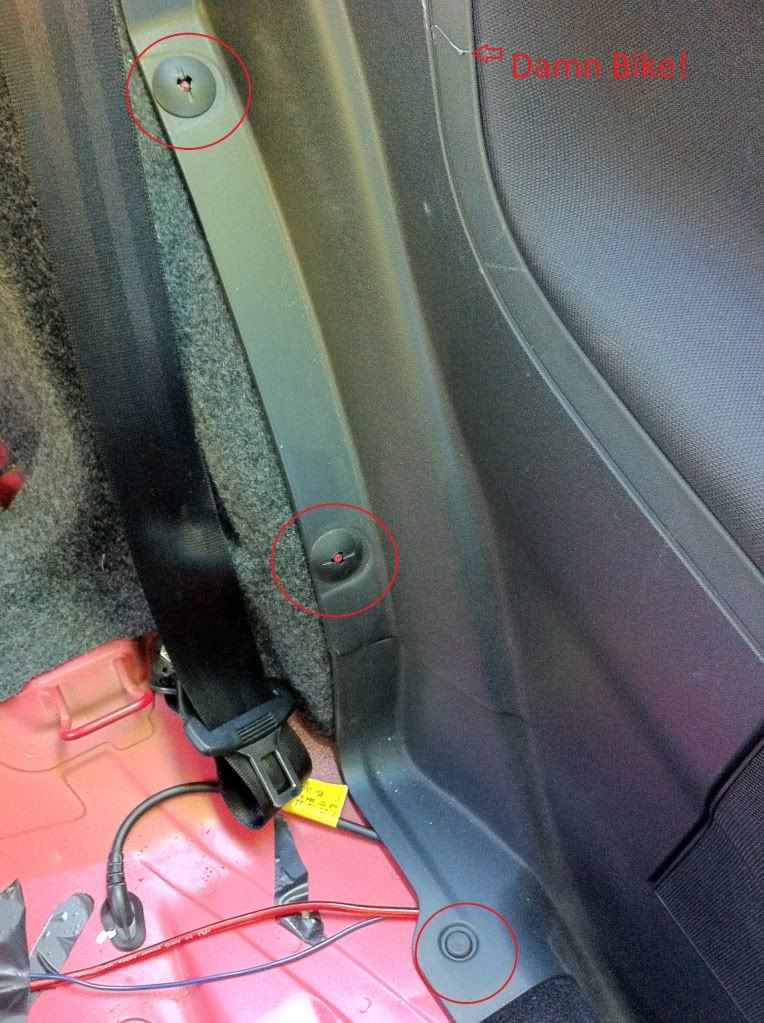
Should look like so:
Then starting from the front door edge start to pull the panel off, It is attached using clips so you need to use gentle persuasion:

Work around clockwise from this point so do the bottom then the top, when all clips are released angle the bottom out and give the panel a quick tap to release it:

If you loose any clips replacements cost about 95p from seat!
The next panel to release under this the the door trim, start from the front and pull it up to release it and work your way back. Once this is romoved it is the perfect time to run cables under the carpet!
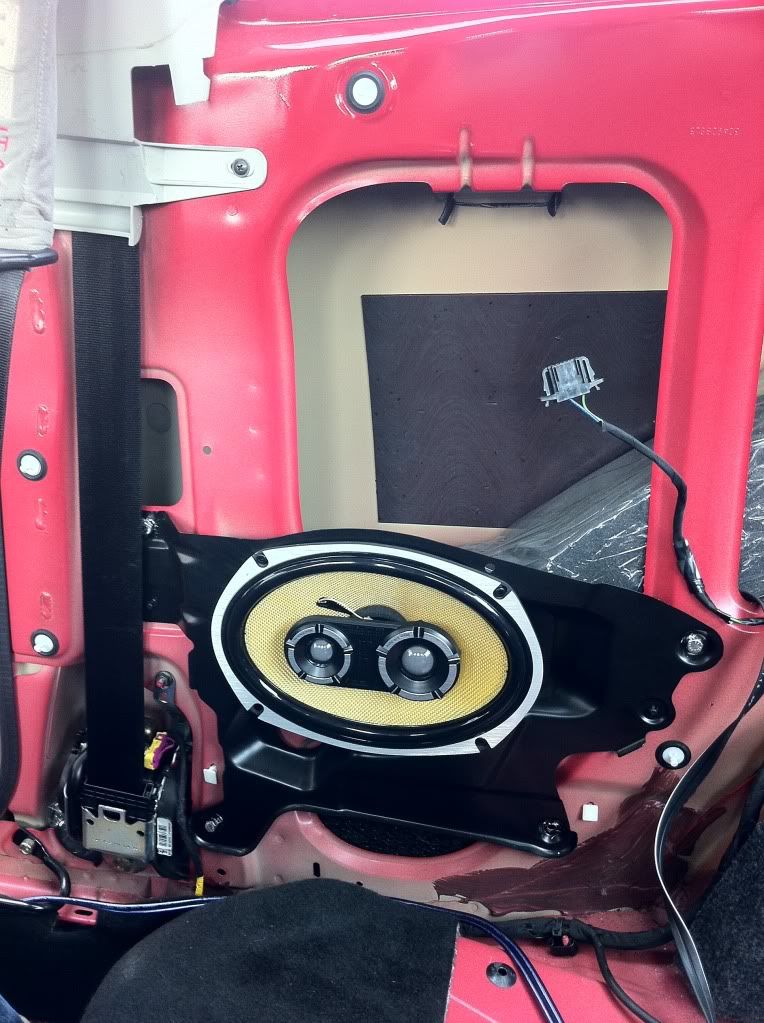
Now then the rear speakers are rivetted in on a metal plate, so unplug the cables and either drill the rivets holding the plate to the car out of get a pair or wire cutters you dont mind getting abused and work on them till they are all out, then remove the metal plate with the speaker in. Next remove the rivets holding the speaker to the plate.
Now you can either make a new speaker plate out of mdf or modify the old one, I modified the old one to fit vibe 6x9s. I then deadened the bodywork and put it back together using m6 bolts instead of rivets to hold the plate!
Sub Woofer - A subwoofer (sub) is a speaker that is designed to produce low frequency sounds (bass). In car audio typical sizes are 10, 12 and 15 inch but there are others that range from 6 to over 24inches.
Transducer - This is a device that converts one form of energy into another (basically a fancy word for a speaker)
Frequency range - This is the frequencies that the component can deal with, so if you want low bass try to get the bottom number as low as possible eg 28-450HZ instead of 60-500Hz (for subs, speakers will be a lot larger range)
Hertz (Hz) - Hertz are the number of intervals in one second, eg at 30Hz a speaker will pulse 30 times in one second.
The cone - This is the part of the speaker that moves to produce the sound. It is the flat surface of the speaker that produces the sound.
Amplifiers
Gain - this is the amount of amplification added to a signal, or in car audio terms the volume.
Phase - Basically it reverses the signal and turns it upside down, this in audio turns means the when a speaker is phased it pulses in opposite ways. For intance (1 means the speaker is compressed, the other means it is released) if the speaker was vibrating like this 101010101010 in phase it would vibrate like this 010101010101.
Low level input - Input using phono leads that is a non amplified version of the signal.
Haigh level inputs - this means the amplifier can take already amplified signals and then amplify them.
Power handling
Peak Power - The maximum the component can give out/take. Not very useful in car audio as technically any speaker could take 1000000W but would blow very quickly. In most cases companies arent stupid enough to put that but dont trust cheap components that claim high peak power.
RMS - This is basically the average power rating for a product, so what it normally runs at. Still not perfect but better than most ratings to go by. This is because it gives a real world use rating of a product, a 600W RMS sub and amp will shake you car..... alot.
Ok as I stated, here is the help on subs!
Right now you have a fancy new radio install, typically the next step alot of people take is to add a sub woofer to increase the bass in the car (for those 'windows down and system up' moments). These are relatively easy to do and not to hard to understand. Please read the speaker, sub and amplifier jargon first if you dont understand about power output and frequency ect.
Ok first up there are 3 kinds of sub installs.
Custom install: This is where you choose the amplifier, sub, enclosure and wires yourself to make up your perfect system, this is good as it allows you to cater to your needs and also gives you the best sound if you get the right parts, but typically this is a more expensive option. This can even extend to a custom enclosure for the boot made to specific measurements to maximise the response and quality of your system.
Bass package: this is where you have a kit (normally made by the manufacturer or shop) that consists of everything you need to be up and running. This often comes with the sub already in an enclosure and everything in one box. The amp is seperate to the enclosure and will need wiring up to it. This package is good as the components have been selected as they work well together. The downside is that not many companys offer a comp kit so if you wanted pro audio the packages from your local halfords isnt going to be much help
Active Package: Same as the standard package but the amplifier is built into the sub, it looks neater but inbuilt amps wont go up to the same output as a large monoblock amplifier. Also you cant use the amp on other components (without wrecking the enclosure). But it does keep your boot tidier.
Ok now for the installation.
First off make sure you are prepared, you will need the tools stated at the top of the page and have a plan of action.
Ok now the first step is to run the cables down the car.
This is one of the hardest tasks, the red power cable needs to go from the battery, through the bulkhead. The easiest way to do this is a gromet on the passenger side of the car. First remove the upper part of the glovebox, then reach up near the top leathand side of the firwall. There u will feel the gromet, carefully pull it out. Then go rount to the engine bay and you will see another gromet about 10cm in front of the recently removed one and pull that out. Now to do i neat job, i put a hole in both gromets and then put one on the wire and feed it through the first hole and this makes the gromet go back into place. Then pull the cable through the little gap between the arch and windscreen wiper cover and put on the second gromet and feed the wire through the second hole. This keeps the cable looking neat and tidy. The go back round into the care, reach through the glovebox to the gromet and gently pull the cable through, making sure the gromet stays in place. Then run the cable down the plastic trim on the carpet all the way to the rear seats. Take the lower part of the rear seats out and then run into the boot.
(ill finish later as i need to go get ready to go out tonight!)
Hope this helps and pm me if you need more help
This is a thread to help you all with Ibiza mk4 audio.
Ok we'll start with the basics.
To understand car audio you need to understand how the wiring works. All ibiza MK4s use ISO blocks. These are two blocks that are a unerversal standard and most new radios come ready out the box with plug and play adapters for them.
^ISO Blocks
You have room for 8 pins on each block, one block is for speakers (has either 4 or 8 wires and the clip is pefectly in the middle), the other is for the power ect.
For power on ISO you need 3 main cables:
*Ground Cable (black) - Used for the ground for the radio
*Constant Power (yellow)- A 12V source that is constantly live, used to store the memory
*Switched Live (Red) - A 12V source only live when the ignition is one, this is why the radio turns on and off with the ignition.
And it typically has these too:
*Illumination (orange) - This is live when the spotlights are turned on, this is how the radio screen will illuminate (or dim) when the lights are on.
*Remitance (power ant or remote) (blue) - A 12V source that is live when the radio is on.
Tools i recomend for working on this car:
*Multimeter
*Selection of flathead and philips screwdrivers
A crimping tool and bullet connectors
*T20 and T25 torx screwdrivers
*Socket set
The car runs on ISO wiring (with a 3rd larger block if you have steering controls). You will not need any wiring adaptors unless you want to keep the steering controls with a new radio (you will need Connects 2 CTSST002) or buy a radio with iso blocks on the rear and cant get it to fit due to the steering control block (you will need PC2-04 and it also swiched the ignition and constant power over).
Ok so now to change the radio you need to first remove the existing one, to do this, use european release keys. You push them into the slots on the face of the radio and the put pressue to the inside of them and then tug them lightly. This will bring out the radio very easily. When the radio is out, unplug all the plugs on the back and also the ariel. There, that is the radio out.
Right to install a new radio, first unbox everything and remove the cage from the new radio (usually just prize the side clips out using a screw driver). Right, next you will need to do one of two things.
Using a steering wheel adapter: {Plug in the steering control adapter (and also the adapter for the radio for the steering controls)} and plug the ISO to radio cable on and push as many wires down the left hand side of the opening (you will find some space), leaving the end to go in the radio with just enough room to be pulled out the opening (if you are installing a mic or anything then run the cables . Then install the cage (the thin metal holder around the radio). Do this by pusing it into the hole, then using a screwdriver, push the small metal flaps so that the press against the inner side of the opening and this will lock the cage in. Now depandant on the unit you may need a antenna adaper (alpines dont), these are £4.99 from Halfords. If you do need one then plug it in now. Next plug them all into the radio and push into the slot, if it doesnt fit, pull it out again and push down on the cables intill it goes in.
No steering controls: Do the same but miss out the part in {}. On the radios loom, swap over the red and yellow wires, plug the ISO to radio loom straight onto the cars ISO plugs.
Troubleshooting problems:
* Cant get the wiring to go back enough so the radio wont fit - Ok, first calm down, you dont want to break anything! Right you have two options. Either unplug it, remove the cage and then pull out the tray underneath, then try to reposition the wires and install again, or remove the top part of the glovebox (4 t20 screws and remove the side panel of the dash iirc) as this will let you reach round and pull the cables, also a great place to pull through any USB cables ect.
*No power - Its most likely that either something has come unplugged, if not check fuse 10 and also the radio fuse.
*Radio does not save - swap round the red and yellow wires.
*No AM reception - you will need a phantom antenna booster. These connect to the blue remote on the back of the radio and boost the signal for the radio.
*Car fire - your screwed........
Speaker and amplifier jargon!
Ok here is a list of jargon from the basics onwards.
Speakers
*Size - The size of the speaker is the measurements across to the outer most edge of the speaker, including the mounting (this is for car audio). So the cone is typically a little smaller.
*Component speakers - These are speakers made for better sound quality by having the main cone and the tweeters seperate and having a good crossover. This gives better quality as 1) the main transducer wont have a hole for the tweeter stalk and 2) the tweeters can be positioned in a place to maximise the quality of the audio.
A component speaker
*2way and 3way - This basically means the amount of transducers on the actual speaker, a two way is what most speakers from halfords use with the tweeter built into the main speaker. A 3way have a tweeter and a mid speaker built onto the main speaker.
2 way
3 way
Fitting rear speakers (3 Door)
This is actually suprisingly easy to do.
First off we need to stard by removing the rear seats. Easiest way to do this is with a 17mm socket on an extention and a flathead screwdriver. Start with the lower bench, just pull up the front edge and then release the wire frame from the hooks, then pull them out the vehicle. Next unto the center 17mm bolt holding the middle seatbelt down, when removed store all the parts in a safe location! Then fold the rear seats down taking out the headrests on the way down. With the seats folded down look at the corner edges where the seats attach to the chassis and you will see a yellow hook , just push it back with the flathead and pull that side of the seat up, then with one movement pull that side of the seat towards the front of the car whilst pulling it out towards the side of the car. Do the same for the other car and bung it all into a spare room to keep it all clean!
Now have a cup off tea, if this is you first speaker change you've done well so far!
Right here comes the fun part, I took pics to help aid the learning process!
First remove these clips:
Should look like so:
Then starting from the front door edge start to pull the panel off, It is attached using clips so you need to use gentle persuasion:
Work around clockwise from this point so do the bottom then the top, when all clips are released angle the bottom out and give the panel a quick tap to release it:
If you loose any clips replacements cost about 95p from seat!
The next panel to release under this the the door trim, start from the front and pull it up to release it and work your way back. Once this is romoved it is the perfect time to run cables under the carpet!
Now then the rear speakers are rivetted in on a metal plate, so unplug the cables and either drill the rivets holding the plate to the car out of get a pair or wire cutters you dont mind getting abused and work on them till they are all out, then remove the metal plate with the speaker in. Next remove the rivets holding the speaker to the plate.
Now you can either make a new speaker plate out of mdf or modify the old one, I modified the old one to fit vibe 6x9s. I then deadened the bodywork and put it back together using m6 bolts instead of rivets to hold the plate!
Sub Woofer - A subwoofer (sub) is a speaker that is designed to produce low frequency sounds (bass). In car audio typical sizes are 10, 12 and 15 inch but there are others that range from 6 to over 24inches.
Transducer - This is a device that converts one form of energy into another (basically a fancy word for a speaker)
Frequency range - This is the frequencies that the component can deal with, so if you want low bass try to get the bottom number as low as possible eg 28-450HZ instead of 60-500Hz (for subs, speakers will be a lot larger range)
Hertz (Hz) - Hertz are the number of intervals in one second, eg at 30Hz a speaker will pulse 30 times in one second.
The cone - This is the part of the speaker that moves to produce the sound. It is the flat surface of the speaker that produces the sound.
Amplifiers
Gain - this is the amount of amplification added to a signal, or in car audio terms the volume.
Phase - Basically it reverses the signal and turns it upside down, this in audio turns means the when a speaker is phased it pulses in opposite ways. For intance (1 means the speaker is compressed, the other means it is released) if the speaker was vibrating like this 101010101010 in phase it would vibrate like this 010101010101.
Low level input - Input using phono leads that is a non amplified version of the signal.
Haigh level inputs - this means the amplifier can take already amplified signals and then amplify them.
Power handling
Peak Power - The maximum the component can give out/take. Not very useful in car audio as technically any speaker could take 1000000W but would blow very quickly. In most cases companies arent stupid enough to put that but dont trust cheap components that claim high peak power.
RMS - This is basically the average power rating for a product, so what it normally runs at. Still not perfect but better than most ratings to go by. This is because it gives a real world use rating of a product, a 600W RMS sub and amp will shake you car..... alot.
Ok as I stated, here is the help on subs!
Right now you have a fancy new radio install, typically the next step alot of people take is to add a sub woofer to increase the bass in the car (for those 'windows down and system up' moments). These are relatively easy to do and not to hard to understand. Please read the speaker, sub and amplifier jargon first if you dont understand about power output and frequency ect.
Ok first up there are 3 kinds of sub installs.
Custom install: This is where you choose the amplifier, sub, enclosure and wires yourself to make up your perfect system, this is good as it allows you to cater to your needs and also gives you the best sound if you get the right parts, but typically this is a more expensive option. This can even extend to a custom enclosure for the boot made to specific measurements to maximise the response and quality of your system.
Bass package: this is where you have a kit (normally made by the manufacturer or shop) that consists of everything you need to be up and running. This often comes with the sub already in an enclosure and everything in one box. The amp is seperate to the enclosure and will need wiring up to it. This package is good as the components have been selected as they work well together. The downside is that not many companys offer a comp kit so if you wanted pro audio the packages from your local halfords isnt going to be much help
Active Package: Same as the standard package but the amplifier is built into the sub, it looks neater but inbuilt amps wont go up to the same output as a large monoblock amplifier. Also you cant use the amp on other components (without wrecking the enclosure). But it does keep your boot tidier.
Ok now for the installation.
First off make sure you are prepared, you will need the tools stated at the top of the page and have a plan of action.
Ok now the first step is to run the cables down the car.
This is one of the hardest tasks, the red power cable needs to go from the battery, through the bulkhead. The easiest way to do this is a gromet on the passenger side of the car. First remove the upper part of the glovebox, then reach up near the top leathand side of the firwall. There u will feel the gromet, carefully pull it out. Then go rount to the engine bay and you will see another gromet about 10cm in front of the recently removed one and pull that out. Now to do i neat job, i put a hole in both gromets and then put one on the wire and feed it through the first hole and this makes the gromet go back into place. Then pull the cable through the little gap between the arch and windscreen wiper cover and put on the second gromet and feed the wire through the second hole. This keeps the cable looking neat and tidy. The go back round into the care, reach through the glovebox to the gromet and gently pull the cable through, making sure the gromet stays in place. Then run the cable down the plastic trim on the carpet all the way to the rear seats. Take the lower part of the rear seats out and then run into the boot.
(ill finish later as i need to go get ready to go out tonight!)
Hope this helps and pm me if you need more help
Last edited:

